

This post may contain affiliate links meaning if you buy from them, I will make a few pennies, at no cost to you. See disclosure here.
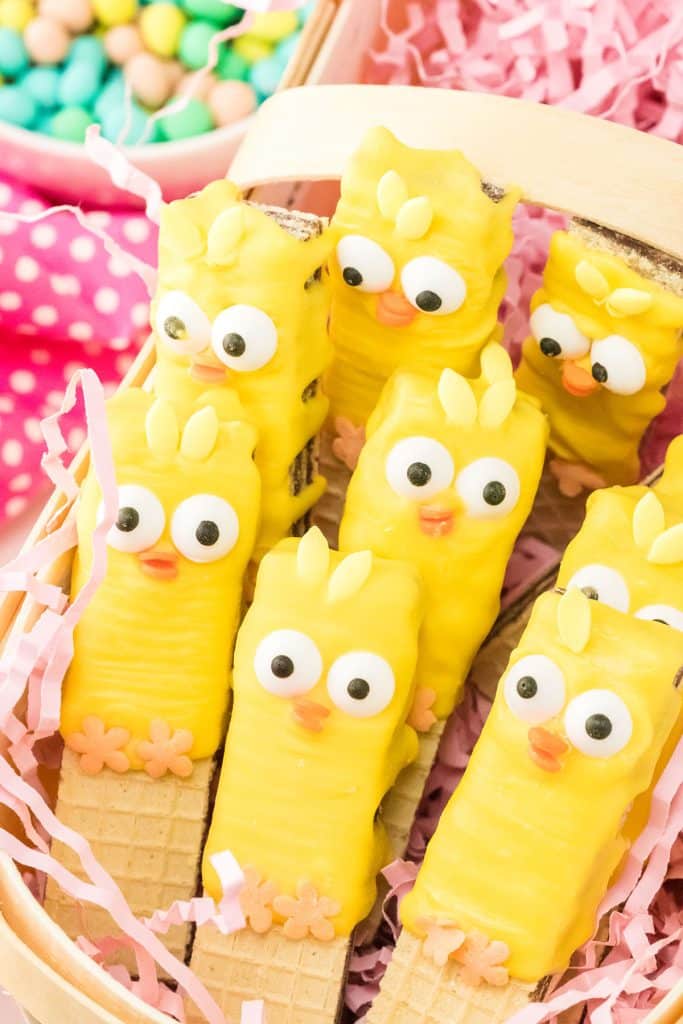
Easter chick dipped wafer cookies are a fun and easy way to make a special Easter treat the kids will love! They’re made with crispy, thin, cream-filled sugar wafers dipped in melted yellow candy, then candy eyes and sprinkles are added for the face. They would be too cute to eat if they weren’t so tasty!

Easter Chick Wafer Cookies
Are they edible crafts? Or crafty treats? I’d say they’re both!
I love adding character to my desserts for special occasions like these easy Easter basket cookie cups, Easter egg Oreo truffles, and spring chick cupcakes.
Now, I’m adding these adorable Easter chick cookies to the list and I don’t know who’s more excited about them, me or my kids!
Dipped wafer cookies are an inexpensive way to entertain the kids and because they’re a no-bake treat it makes it easy to get them involved!
Why you’ll love Easter Chick Dipped Wafer Cookies 🐥
They’re cute as can be – Just look at that little face!
Budget-friendly – There are so few ingredients needed to make the dipped wafers – you may already have what you need in your cupboards.
Customizable for all occasions – Once you know how to make Easter chick dipped wafer cookies, you can make them for any occasion. Switch up the color of the candy melts and add some festive sprinkles and you can make these for any celebration.

Things you’ll need
- Microwave safe bowl – for easily melting the candy melts.
- Food grade tweezers – not totally necessary but helps with precision.
- Piping bag – a large freezer bag with the corner snipped can also be used.
- Candy eyeballs – I see these in nearly every market baking aisle.
- Yellow candy melts – Michaels has a large variety of colorful candy melts (as does Meijer if you’re a Midwesterner). Otherwise, you can order them.
- Orange round sprinkles – for the beak.
- Orange flower shaped sprinkles – for the feet.
- Yellow leaf shaped sprinkles – for the hair.
Ingredients
Below is a list of the ingredients you’ll need to gather to make this recipe. Scroll all the way down for the full recipe card.
- Wafer Cookies – Not to be confused with Nilla Wafers! The sugar wafer cookies used in this recipe are paper-thin layers of crisp wafer cookies filled with layers of cream. Keebler, among other brands, make them and the most popular are chocolate, vanilla, and strawberry. You can use whatever flavor you prefer.
- Yellow Candy Melts – Candy melts (aka candy wafers…not to be confused with the wafer cookies we’re using here) are easy to work with by melting them in the microwave. They are a no-fuss way to dip all kinds of desserts, and we’re using yellow for the chicks.
- Coconut Oil – Using a bit of liquid coconut oil helps to thin and smooth out the candy melts and prevents the mixture from setting too quickly.
- Decorative Items – Candy eyeballs, orange sprinkles for the beak, orange flower-shaped sprinkles for the feet, and yellow leaf-shaped sprinkles for the hair.

How to make Easter Chick Dipped Wafer Cookies
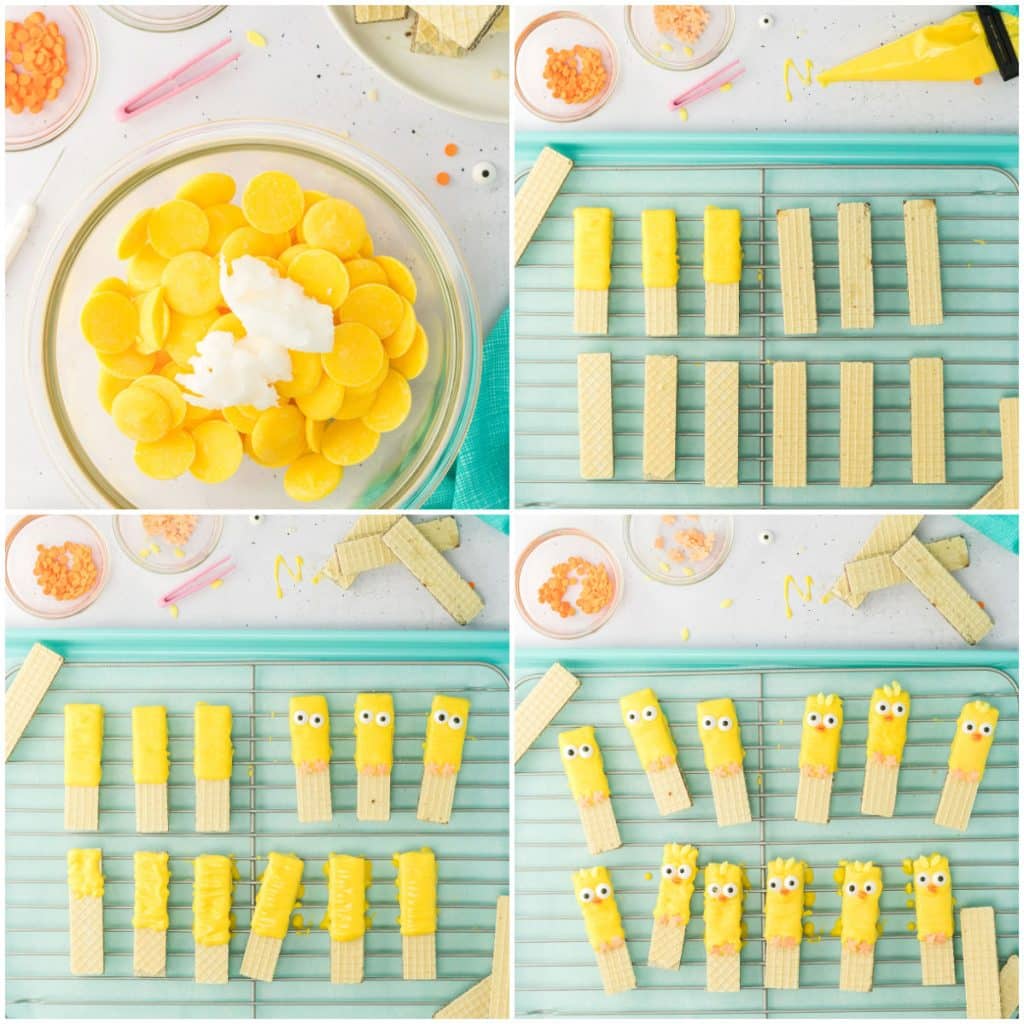
- Step One: Melt candy melts and coconut oil in a microwave-safe bowl for 30 seconds at a time. Stir in between each interval until fully melted and smooth. This should take between 3-5 minutes, depending on your microwave.
- Step Two: Pour the melted candy into a piping bag. Arrange the wafer cookies on a wire rack overtop a parchment-lined baking sheet.
- Step Three: Starting at the top of the cookie, pour or pipe the melted candy onto the cookie in a back-and-forth motion, covering about 2/3 of the cookie. Allow the excess to drip off onto the parchment paper below.
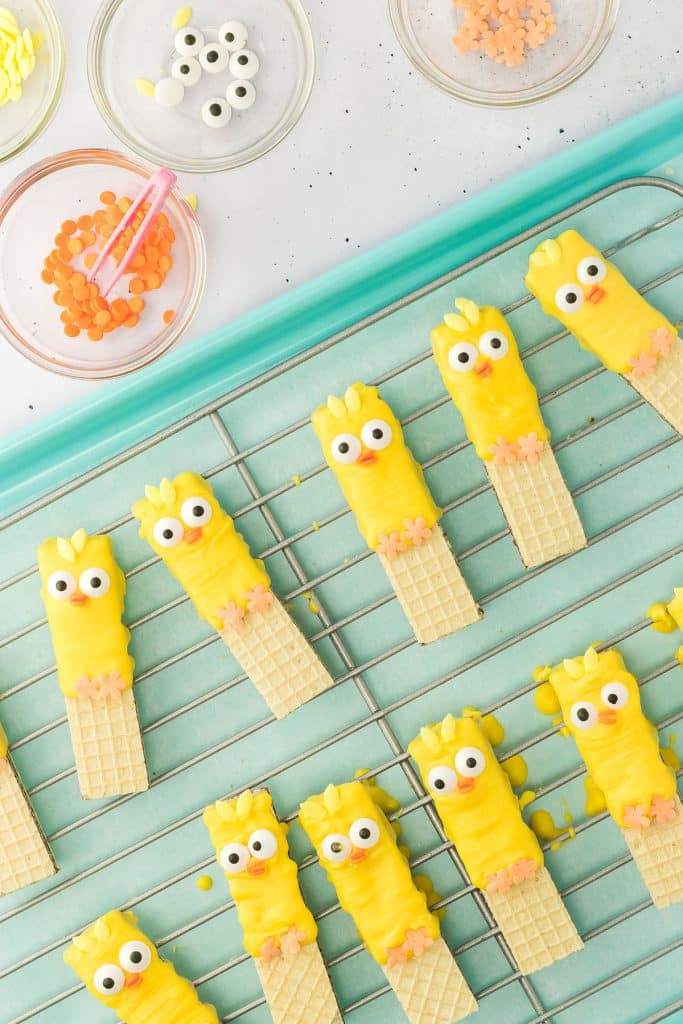
- Step Four: Immediately, use a pair of tweezers to add 2 candy eyeballs near the top, 2 flower sprinkles for the feet where the yellow candy melt ends, and 2 hair sprinkles above the eyes near the top of the cookie.
- Step Five: Last, you’ll add 2 orange sprinkles under the eyes to make the beak. Allow the Easter chick dipped wafer cookies to set for 10 minutes. Enjoy!
What to serve with them
These make great gifts to package and hand out to guests! Prepare them in cellophane and tie them with a ribbon.
If you’re serving them as part of an assortment of desserts for Easter, I’d recommend pairing them with others like white chocolate crockpot candy, easy frosted sugar cookie bars, and slices of honey bun cake.
You could also make some chocolate birds nest cookies so the chicks have somewhere to live 😉
Since these wafer cookies are so easy to make, why not go all out with the rest of the desserts?
Tips & Suggestions 🐤
- Vegetable shortening can be substituted for the coconut oil but I find that coconut oil tastes better.
- The melting wafers must be thinned out. If the coconut oil or shortening is not added then the wafers are clumpy and set too quickly.
- Any sprinkles can be used for this as long as it resembles a beak and feathers.
- A piping bag is not necessary however it is faster and more precise, this means less mess and less waste.
- Work quickly! You want to be prepared and have all your decorations out and ready to go so it doesn’t set before you add your decorations.
How to store them
Keep them stored in an airtight container at room temperature for up to 1 week. They’re better eaten within the first couple of days and better still eaten the day they’re made.
I don’t recommend keeping them in the fridge. Once they become moist, they tend to get soggy.
If stacking them, separate the layers with parchment paper so that they remain intact and don’t clump together.
Can I freeze dipped wafers?
No, I wouldn’t recommend it. They will freeze OK, but it’s when they thaw that the texture will change.
FAQs
Are there any alternatives to piping?
Certainly. I find that a piping bag helps with a more consistent pour and reduces the waste of the melted wafers, however, there are ways to work around this.
Dip the wafers into the melted yellow candy and let the excess drip off.
Or, you can pour the melted wafers onto the cookie using a cup with a spout, or a spoon.
Do candy melts require tempering?
No! That’s the beauty of using candy melts. They’re not actually chocolate!
Tempering chocolate is a process that requires precise temperatures and the use of the stove, and of course, actual chocolate, to get that beautiful sheen.
Can I use white chocolate chips instead of candy melts?
You can! You can even use white candy melts if preferred. I use yellow because I think they stand out and present adorably, but you could even do some of each.
Or, if you have white candy melts and yellow food coloring that works too.
Need more fun Easter recipes? Try these:
How to Dye Easter Eggs with Koolaid
Click here for my entire collection of holiday recipes.

Easter Chick Dipped Wafer Cookies
Ingredients
- 1 package sugar wafer cookies any flavor
- 1 cup yellow candy melts
- 1 tablespoon coconut oil
- 60 candy eyeballs
- 60 round orange sprinkles for the beak
- 60 orange flower-shaped sprinkles for the feet
- 60 yellow leaf-shaped sprinkles for the hair
Instructions
- In a small microwave-safe bowl, add the yellow candy melts and coconut oil. Heat for 30 seconds, stir, repeat, until fully melted and smooth. Depending on microwave power level, this should take between 3 and 5 minutes.
- Pour the melted candy into a piping bag.
- Place the wafers on a wire rack on top of a parchment-lined baking sheet to capture any dripping from the melted wafers.
- Starting at the top of the cookie, pour or pipe the melted candy onto the cookie in a back and forth motion covering two-thirds of the cookie.
- Allow the excess to drip off and then immediately, using tweezers, add 2 candy eyeballs and two of the flower-shaped sprinkles to resemble the feet.
- Add 2 of the yellow hair sprinkles above the eyes, near the top and place the 2 orange sprinkles under the eyes to make the beak.
- Allow to set for at least 10 minutes and enjoy!
Notes
- dip the wafers into the melted yellow candy and let the excess drip off.
- pour the melted wafers onto the cookie.
Nutrition
Nutritional information is an estimate and provided to you as a courtesy. You should calculate the nutritional information with the actual ingredients used in your recipe using your preferred nutrition calculator.


Very cute! Does the coconut oil give them a coconut flavor? If so, is there a substitution that can be used?
It doesn’t, you’re just using a bit to thin the color melts, but you can use vegetable oil if you prefer.