This post may contain affiliate links meaning if you buy from them, I will make a few pennies, at no cost to you. See disclosure here.
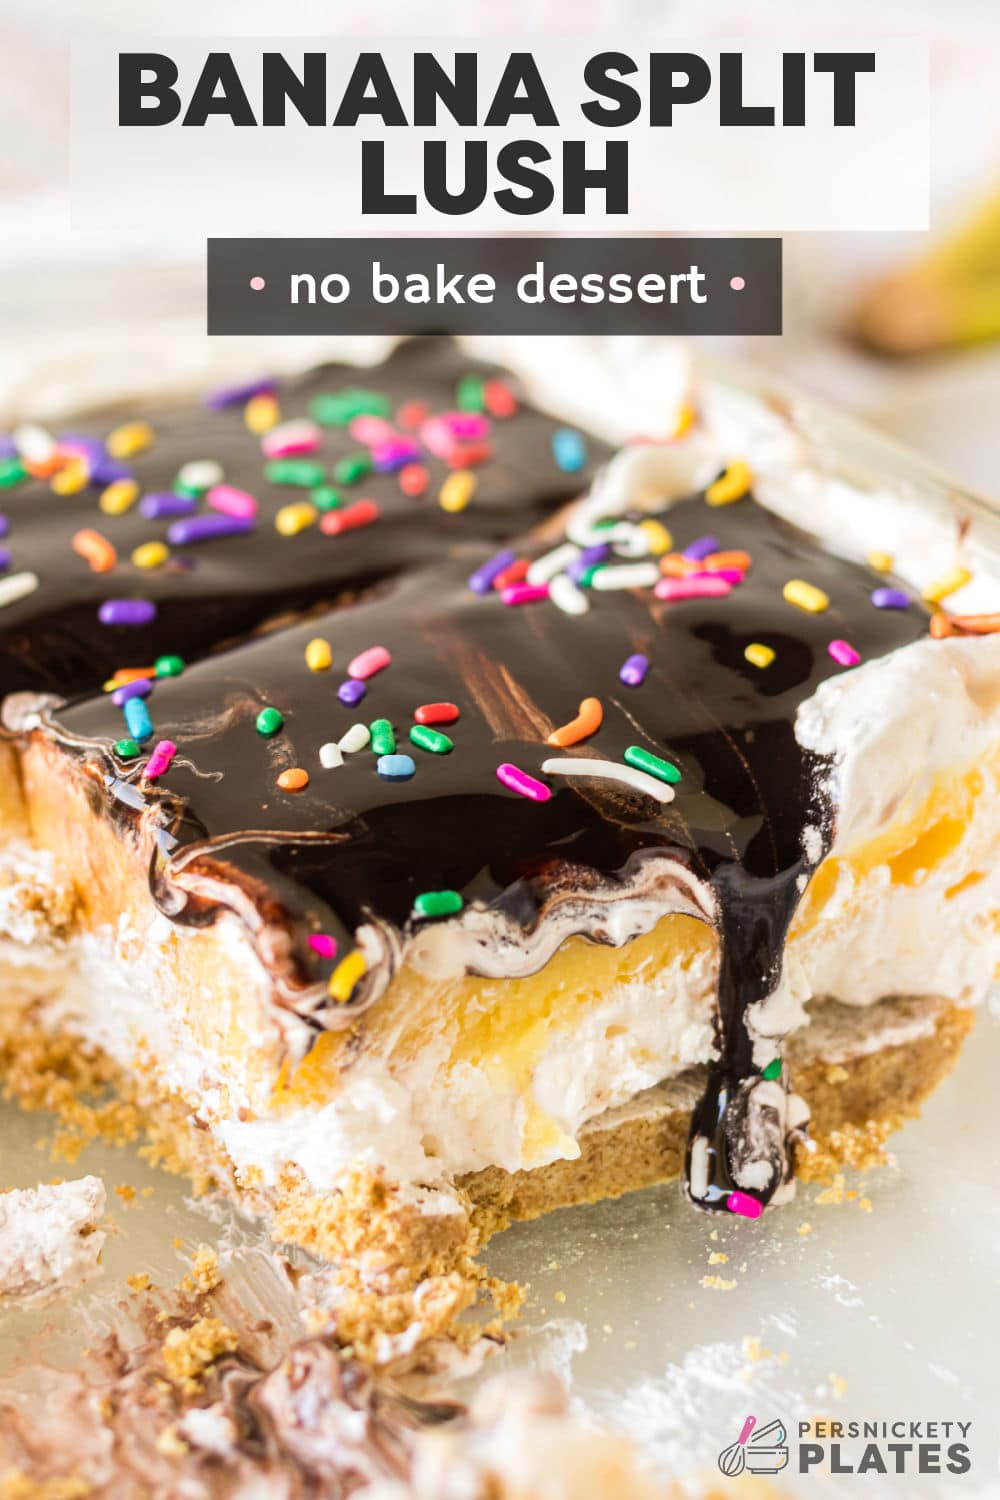
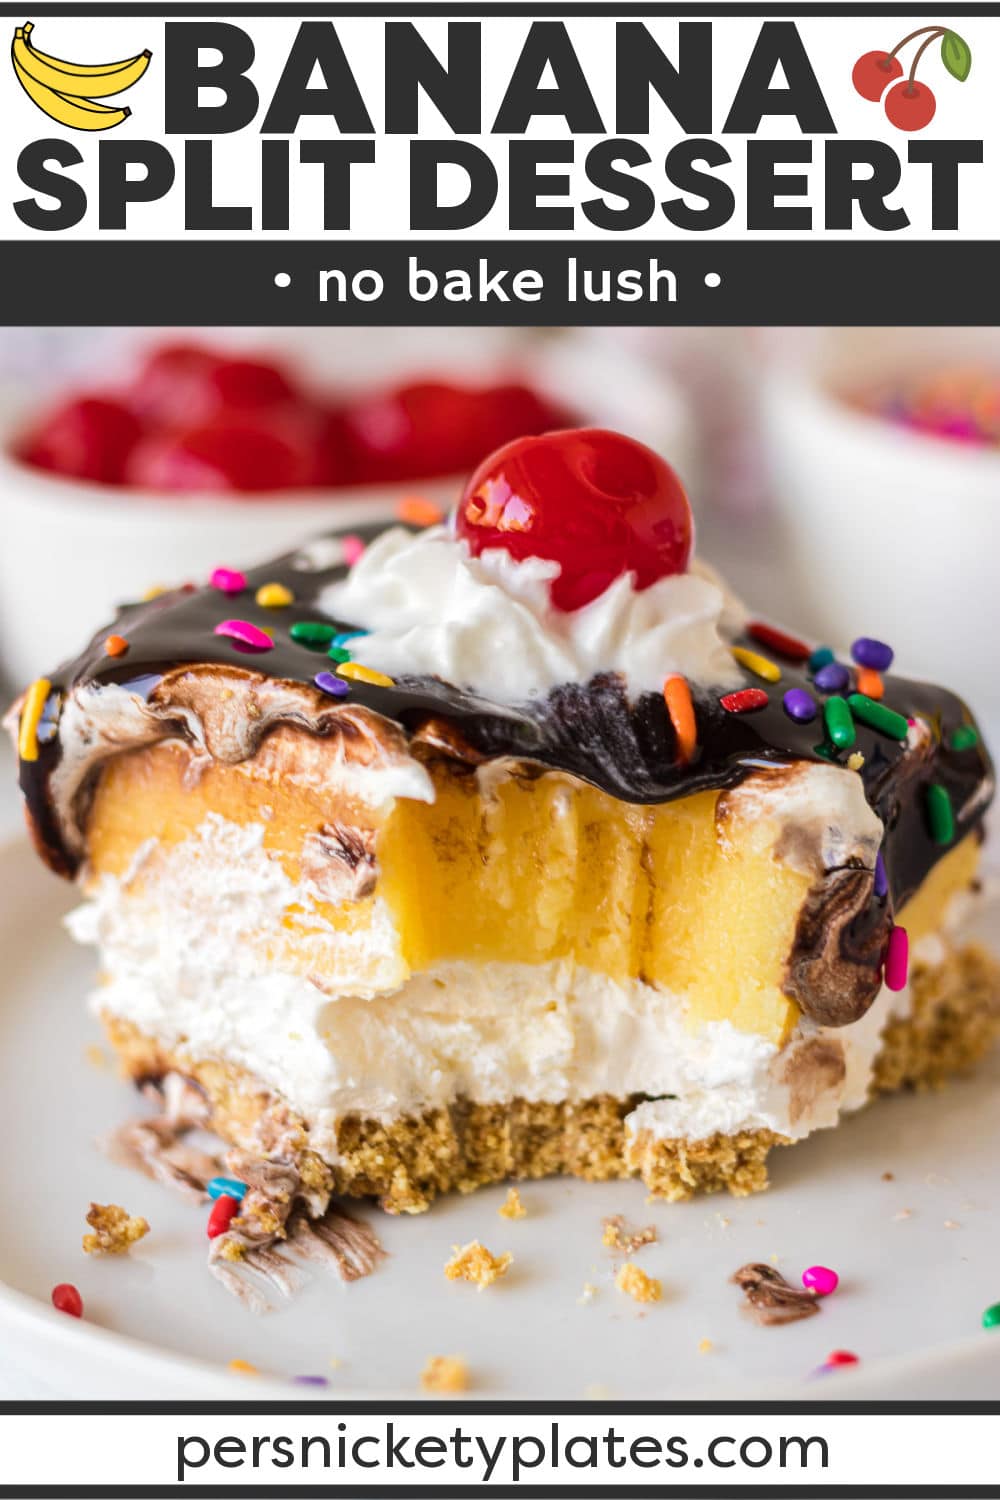
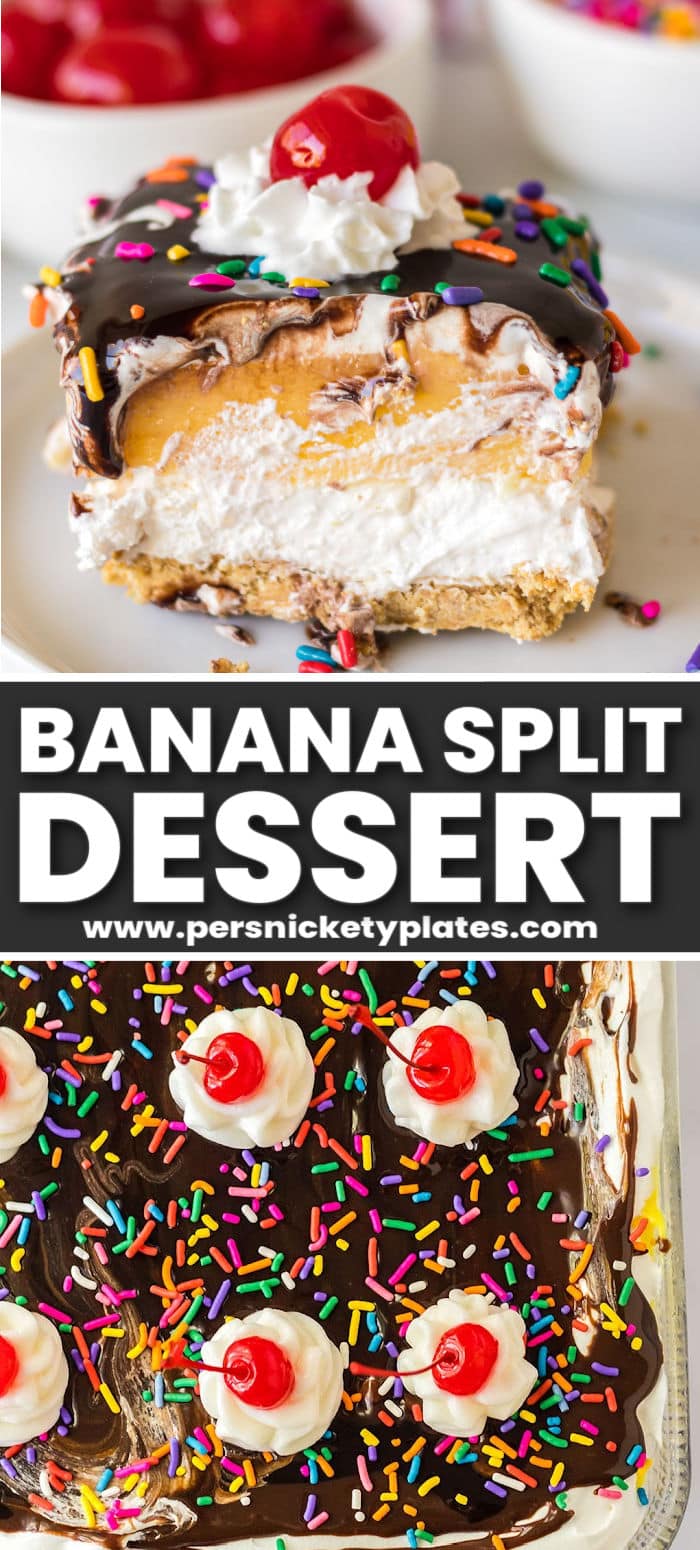
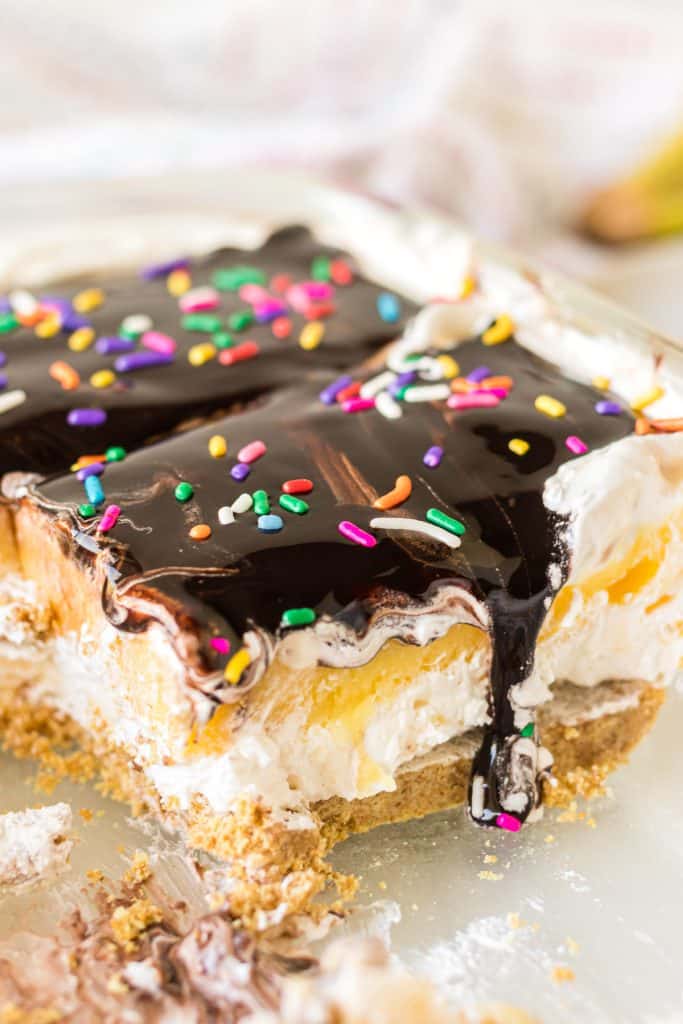
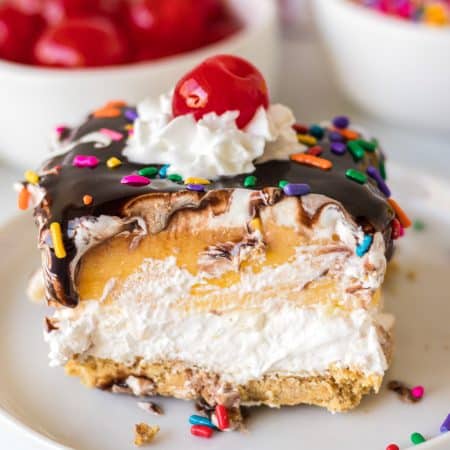
This banana split dessert, also known as a banana split lush, is a no-bake treat layered with the flavors of a classic banana split and served in slices. It’s a simple yet impressive dessert that is as easy as it is tasty!
With no oven required, it takes just 30 minutes to whip it up and the rest is chill time so that it sets nicely for when you’re ready to slice into it.

Each piece of this banana split dessert has a bit of everything. A sweet graham cracker crust, a sweet cheesecake layer, topped with a luscious banana pudding, and a topping of light and airy whipped topping.
That’s the beauty of layered desserts like this one, blueberry heaven on earth cake, and strawberry brownie delight, they give you so many flavors and textures in one!
When craving a banana split sundae, this is an easy alternative and great for serving a crowd. Not having to deal with melting ice cream or browning bananas either makes it ideal for bringing to potlucks or serving poolside.
Want more banana dessert indulgence? Don’t miss my banana pudding cheesecake bars or this bananas and cream recipe!
Why you’ll love this Banana Split Dessert recipe
Delicious dessert – If you like anything that has to do with creamy cheesecake, smooth pudding, whipped topping, or crunchy graham crackers, this is a dessert for you. It’s finished off with your favorite banana split toppings, including hot fudge and a cherry on top!
Easy recipe – This layered dessert is a no bake recipe perfect for hot summer days & easy enough for the kids to help with.
Portable – Once it’s chilled, cover it, carry it, and chill it again until you’re ready to serve it. As long as there’s room in the fridge you can take it anywhere.
Budget-friendly – Nothing in this recipe is super fancy and many of the ingredients you may already have on hand. Not only is this banana split dessert a family favorite, but it won’t break the bank either.
Tools you’ll need
- Baking Dish – love that this one has a lid for storage or transport.
- Hand Mixer
- Whisk
- Mixing Bowls
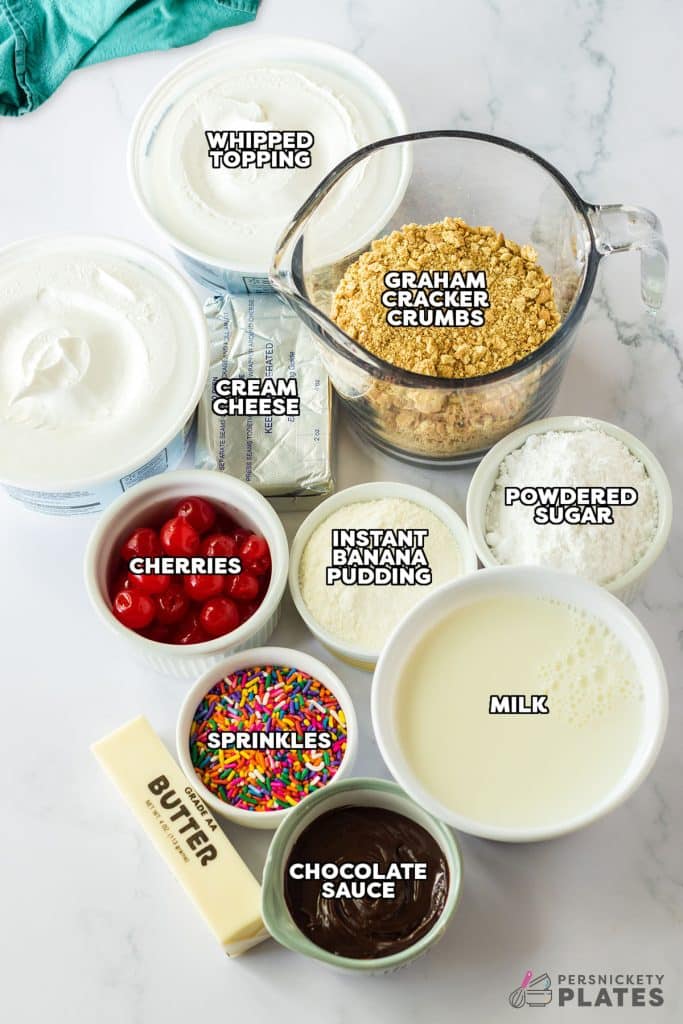
Ingredients
Below is a list of the ingredients you’ll need to gather to make this recipe, why you need them, and possible substitutions. Scroll all the way down for the full recipe card with measurements.
Jump- Graham Cracker Crumbs – You can buy packaged crumbs, but if you can’t find them or you have crackers on hand, pulsing them in the food processor will get the job done. You can also use a pretzel crust or Oreo crust as we do in this chocolate lush if preferred.
- Butter – You can’t have a buttery graham cracker crust without butter! It is melted and used to bind the crumbs together. Use unsalted or salted, whatever you prefer.
- Cream Cheese – Bring the cream cheese to room temperature ahead of time so it’s easy to cream. Also, you want to make sure to use the cream cheese from a block. It contains less water than a tub of spreadable cream cheese so it won’t affect the consistency.
- Powdered Sugar – Sometimes called confectioners’ sugar or icing sugar. Added to the cream cheese to sweeten it up. It also helps to maintain the structure of that layer.
- Instant Banana Pudding – Gives this dessert the signature banana flavor in the form of a silky pudding layer.
- Milk – Needed to turn the instant pudding powder into actual pudding. I use 2% because that’s what we usually have on hand.
- Whipped Topping, Thawed – Cream cheese is thick so we add whipped topping into the cream cheese layer to lighten it up and make it a bit more fluffy. Then we save the rest for the topping. Use Cool Whip or homemade stabilized whipped cream.
- Toppings – Chocolate sauce, sprinkles, maraschino cherries. You could also add some sliced bananas or fresh strawberries, but I’d hold off on those until you’re ready to serve it.
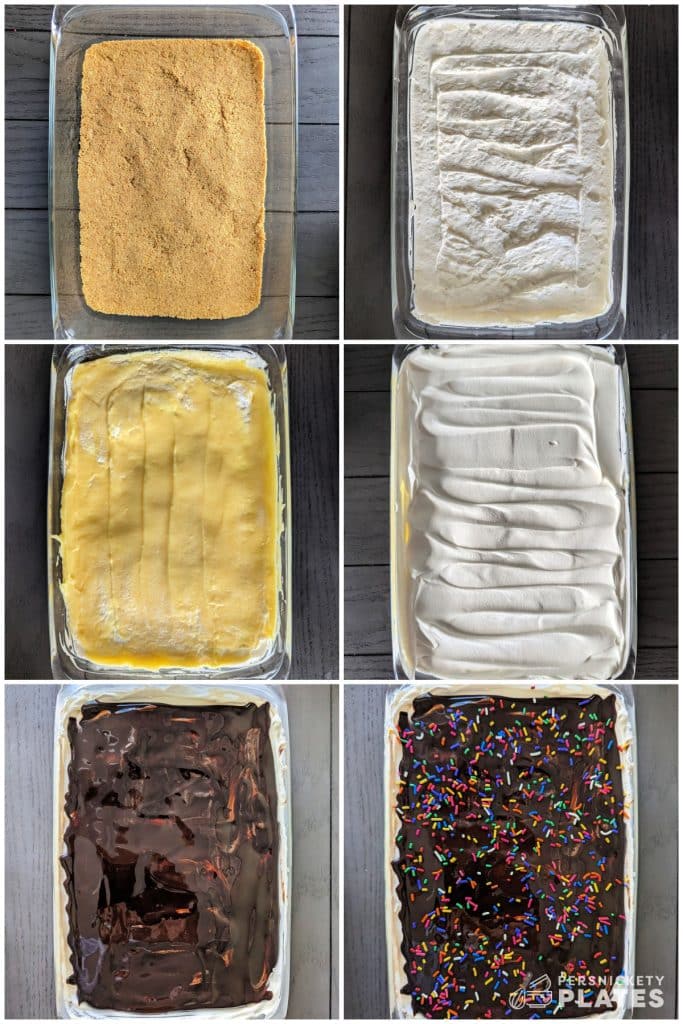
How to make a Banana Split Desserts
This section shows you how to make this recipe, with process photos showing the steps to help you visualize it. For full instructions, including amounts and temperatures, see the recipe card below.
Jump- Step One: To make the first layer, combine graham cracker crumbs and and melted butter to a large mixing bowl and stir to combine. Pour it into a 9×13 baking dish and press the crumb mixture evenly into the bottom of it.
- Step Two: The cream cheese layer comes together by adding the cream cheese and powdered sugar into another large mixing bowl and beating it on medium speed until smooth. Then, gently fold in half of the whipped topping then carefully spread that over the graham cracker crust.
- Step Three: To make the banana layer, use a medium mixing bowl this time and whisk together the dry pudding mixes and milk until fully combined. Spread that layer over the cream cheese layer then top that with the remaining whipped topping.
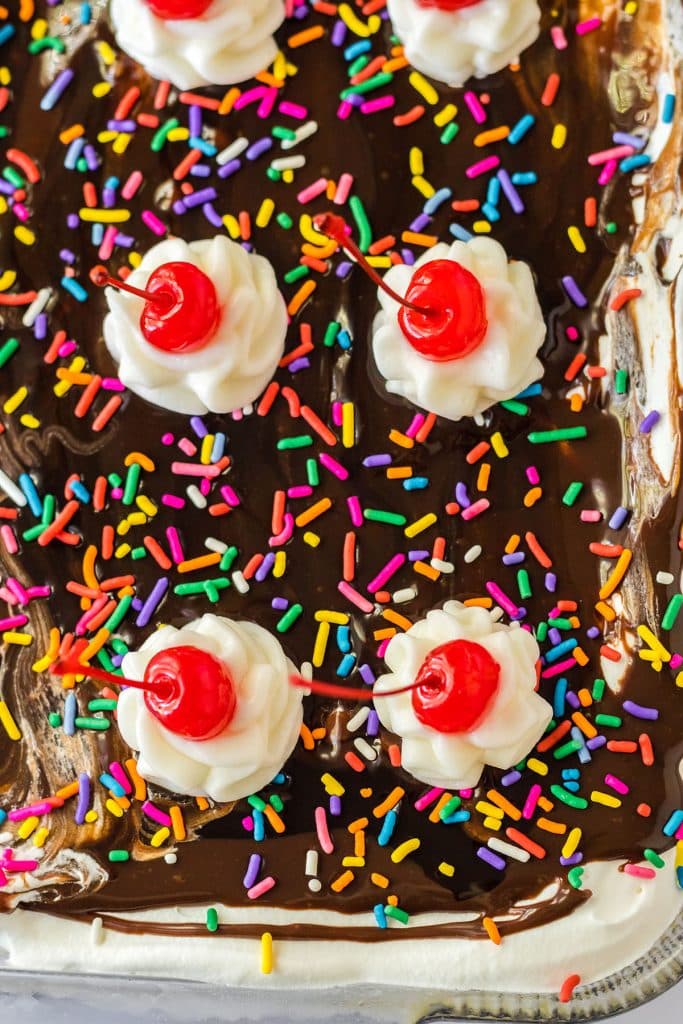
- Step Four: Top with chocolate sauce, cherries, and sprinkles. Cover it with plastic wrap and keep it refrigerated for at least 4 hours or overnight. Enjoy!
- For clean slices, use a sharp kitchen knife and wipe the blade between every slice. Be sure to slice just out of the fridge. Even easier when frozen.
- Swap the whipped topping with real whipped cream if you choose. Just know it will become watery and runny much sooner.
- Skip hot fudge and use chocolate sauce or chocolate syrup. Hot fudge will melt/deflate the whipped topping – if you’re ok with that, go ahead!
- Grease the bottom of the baking dish before adding the crust so that it doesn’t stick when serving.
- Make this dessert your own and get a little creative. Add a fresh fruit layer in there or add them to the cream cheese mixture. Blueberries, strawberries, or crushed pineapple would be nice.
- Fresh bananas would make a great garnish as well. So would chopped nuts! If you’re using fresh bananas, squirt them with lemon juice before adding them will help to prevent them from turning brown. You can also wait to add them until just before serving.
How to store it
How to store leftovers
Keep leftovers in an airtight container.
How long will this banana split lush last in the fridge?
It’ll keep for up to 4 days in the fridge.
Can I freeze it?
Yes! It freezes very well and comes out a bit more ice cream-ish, just like the real deal!
FAQs
What is a banana split?
A traditional banana split is made with a single large banana sliced in half lengthwise.
Once it’s split into two, it’s served with 3 scoops of ice cream in between, then topped with a variety of sauces, nuts, cherries, sprinkles, you name it.
What other toppings can I add to this dessert?
Add whatever you normally put on your banana split to the top of this recipe!
Crushed walnuts, peanuts, or almonds. Maraschino cherries, sprinkles, and chocolate chips would be great.
A drizzle of chocolate syrup or caramel sauce or white chocolate shavings. Go nuts!
Can I make it in advance?
Absolutely. I do find it’s best served the day it’s made, once it has been chilled, but you can certainly make it the day before and serve it when you’re ready.
Banana Split Lush
Need more no bake desserts? Try these:
No Bake Chocolate Peanut Butter Bars
Click here for my entire collection of dessert recipes.

No Bake Banana Split Dessert
Ingredients
- 2 cups graham cracker crumbs
- 8 tablespoons butter melted
- 8 ounces cream cheese softened
- 1 cup powdered sugar
- 6.8 ounces instant banana pudding two 3.4 oz boxes
- 3 cups milk I use 2%
- 16 ounces whipped topping, divided thawed (Cool Whip)
Toppings:
- chocolate sauce
- sprinkles
- whipped cream
- cherries
Instructions
- To a small mixing bowl, add the graham cracker crumbs and melted butter. Stir until well combined and moistened.
- Press the crumb mixture evenly into the bottom of a 9×13 baking dish.
- To a large mixing bowl, add the cream cheese and powdered sugar. Use a hand mixer on medium and beat until smooth.
- Gently fold in half (8 ounces) of the whipped topping.
- Carefully spread the mixture over the crust in the baking dish.
- In a medium mixing bowl, whisk together the dry pudding mixes and milk until fully combined and thickened – approximately 2 minutes.
- Spread the pudding layer evenly over the cream cheese layer.
- Spread the remaining whipped topping over the pudding layer.
- Cover and move the entire pan to the fridge to chill for at least 4 hours, up to overnight.
- Before serving, top with chocolate sauce, cherries, whipped cream, and sprinkles.
- Slice and serve!
Video
Notes
- Store leftovers covered in the refrigerator for up to 4 days.
- To make slicing easier, you can freeze the dessert.
- The dessert can be made ahead of time.
Nutrition
Nutritional information is an estimate and provided to you as a courtesy. You should calculate the nutritional information with the actual ingredients used in your recipe using your preferred nutrition calculator.
Did you make this recipe?
Tag me on Instagram @melissa_pplates so I can see!Did You Make This?
If you made this recipe, I’d love to know how it went in the comments section below.
You can also tag me on Instagram – @melissa_pplates or share a pic in the Persnickety Plates Community Facebook group. I love seeing what you’ve tried!