

This post may contain affiliate links meaning if you buy from them, I will make a few pennies, at no cost to you. See disclosure here.
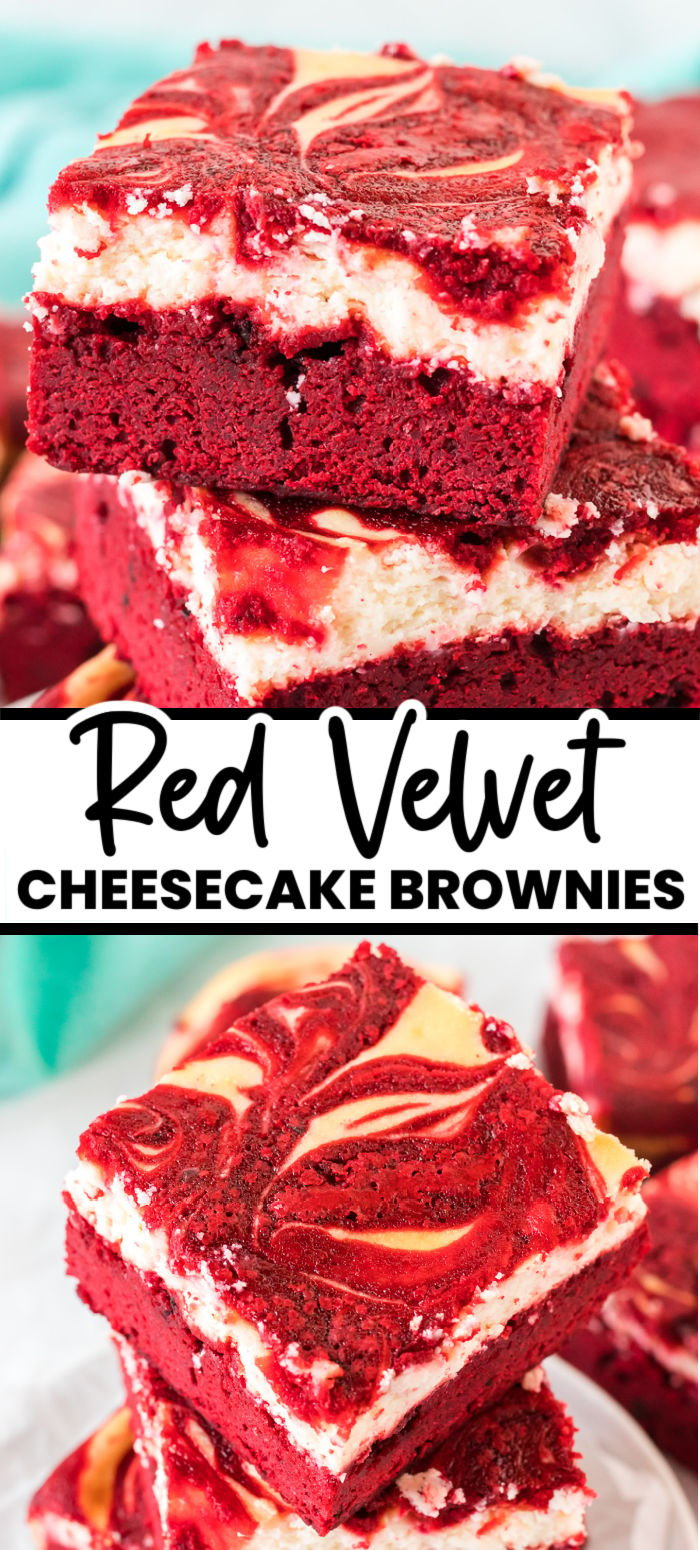
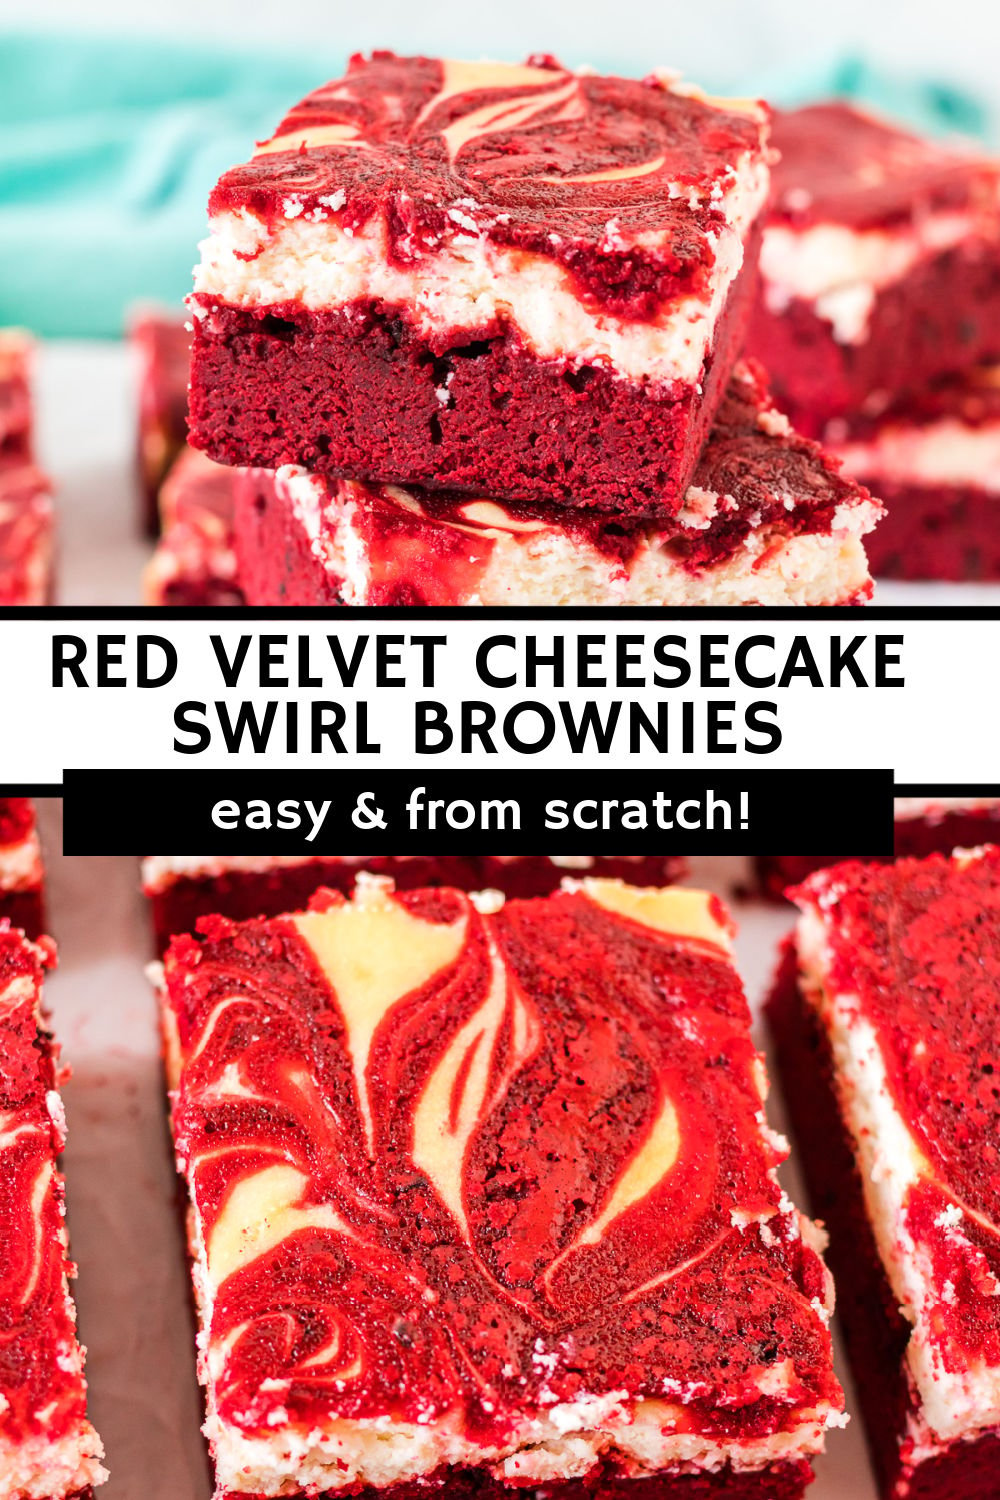
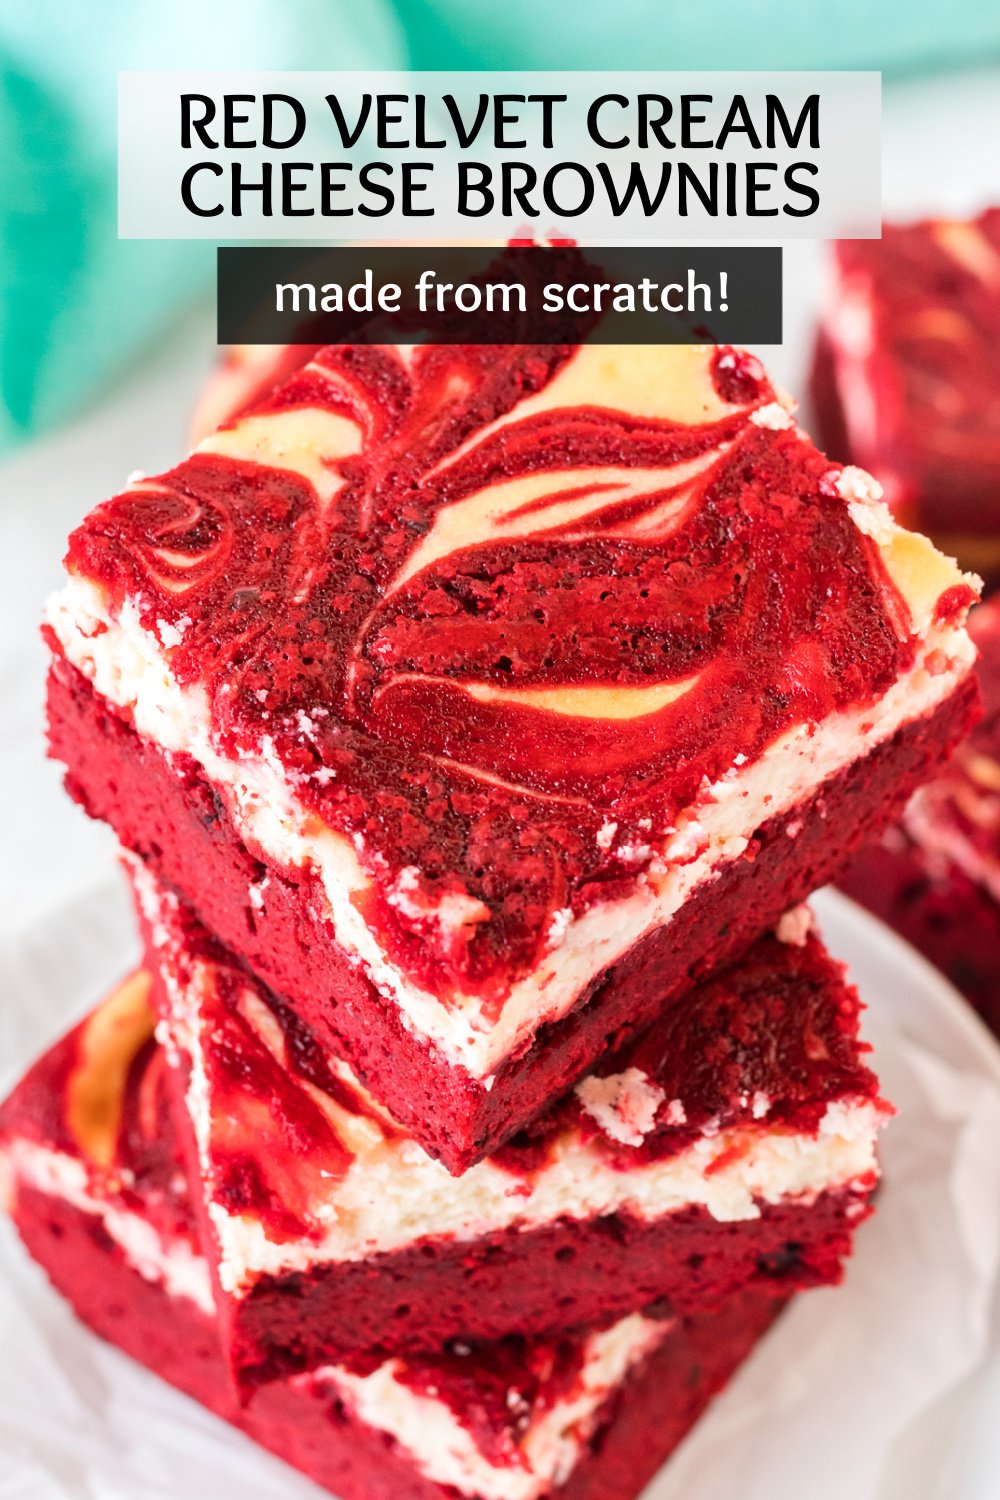
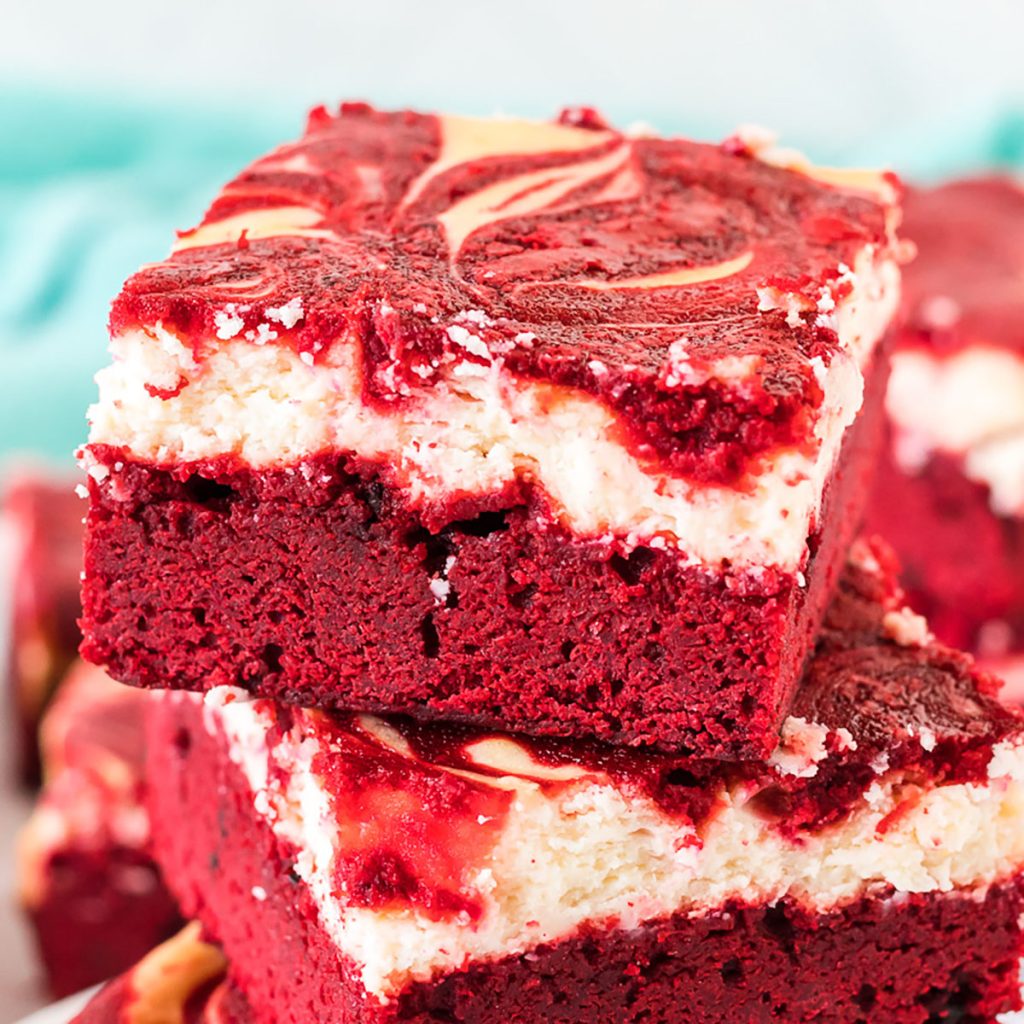
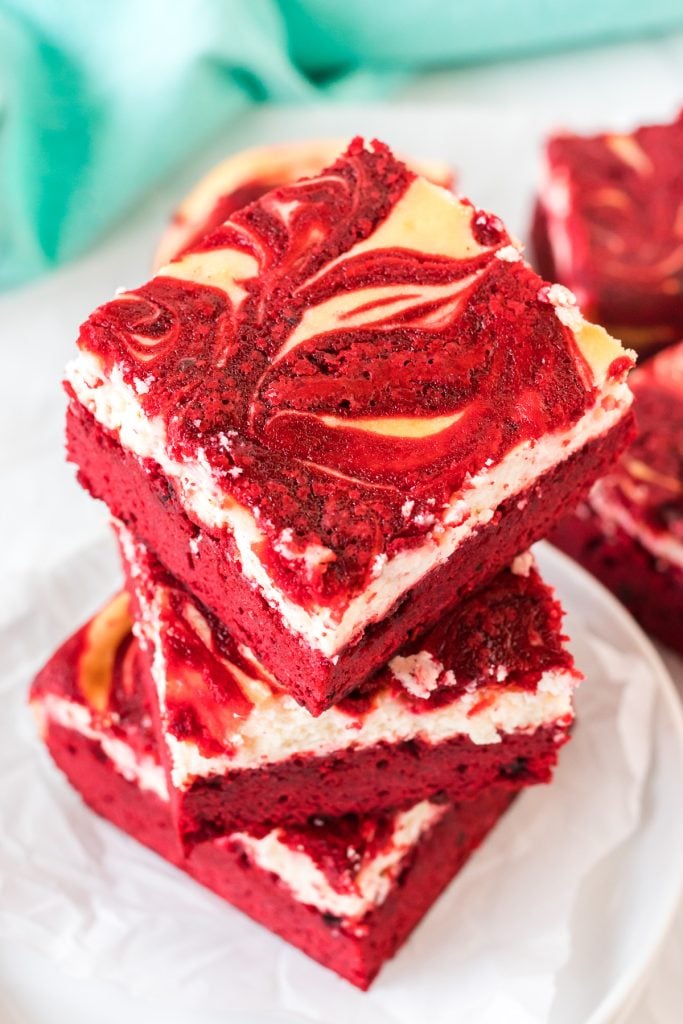
Red Velvet Cheesecake Brownies are made from scratch but so easy! A rich, red velvet brownie topped with a creamy cheesecake topping – swirled together for a dessert that is as pretty as it is delicious!
Red Velvet Cream Cheese Brownies
Brownies are my love language but I had never made a red velvet brownie before.
Red velvet cookies, sure, but I hadn’t transformed brownies yet.
I have a very popular Halloween swirl cream cheese brownie and a Christmas version, and now I have Red Velvet Cheesecake Brownies that are perfect for Valentine’s Day or even Christmas.
Or just a random Tuesday because they’re delicious and you don’t need a reason to have brownies.
You start with an easy, from scratch brownie base that has white vinegar to react with the cocoa powder for that traditional red velvet effect (read more about the science of red velvet here), but then I amped up the color with red dye.
Then you top it with a simple, four ingredient tangy cheesecake topping and swirl in some red velvet batter.
Why you’ll love these Red Velvet Brownies
- They are creamy and decadent.
- They’re easy! They’re made with pantry staples, nothing fancy, but they look fancy.
- Perfect for Valentine’s Day. The bright red is perfect for celebrating. Pair them with some Valentine’s Day jello shots!
- Kids and adults love them.
Cookies for Kids’ Cancer
If you remember, for the last several years I have worked with Cookies for Kids’ Cancer to raise awareness and fight against pediatric cancer by sharing Valentine themed desserts (last year I did Double Chocolate M&M Cookies, the year before I did Red Velvet Cake Mix Cookie Bars…).
Cancer is the #1 cause of death of children by disease in the U.S. There are 40,000 U.S. children actively battling cancer right now. The National Cancer Institute’s budget for childhood cancer is less than 4%, which is disheartening.
Our goal is to raise at least $3,000 because OXO, Mediavine and Dixie Crystals have each pledged to match our donations raised through this campaign up to that amount. That means when we raise $1, it turns into $4!
You can help make a difference by donating to Cookies for Kids’ Cancer! We’re well on our way to the goal so even $1 will help.

>> DONATE HERE TODAY <<
Now, let’s be a good cookie and bake some brownies.
Tools you’ll need
- Mixing Bowls – I like standard glass bowls because they’re microwave safe and dishwasher safe.
- Hand Mixer – You’ll want to mix the cream cheese layer with a hand mixer to ensure it is smooth.
- Spatulas – I use these silicone spatulas for everything. They’re perfect for mixing brownie batter.
- Food Coloring – To get the vibrant red color, you’ll need to use food coloring. This is my go-to kit.
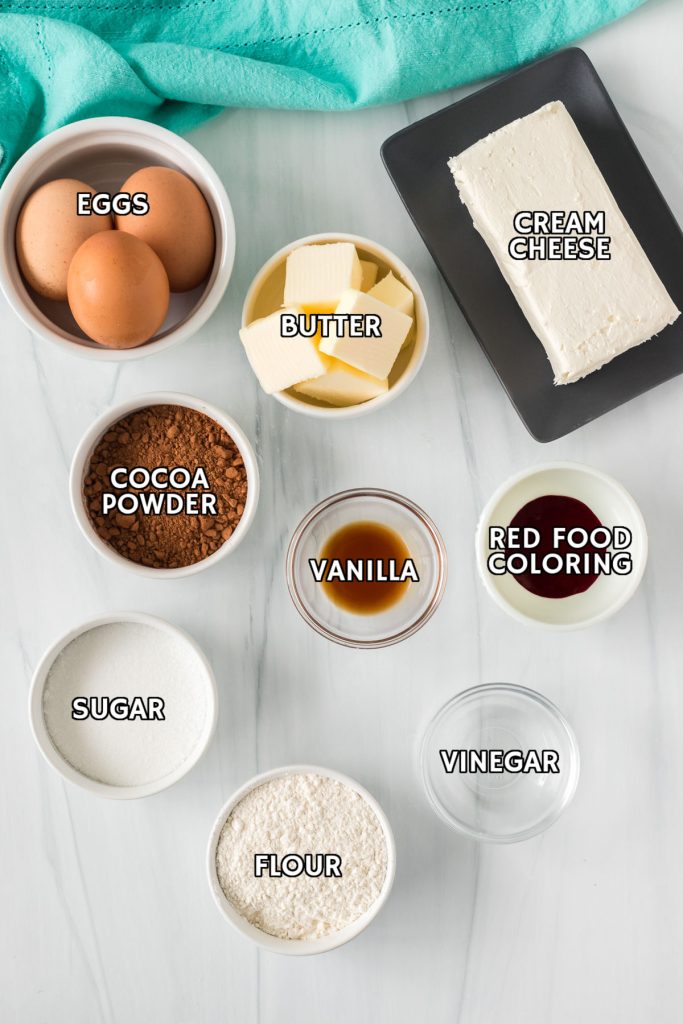
Ingredients for Red Velvet Cheesecake Brownies
Below is a list of ingredients to help you prep. Scroll all the way down for the full recipe card with measurements.
- Butter – Unsalted butter, or if you’re using salted, omit the additional salt.
- Sugar – Granulated white sugar for both the brownie layer and the cheesecake layer.
- Vanilla Extract – Use a high quality vanilla extract, not imitation, for the best flavor. I buy in bulk from Sam’s Club or Costco but you can also make homemade vanilla.
- Cocoa Powder – I use Hershey’s unsweetened cocoa powder.
- Salt – Again, if you’re using salted butter, you can skip the additional salt.
- Food Coloring – Red food coloring really makes the red velvet layer and swirls vibrant. I know people have mixed feelings about food coloring but I use it so infrequently that I’m ok with it.
- Vinegar – A staple in red velvet, vinegar reacts with the cocoa powder.
- Eggs – You’ll need three eggs at room temperature – two beaten for the brownie layer, and one for the cheesecake layer.
- Flour – All purpose white flour.
- Cream Cheese – Can’t have cheesecake without cream cheese! Start with room temperature cream cheese so it mixes smoothly, without lumps.
How to make Red Velvet Cheesecake Swirl Brownies
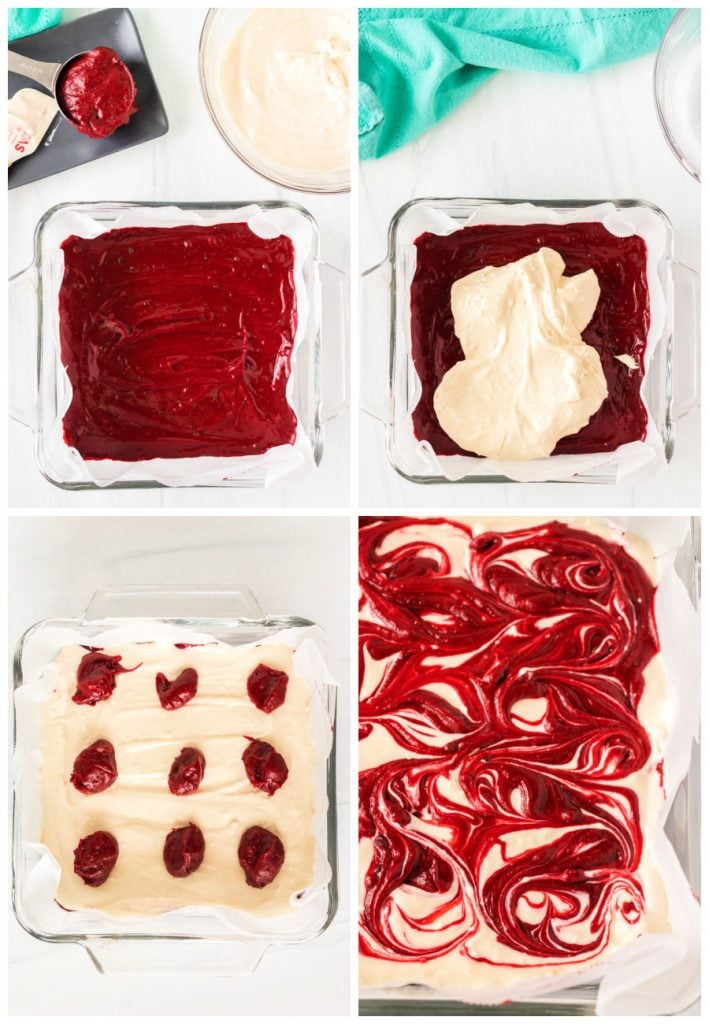
- STEP ONE: Make the brownie layer. First, to a large microwave safe mixing bowl, melt the butter (alternatively, you can do this in a saucepan over low heat). To the melted butter, add the sugar and stir until dissolved, then add the vanilla, cocoa powder, salt, food coloring, and vinegar. Beat the eggs in a separate bowl then stir them into the batter. Fold in the flour until fully combined and then reserve 1/4 cup of the batter and set aside. Spread the remaining batter into an 8×8 baking pan that has either been lined with parchment paper or lightly sprayed with non-stick spray.
- STEP TWO: Make the cheesecake layer. To a medium mixing bowl, add the room temperature cream cheese, sugar, egg, and vanilla and beat with a hand mixer on medium until smooth and creamy. Gently spread the cream cheese layer over the red velvet layer.
- STEP THREE: Make the swirls. Carefully dollop the reserved red velvet brownie batter onto the cheesecake layer and gently swirl with a wooden skewer or a butter knife.
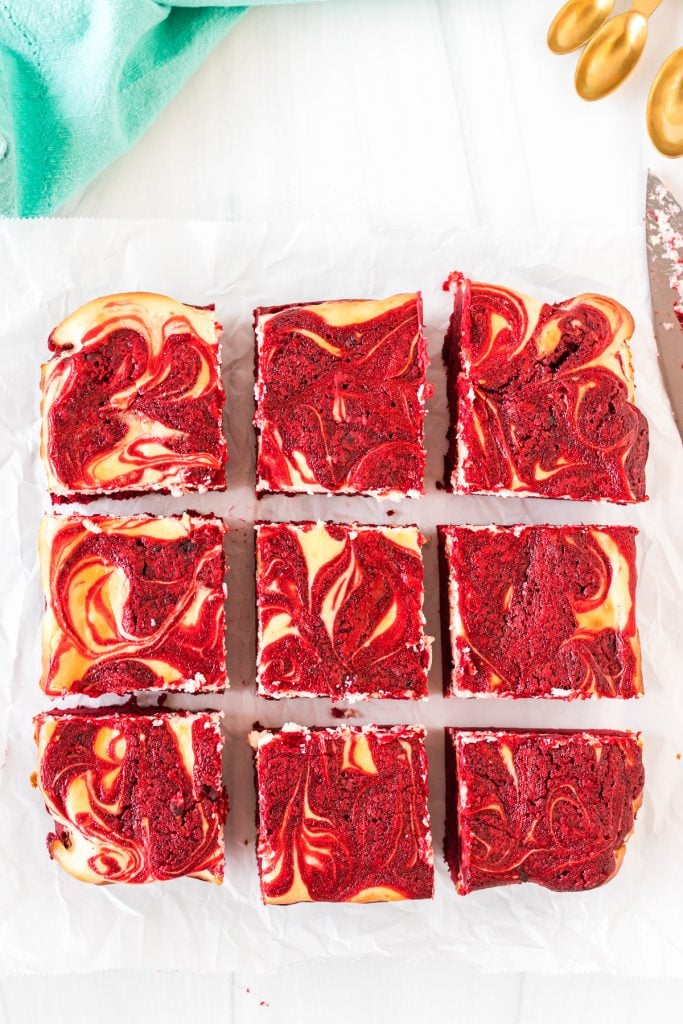
- STEP FOUR: Bake. Finally, bake at 375° for 30-35 minutes. The center should be firm and not jiggly. Remove from oven and let cool completely before slicing.
Enjoy!
How to store Red Velvet Cheesecake Swirl Brownies
Cheesecake Swirl Brownies need to be refrigerated. Leftovers should be stored covered in the fridge for up to a week.
How long do cream cheese brownies last?
Stored wrapped in the fridge so they don’t dry out, cream cheese brownies will last up to a week.
Can I freeze red velvet brownies?
Yes, these brownies will freeze well. Wrap them tightly in plastic wrap then place in a freezer bag. They will keep in the freezer for up to a month. Move them to the fridge to thaw when you’re ready to enjoy them.
FAQs
Even though there is cocoa involved, red velvet has a balance of chocolate and vanilla flavors. The chocolate is subtle because there is less cocoa powder than a chocolate cake recipe and the acids (vinegar, here) give it a tanginess.
As written, these red velvet brownies have about 350 calories each. That is assuming you cut them into 9 (generous) servings. You could certainly make them smaller to get more servings.
Need more red velvet recipes? Try these:
Red Velvet M&M Cake Mix Cookies
Red Velvet Rice Krispies (sure they look like raw meat, but you could form them into hearts…)
Red Velvet Cake Mix Cookie Bars
Click here for my entire collection of dessert recipes.

Red Velvet Cheesecake Brownies
Ingredients
For the red velvet brownie layer
- ½ cup unsalted butter
- 1 cup granulated white sugar
- 1 teaspoon vanilla extract
- ¼ cup unsweetened cocoa powder
- ⅛ teaspoon salt
- 1 Tablespoon red food coloring scant
- 1 teaspoon vinegar
- 2 large eggs beaten
- ¾ cup all purpose flour
For the cheesecake layer
- 8 ounces cream cheese at room temperature
- ¼ cup granulated white sugar
- 1 large egg at room temperature
- ¼ teaspoon vanilla extract
Instructions
- Preheat the oven to 375° and line an 8×8 baking dish with parchment paper or lightly spray it with non-stick spray and set aside.
- To a large microwave safe bowl, melt the butter then add in the sugar and stir until fully incorporated.½ cup unsalted butter, 1 cup granulated white sugar
- Add in the vanilla, cocoa powder, salt, food coloring, and vinegar. Stir until combined.1 teaspoon vanilla extract, ¼ cup unsweetened cocoa powder, ⅛ teaspoon salt, 1 Tablespoon red food coloring, 1 teaspoon vinegar
- Add in the beaten eggs and stir to combine.2 large eggs
- Fold in the flour until fully incorporated. Reserve ¼ cup of the batter and set aside. Pour the remaining batter into the prepared pan and smooth until even.¾ cup all purpose flour
To make the cheesecake layer
- To a medium mixing bowl, add the softened cream cheese, sugar, egg, and vanilla and mix with a hand mixer on medium until smooth and cream.8 ounces cream cheese, ¼ cup granulated white sugar, 1 large egg, ¼ teaspoon vanilla extract
- Carefully pour the cream cheese layer onto the red velvet layer and gently spread so it is even.
- Dollop the reserve red velvet batter onto the cream cheese layer and gently swirl with a skewer.
- Bake for 30-35 minutes or until just golden the center is set and no longer jiggly.
- Remove from the oven and allow to fully cool before slicing.
Notes
Nutrition
Nutritional information is an estimate and provided to you as a courtesy. You should calculate the nutritional information with the actual ingredients used in your recipe using your preferred nutrition calculator.
Did you make this recipe?
Tag me on Instagram @melissa_pplates so I can see!Be sure to visit the other bloggers participating in the Valentine’s Day event and check out their recipes!
Heart Shaped Thumbprint Cookies from Julie of The Little KitchenLittle Debbie Strawberry Shortcake Rolls Ice Cream from Rose of Rose Bakes
Salted Dark Chocolate Pistachio Cookie Bars from Jessica of A Kitchen Addiction
Red Velvet Swirl Cheesecake Brownies from Julie of Back To My Southern Roots
Dark Chocolate Covered Strawberry Latte from Lisa of Taste Cook Sip
Chocolate Valentine’s Day Cake for Two from Faith of An Edible Mosaic
Chocolate Petit Fours from Carlee of Cooking With Carlee
Iced Sugar Cookies from Nina of Crazy for Cookies and More
Valentine’s Fudge from Raquel of Organized Island
Pink Gin Fizz from Caroline of Caroline’s Cooking
Cherry Chocolate Chip Cake from Stefanie of Stef’s Eats and Sweets
Flourless Chunky Peanut Butter Blossoms from Colleen of Faith, Hope, Love, & Luck Survive Despite a Whiskered Accomplice
Valentine’s Day Oatmeal M&M Cookies from Kelly of Kelly Lynn’s Sweets and Treats
Gluten free peanut butter cookies from Holly of A Baker’s House
Gluten Free Vanilla Cake with Pink Buttercream Frosting from Elaine of Small Farm Big Life
Small Batch Chocolate Chip Cookies from Courtney of Courtney’s Sweets
Small Batch Chocolate Cupcakes from Lisa of Blogghetti
Valentine’s Day M&M Cookie Bars from Jaclyn of Crayons & Cravings
Red Velvet Baked Doughnuts from Sue of It’s Okay to Eat the Cupcake
Soft Iced Pumpkin Cookies from Laura of Untwisted Vintage
Guava Pink Peppercorn Margaritas from Courtney of Cook Like a Champion
Sugar Cookie Cups from Kelsey of Dance Around the Kitchen
Chewy Buckwheat Chocolate Chunk Cookies with Sea Salt from Lisa of Garlic & zest
Shortbread Hearts of Love from TammyJo of The Chocolate Cult
Valentine Sugar Cookies from Gwynn of Swirls of Flavor
Rhubarb Raspberry Tart from Betsy of The JavaCupcake Blog
Sugar Cookie Cups from Kelsey of Dance Around the Kitchen
Best Stout Beer Tiramisu from Linda of Ketchup with Linda
Creamed Chipped Beef from Rebekah of Kitchen Gidget
Bakery Style Peanut Butter Cookies from Becca of The Salted Cookie
Candy Trains from Sarah of Sarah Cooks the Books
Star Wars Grogu Heart Cookies to Support Cookies for Kids Cancer from Jenn of justJENN recipes
Peanut Butter Buckeyes from Nicole of For the Love of Food


If I double this recipe, can I bake it in one large pan and if so, what would be the best size? Also, what type vinegar is used?
8×11 or 9×13 would work. White vinegar 🙂