


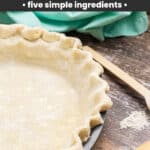
The secret to the perfect slice of homemade pie is in this all butter pie dough recipe. Made with just 5 ingredients and 10 minutes of prep time, you’ll get a tender and flaky buttery crust every time!

I’ll be honest. For many years I defaulted to using Pillsbury premade pie dough because making homemade pie crust intimidated me. Then I realized how simple it actually is to make your own and got over my fears.
I’m sharing a simple, basically foolproof recipe for a pie crust that is so buttery, tender, and flaky, it almost melts in your mouth.
It’s an easy one to whip up that requires just a couple of hours of chill time! This recipe is enough for one crust, but if you need a top and bottom crust, easily double it.
If you have extra time, you can even whip up a few and keep some frozen. That way, they’ll be ready whenever you need them and you don’t have to worry about using store-bought pie dough.
I’ve used it for everything from a fresh strawberry pie to a chicken pot pie and every pie in between!
If you’re looking for a crust with shortening, try my grandma’s no fail pie crust recipe.
Easy All Butter Pie Crust

Why you’ll love this recipe
- It takes just 10 minutes to prepare!
- Made with just 5 ingredients, and one of them is ice water.
- Has the best texture and pairs well with both sweet and savory fillings.

Helpful Tools
Ingredients
Below is a list of the ingredients you’ll need to gather to make this recipe, why you need them, and possible substitutions. Scroll all the way down for the full recipe card with measurements.
Jump- All-purpose flour – It’s really important to measure your flour accurately. You don’t want your pie crust tasting floury, and you don’t want it too dense either.
- Granulated white sugar – Gives the dough just the right amount of sweetness so that it’s not too bland.
- Salt – Enhances the overall flavor of the butter pie crust. It’s needed because we’re using unsalted butter.
- Unsalted butter – COLD butter, cut into cubes. Cold butter, ice water, and chilling the dough all contribute to the resulting tender, flaky crust.
- Ice water – Water brings the dry mixture together to form a dough, but it needs to be cold as ice!

How to make Butter Pie Dough
This section shows you how to make this recipe, with process photos showing the steps to help you visualize it. For full instructions, including amounts and temperatures, see the recipe card below.
Jump- Step 1: In a large mixing bowl, whisk the flour, sugar, and salt. Then, cut the cold butter cubes into the flour mixture using either a fork or a pastry cutter. It should be coarse crumbles with pea-sized pieces of butter.

- Step 2: Add just a tablespoon at a time of water. To bring the dough into a crumbly pile of dough. You can use up to 6 tablespoons of water. Not using enough will result in cracks when you roll out the dough. It is better to be slightly wet than too dry.

- Step 3: Pour the dough onto a clean surface and mold it into a ball. Wrap the dough in plastic wrap and flatten it like a disk. Chill it in the fridge for at least 2 hours.
Using a silicone mat will help you press the crumbly dough together.


- Step 4: When you’re ready to bake it, roll out the dough onto a lightly floured surface to approximately 1/8” thick. Start from the center and work your way outward. Place it on a pie plate and use it for your favorite pie recipe!

- Keep your ingredients cold until just before using them. This way, when the butter pie dough is baking, the butter melts slowly, and thanks to the steam from the water (and the butter), it results in flaky layers.
- Popping the butter cubes into the freezer for about 30 minutes before you start is not a bad idea.
- You can use a food processor instead of a pastry cutter if you prefer. Just be careful not to overdo it.
- If your dough becomes soft or sticky, it means your butter is melting as you’re working with it. If this is the case, pop the dough into the fridge for a few minutes.
- I recommend a glass pie dish, if you have one. It conducts heat evenly, and you can tell when the crust is browning.
Using a Food Processor
If you prefer to use a food processor instead of a pastry cutter, that works as well. The texture will change a bit as the butter will be in smaller pieces, but the process is the same. I am often too lazy to get out my food processor 🙃


Make Ahead & Freeze
How to store homemade butter pie dough
If you’re not ready to use the dough just yet, keep the wrapped disks in the freezer for up to 3 months. Make sure they’re well sealed and place them in a freezer bag.
Thaw in the fridge overnight when you’re ready to use it.
FAQs
How to prevent a tough pie crust?
Using the right amount of fat (aka butter) is key! If there isn’t enough, you risk dry, crumbly dough, which then looks like it needs to be brought together, resulting in overworked dough. Also, don’t overwork the dough.
Why did my crust burn?
Depending on the recipe, sometimes the pie crust will bake faster than the filling or the edges will start to brown too quickly. If you don’t own a pie shield, you can always cover the edges with foil to prevent browning or burning.

More Ways To Use All Butter Pie Crust:
Click here to view my entire collection of dessert recipes.

Easy All Butter Pie Dough
Ingredients
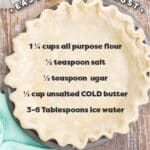
- 1 ¼ cups all purpose flour
- ½ teaspoon salt
- ½ teaspoon granulated white sugar
- ½ cup unsalted butter COLD, cut into small cubes
- 3-6 Tablespoons ice water
Instructions
- To a large mixing bowl, whisk together the flour, salt, and sugar.1 ¼ cups all purpose flour, ½ teaspoon salt, ½ teaspoon granulated white sugar
- Use a fork or a pastry cutter to cut the cold butter cubes into the flour mixture until it looks like a coarse meal, with pea-sized pieces of butter.½ cup unsalted butter
- One tablespoon at a time, add the water, using a fork to pull the dough into a crumbly pile, adding up to 6 tablespoons, if needed.3-6 Tablespoons ice water
- Wrap the dough in plastic wrap and flatten it into a disk.
- Move it to the fridge to chill for at least 2 hours.
- Once ready to use, lightly flour a surface and a rolling pin and roll the dough, starting at the center, to approximately ⅛" thick.
- The recipe makes enough for one single pie crust – double the recipe if you need a top and bottom crust.
Notes
- Use a silicone mat to help bring crumbly dough together.
- Keep all ingredients cold until mixing.
- Freeze butter cubes for 30 minutes before using.
- A food processor works instead of a pastry cutter—pulse gently.
- If dough gets too soft or sticky, chill it briefly.
- Bake in a glass pie dish for even browning and visibility.
Nutrition
Nutritional information is an estimate and provided to you as a courtesy. You should calculate the nutritional information with the actual ingredients used in your recipe using your preferred nutrition calculator.
Did you make this recipe?
Tag me on Instagram @melissa_pplates so I can see!Did You Make This?
If you made this recipe, I’d love to know how it went in the comments section below.
You can also tag me on Instagram – @melissa_ppplates or share a pic in the Persnickety Plates Community Facebook group. I love seeing what you’ve tried!


I never make crust but decided to today for my chicken pot pie. I’m not a baker, but this recipe was easy to follow and wow! The crust was so flaky and butter and delicious. Saving this for any pie I make now
that makes me so happy =)
This was the best tasting chicken pot pie that I’ve ever made! My husband said the same thing and the one I’ve made for the past 31 years was his mother’s recipe!
I even made the included crust recipe and not only was it easy, it took the overall taste of the pie over the top!!!
This will become a favorite in my house!!!
Love waking up to these type of messages! Thanks, Leslie 🙂
I know this is a strange question, but what if we don’t have access to ice water, only cold tap water?
I think it’ll be ok but the colder the better for flaky layers. Let me know how it works out 🙂
I could use some extra instructions on what small cubes of butter mean. I made small cubes but maybe too small and it didn’t turn out right at all. Tasted delicious though.
Were you able to see the ingredient shot & process shots above? I tried to include lots because it’s easier to show in this case than to guess what “small” means 🙂 but about 1/4″ to 1/2″ cubes. I’m glad it still tasted delicious!