

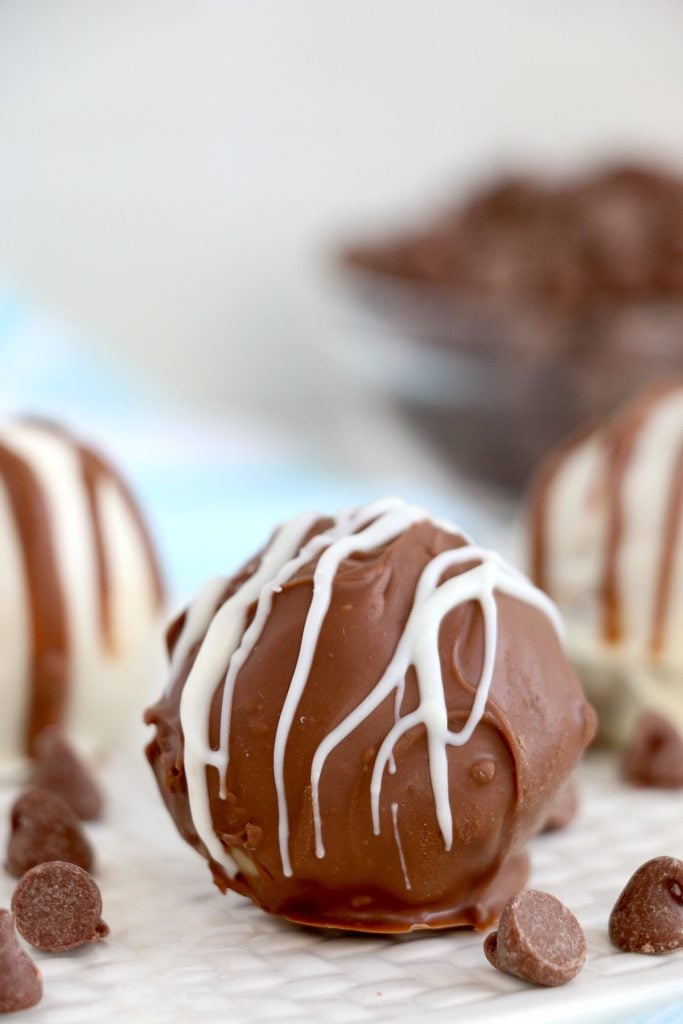
Easy chocolate chip cookie dough truffles are a fun no-bake treat. No eggs and the use of heat treated flour make them perfectly safe to eat!

No Bake Cookie Dough Balls
As much as a love a nice, warm freshly baked chocolate chip cookie, there’s just something so tempting about the dough…maybe because I was never allowed to eat raw cookie dough as a kid. No one wants food poisoning.
But this version of edible cookie dough is perfectly safe to eat, which makes my kids happy.
I make various Oreo balls for holidays and just-because (like my Christmas Oreo Bon Bons and Ghost Oreo Balls) but I hadn’t tried my hand at a cookie dough ball yet.
I wanted a cookie dough truffle without sweetened condensed milk because that is not an ingredient I often have on hand (though I do use it in my fiesta fudge cookies).
What I came up with are these cookie dough truffles that are made with everyday ingredients and whip up in no time. If you don’t feel like forming them into balls and dipping them, you can just eat the dough with a spoon!
Why you’ll love edible cookie dough truffles
- Easy to find ingredients.
- They’re safe to eat! No raw eggs or flour so no one is taking a chance at sickness.
- Kids and adults love them.
- They last up to a week in the fridge but they also freeze well for truffles on demand.
Helpful Tools
- Mixing Bowls – I love this set with the grippy bottom so they don’t scoot all over the counter.
- Mixer – I use my hand mixer way more than my stand mixer.
- Silicone Spatulas – I use these for everything!
- Cookie Scoops – I have and use all sizes.
Ingredients for No Bake Cookie Dough Truffles
Below is a list of the ingredients you’ll need to gather to make this recipe, why you need them, and possible substitutions. Scroll all the way down for the full recipe card with measurements.
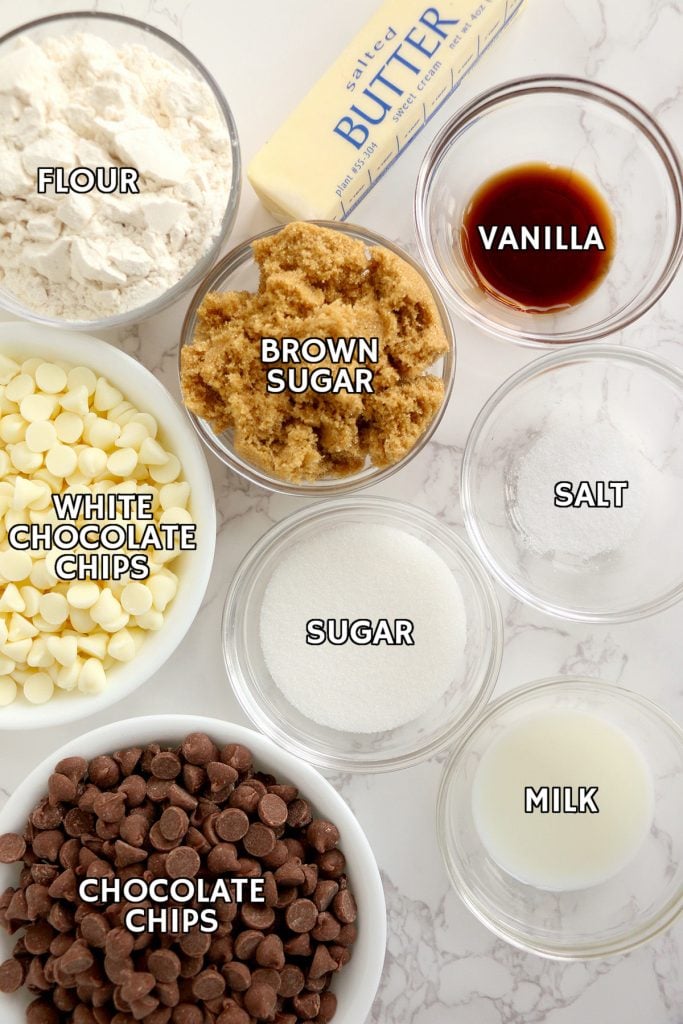
Jump- Flour – All-purpose white flour, which we’ll heat treat to make it safe to eat. Instructions below.
- Butter – I personally like to use salted butter, but unsalted works as well. Softened to room temperature.
- Brown Sugar – Light or dark brown sugar will work.
- White Sugar – Granulated white sugar. I haven’t tested with sugar replacements.
- Salt – For balance.
- Milk – I use 2% because that’s what we typically have on hand.
- Vanilla Extract – I know vanilla is pricey but vanilla extract is always better than imitation. I buy it in bulk from Sam’s or Costco to save a bit.
- Chocolate Chips – You’ll need chocolate chips to mix into the cookie dough as well as some to melt to dip them in. White, milk, dark, semi-sweet, minis- use your favorites. You can also use melting wafers or chocolate almond bark, if you prefer.
- Coconut Oil – Depending on the quality of chocolate chips you use, you may need some coconut oil to thin the chocolate a bit. If it is too thick for dipping, add a bit of coconut oil (around 1 tablespoon) to thin it out.
How to make Edible Cookie Dough
This section shows you how to make this recipe, with process photos showing the steps to help you visualize it. For full instructions, including amounts and temperatures, see the recipe card below.
Jump- STEP ONE: First, heat treat your flour by spreading it onto a baking sheet and heating in a preheated 350° F oven for 5 minutes. Let it cool completely.
- STEP TWO: Now, start the truffles by creaming together the butter, brown sugar, white sugar, and salt in a mixing bowl until fluffy. Then, add in the milk and vanilla and mix well. Blend in the heat treated (& cooled) flour until thoroughly mixed. Stir in 1/2 cup of chocolate chips until evenly distributed.
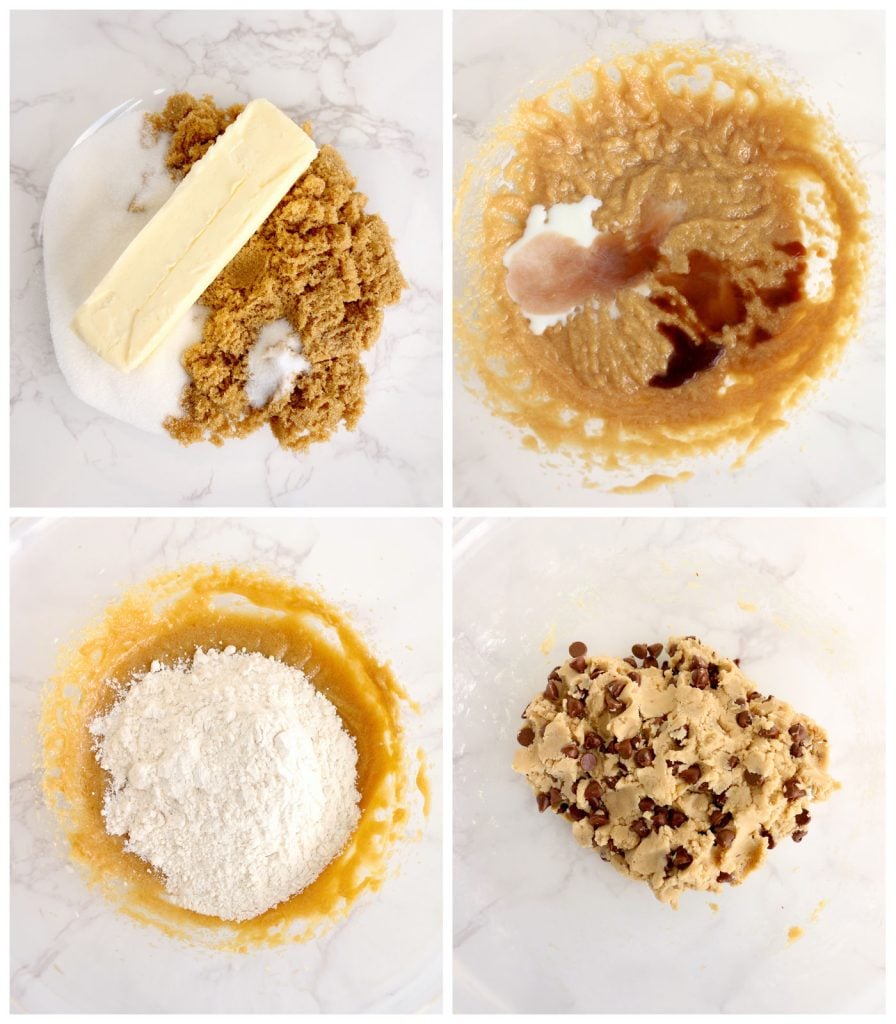
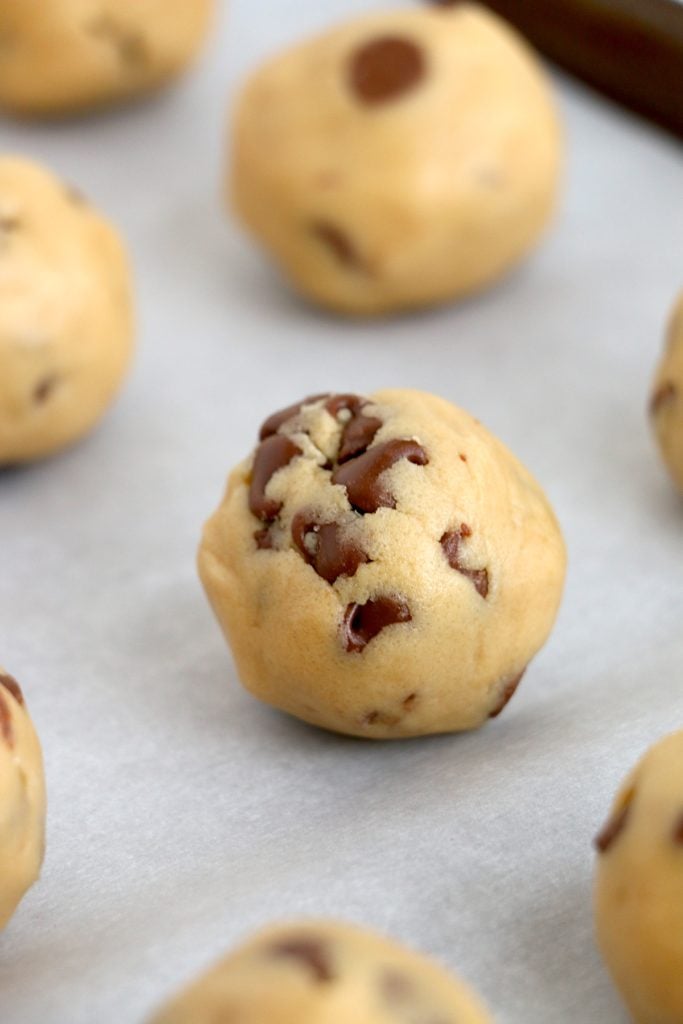
- STEP THREE: Next, use a 1″ cookie scoop to portion out the dough, rolling in your hands to smooth each ball. Place the balls onto a baking sheet lined with parchment paper, repeating until out of dough. Once finished, place the entire pan in the freezer for one hour. The balls will be easier to work with once frozen.
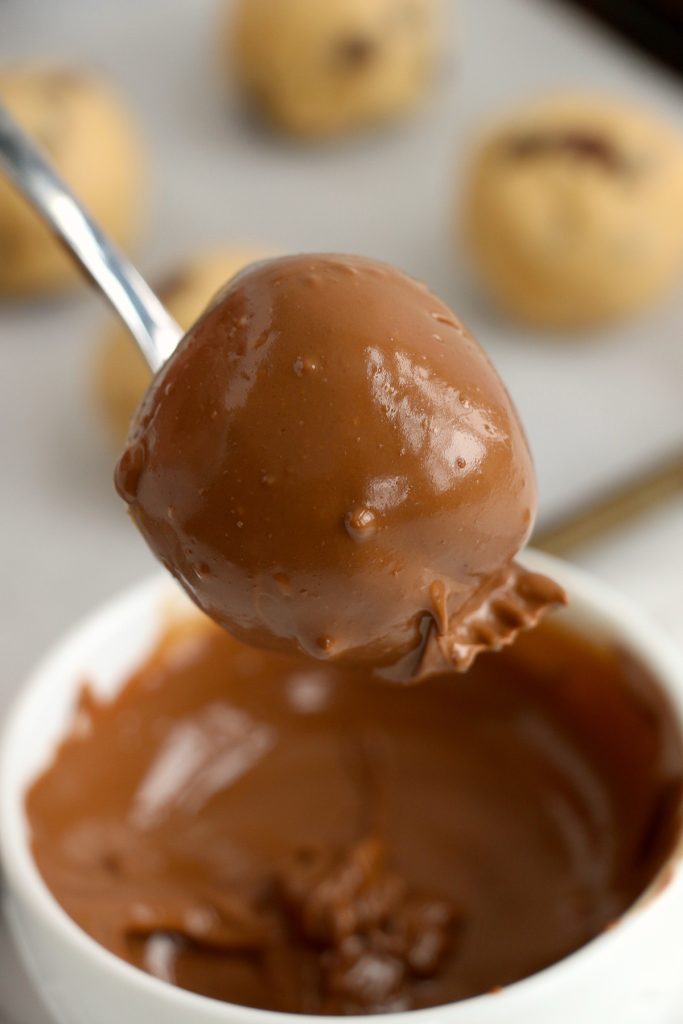
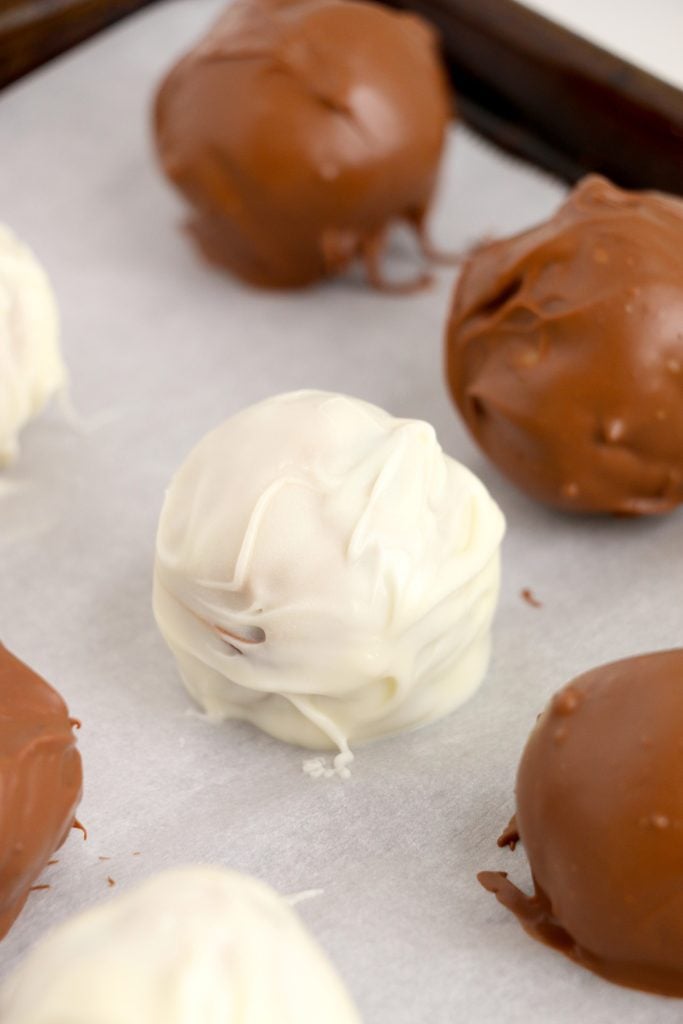
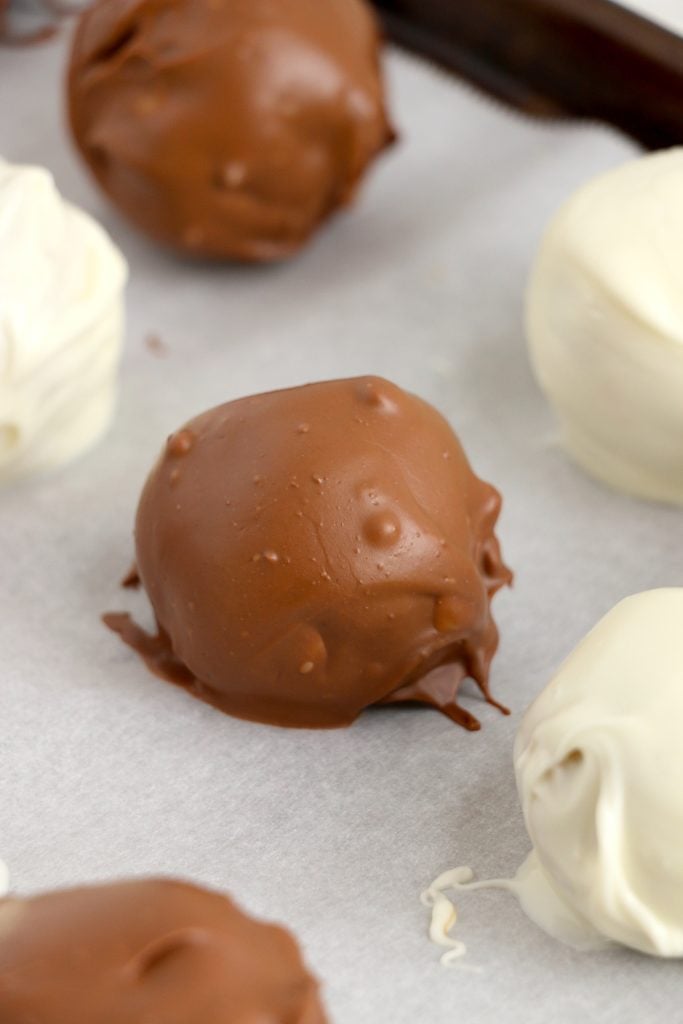
- STEP FOUR: Finally, remove the balls from the freezer and melt the chocolate chips in a microwave safe bowl – 30 seconds, stir, 30 seconds stir, repeating until melted smoothly. Use either a toothpick or two forks to dip each ball into the melted chocolate. Drizzling with the opposite color chocolate for added effect.
- STEP FIVE: Once complete, let the chocolate set, approximately 15 minutes, and then enjoy!
- You can use your favorite chocolate chips both in the dough and for dipping – mini chocolate chips, semi-sweet, milk chocolate, dark chocolate, white chocolate, etc.
- If you prefer, melting wafers are an easy alternative to melting chocolate chips. I like Ghirardelli dark chocolate melting wafers (like I use in my Rice Krispie Peanut Butter Balls).
- If you just want an edible cookie dough, you can make the recipe as written and skip the chocolate dipping portion.
Storage & Leftovers
In the fridge
Cookie dough truffles will keep up to a week covered in the fridge.
Can I freeze cookie dough truffles?
Yes, they freeze well. Store them in a zip top freezer bag for up to 3 months.
FAQs
Can I double the recipe?
Yes, as written, this recipe will make approximately 15 1″ cookie dough truffles but you can easily double (or triple). Use my common kitchen conversions chart for help, if you need it.
Is it safe to eat raw cookie dough?
No, the CDC recommends you “say no to raw dough” but that is why this recipe is made without eggs and with the use of heat treated flour so it IS safe to eat “raw”.
Does flour have to be cooked?
Yes, flour is a “raw” ingredient and it shouldn’t be eaten without being cooked first. I get this question a lot with my “raw meat” rice krispy treats (where we heat the cake mix)
How do you heat treat flour?
There are two easy ways to heat treat flour:
First, in the oven – spread the flour onto a baking sheet and heat at 350°F for 5 minutes. Done.
Second, in the microwave – put the flour in a microwave safe bowl and heat it on high until it reaches 165°F. This method requires a food thermometer.
Heat-treating flour ensures that the bad bacteria is killed so you can use it in no-bake desserts.
Need more cookie dough recipes? Try these:
Cookie Dough Dip
Chocolate Chip Cookie Dough Bars
Mini Cookie Dough Cheesecakes
Cookie Monster Edible Cookie Dough
Click here for my entire collection of dessert recipes.


No Bake Cookie Dough Truffles
Ingredients
- 1 cup all purpose flour
- ½ cup butter softened
- ½ cup brown sugar
- 3 tablespoons granulated white sugar
- ¼ teaspoon salt
- 1 tablespoon milk
- 1 teaspoon vanilla extract
- 2 cups milk chocolate chips divided
- 1 ½ cups white chocolate chips
- Coconut oil if needed
Instructions
To heat treat the flour
- Preheat oven to 350ºF.
- Spread flour on a baking sheet in a thin layer. Bake for 5 minutes. Cool completely before using.1 cup all purpose flour
To make the truffles
- In a large bowl, cream together the butter, brown sugar, sugar, and salt. Beat until fluffy.½ cup butter, ½ cup brown sugar, 3 tablespoons granulated white sugar, ¼ teaspoon salt
- Add milk and vanilla. Mix well.1 tablespoon milk, 1 teaspoon vanilla extract
- Blend in heat treated flour until mixture is uniform. Dough should form a ball.
- Stir in ½ cup milk chocolate chips.2 cups milk chocolate chips
- Using a 1-inch scoop, scoop dough and roll into balls. Place balls on a baking sheet lined with parchment paper.
- Freeze truffles for 1 hour.
- Melt white chocolate chips in a microwave-safe bowl in 30-second intervals, mixing until smooth.
- Using two forks, dip half of your truffles completely in the melted white chocolate. Allow excess to run off and place them back on the parchment paper.1 ½ cups white chocolate chips
- Repeat with the milk chocolate chips for the other half of the truffles.
- If desired, drizzle the opposite colored chocolate with a spoon for decoration. If melted chocolate is too thick to drizzle, add a small amount of coconut oil and warming in the microwave will thin it.Coconut oil
- Chill until chocolate is set.
Notes
- Mini chocolate chips may be used.
- For the coating, melting wafers or chocolate almond bark may be used in place of chocolate chips.
- Store leftovers in the fridge for up to a week or the freezer for up to 3 months.
Nutrition
Nutritional information is an estimate and provided to you as a courtesy. You should calculate the nutritional information with the actual ingredients used in your recipe using your preferred nutrition calculator.
Did you make this recipe?
Tag me on Instagram @melissa_pplates so I can see!Did You Make This?
If you made this recipe, I’d love to know how it went in the comments section below.
You can also tag me on Instagram – @melissa_ppplates or share a pic in the Persnickety Plates Community Facebook group. I love seeing what you’ve tried!