


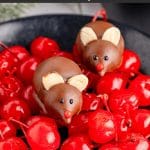
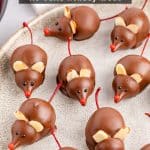
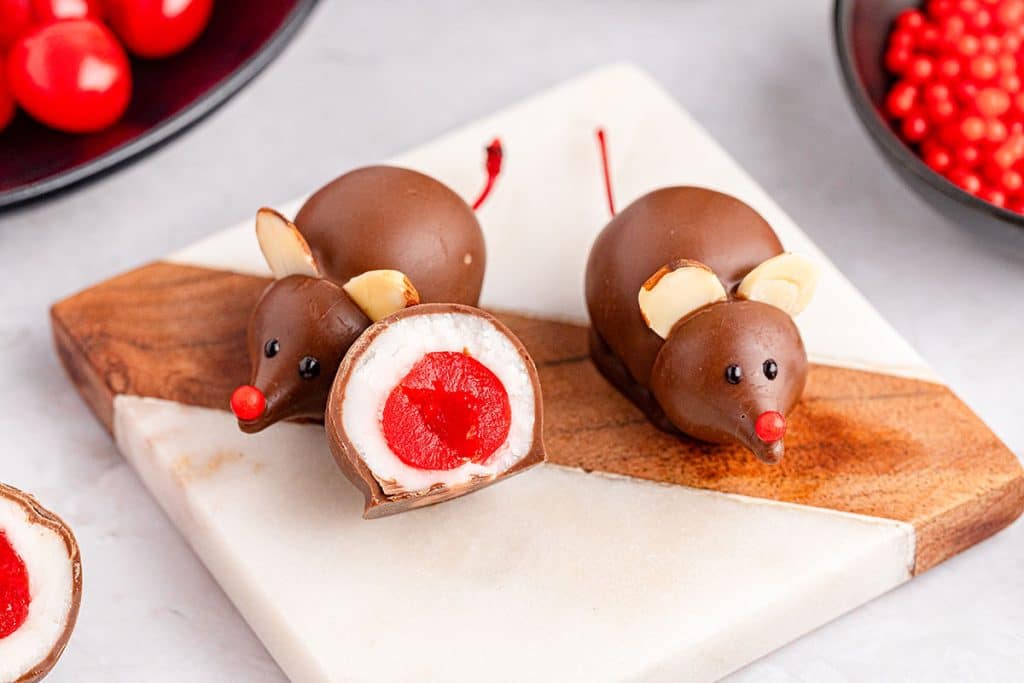
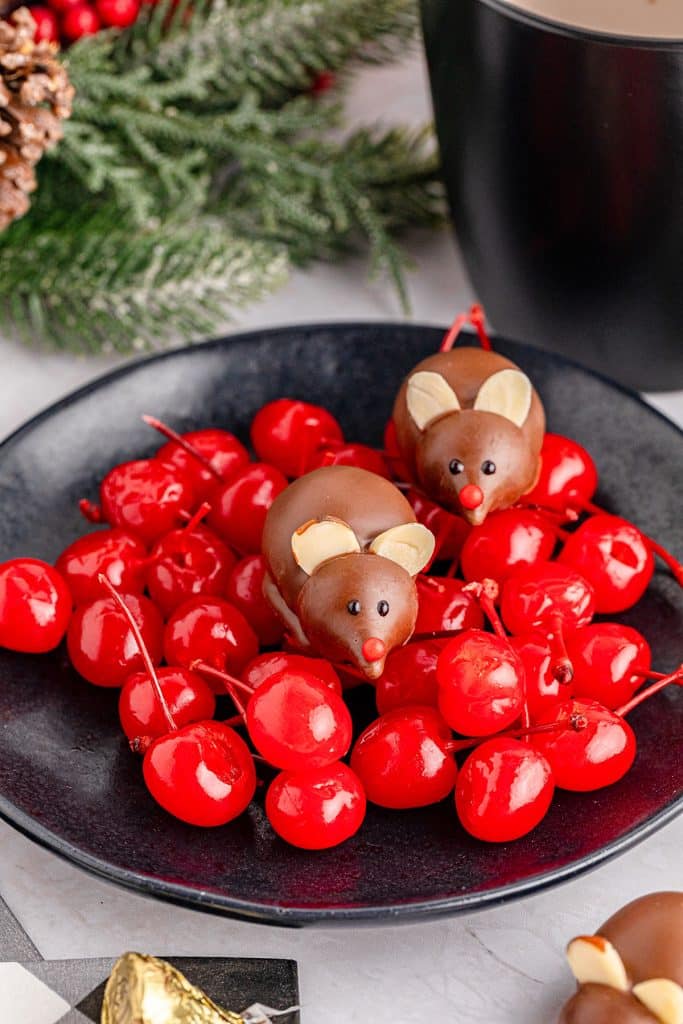
These edible chocolate-covered cherry mice are made with a maraschino cherry dipped in melted chocolate. We use a Hershey’s Kiss for the face, almond slices for the ears, and icing and sprinkles for the eyes and the nose. These fun little treats will make a whimsical addition to this year’s holiday celebrations

No Bake Chocolate Covered Cherry Mice
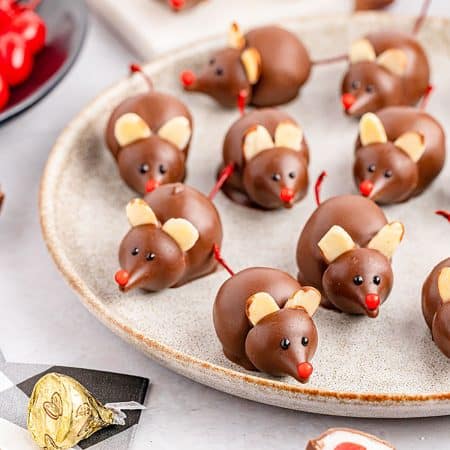
Chocolate cherry mice are just about the cutest no-bake Christmas candy anyone has ever seen! This fun treat is as adorable as it is delicious – the little face and ears are so much fun.
It’s a no-bake treat perfect for the kids to do all on their own. Younger kids might need help with the melting of the chocolate, but otherwise, it’s a great way to set them up with an activity during the holiday season!
With a little creativity, these sweet treats are equal parts craft and dessert.
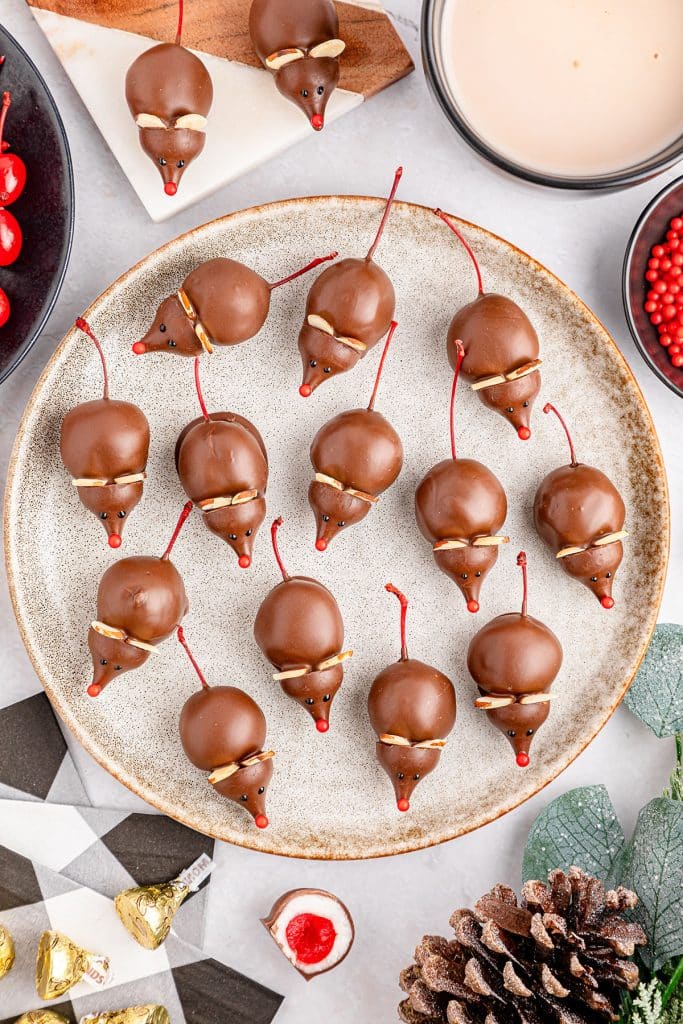
Serve these little characters as part of a holiday dessert tray or a cheese platter for a fun and playful presentation.
Why you’ll love Chocolate Cherry Christmas Mice
Stinkin’ adorable! – Kids, grandkids, and even adults love these cute little creatures. Chocolate covered cherry mice not only taste incredible but look the part too!
Easy to Make – They’re a no-bake treat that requires melting chocolate and chill time. Otherwise, it’s a simple process that I’ll walk you through step-by-step.
Make ahead – These chocolate mice need time to chill and set, so they make a great make-ahead treat. They don’t need to be kept in the fridge either and can stay out at room temperature for a while.
Tools you’ll need
- Mixing Bowls
- Decorating Tweezers – Not totally necessary but make it easy to handle all the small pieces.
- Red Sugar Pearls
Ingredients
Below is a list of the ingredients you’ll need to gather to make this recipe, why you need them, and possible substitutions. Scroll all the way down for the full recipe card with measurements.
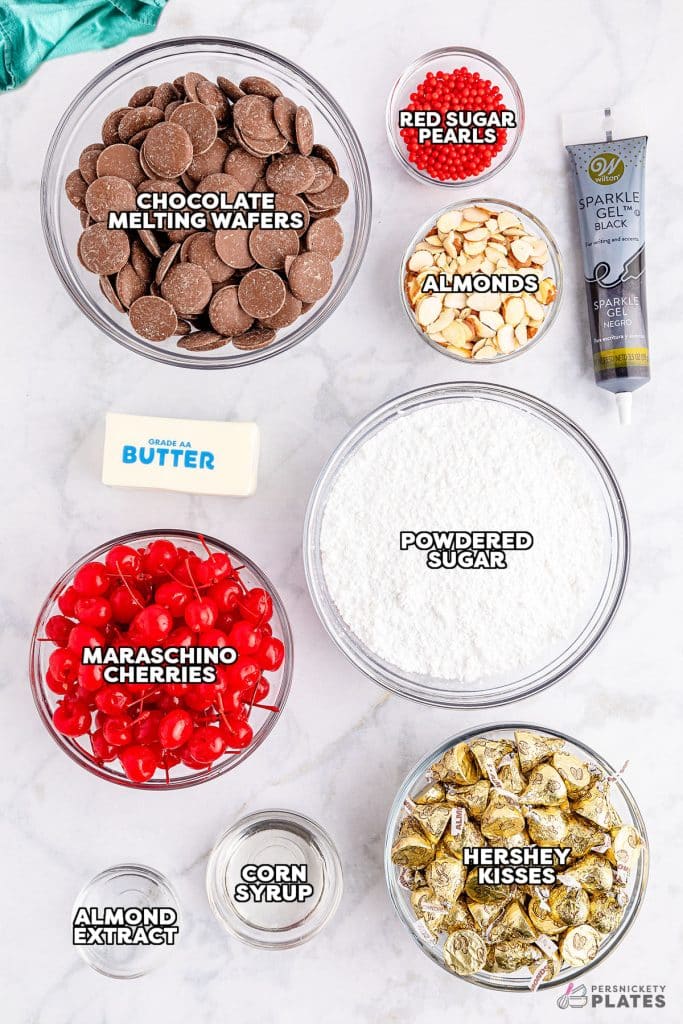
- Maraschino Cherries – Candied cherries that come in a jar (you know, the bright red ones on top of sundaes!). Be sure to drain them and dry them well before using them. Keep the stems on for the tails.
- Unsalted Butter – Bring it out to room temperature to soften. It helps to keep the dough buttery and moist.
- Corn Syrup – This will help to prevent the sugary dough from hardening. It’ll keep it nice and soft to bite into, even as it chills.
- Almond Extract – For a tasty almond flavor that pairs well with the almond ears!
- Powdered Sugar, sifted – Helps to form the sweet dough.
- Milk Chocolate Melting Wafers – Ghirardelli melting wafers (either milk chocolate or dark chocolate) are my preferred chocolate. Use premium chocolate for the best texture and flavor (I don’t recommend chocolate candy melts here or semisweet chocolate chips, they don’t melt as nicely).
- Hershey Kisses – For the adorable face! I like to use chocolate almond kisses for the heads but you can use regular chocolate.
- Slivered Almond Slices – For the ears! Peanut halves work too.
- Black Decorative Icing and Red Sugar Pearls – The eyes and the little red nose!
How to make Chocolate Cherry Mice
This section shows you how to make this recipe, with process photos showing the steps to help you visualize it. For full instructions, including amounts and temperatures, see the recipe card below.
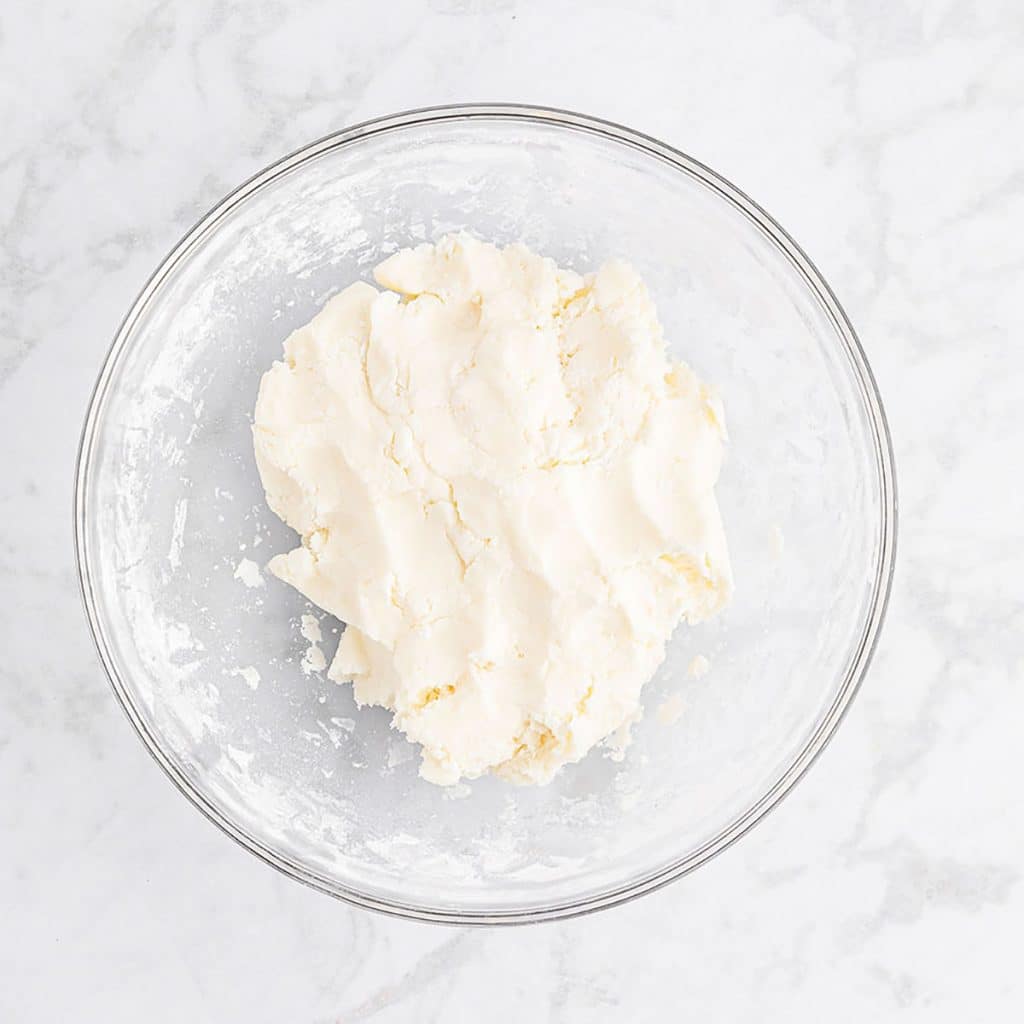
- Step 1: In a large bowl, mix the butter, corn syrup, and almond extract on medium speed until fully combined. Then, gradually add the powdered sugar and knead it until a dough forms.
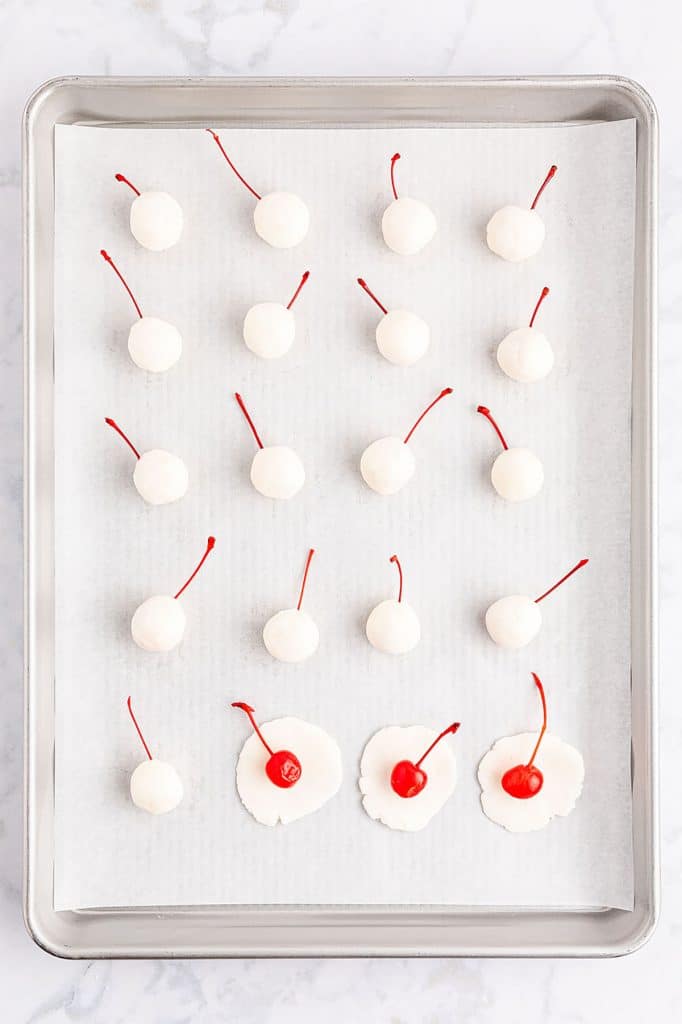
- Step 2: Pinch off about 1/2 tablespoon of dough, roll it into a ball, and flatten it into a disc. Place a cherry into the center of each disk and wrap the dough around it, keeping the stem exposed. Smooth out the dough with your hands and place them on a parchment-lined baking sheet. Chill the tray in the fridge for about 2-4 hours until they are firm.
- Step 3: Melt the chocolate in the microwave or double boiler and dip the dough-covered cherries one at a time by holding the step. Lay them on their sides on the prepared baking sheet and immediately press the flat side of the chocolate Kiss onto the opposite end of the stem for the head.
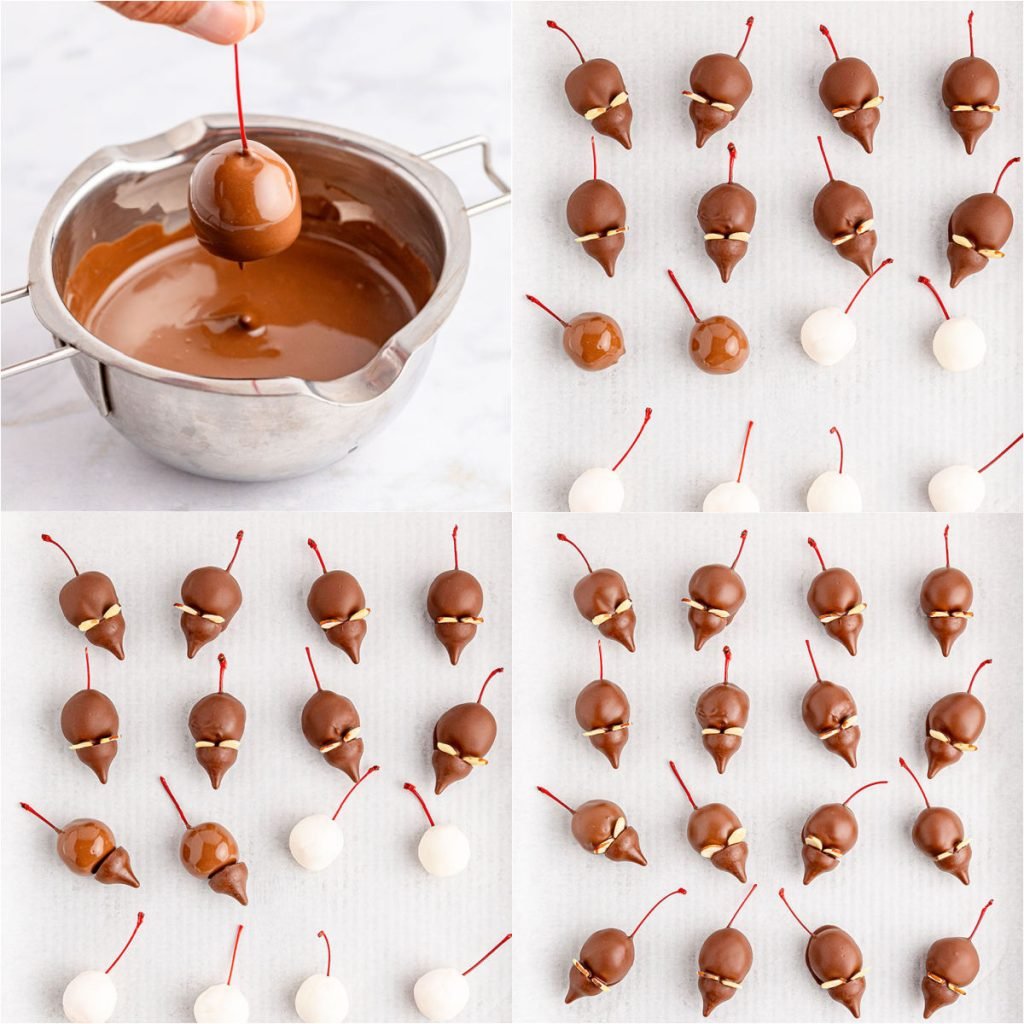
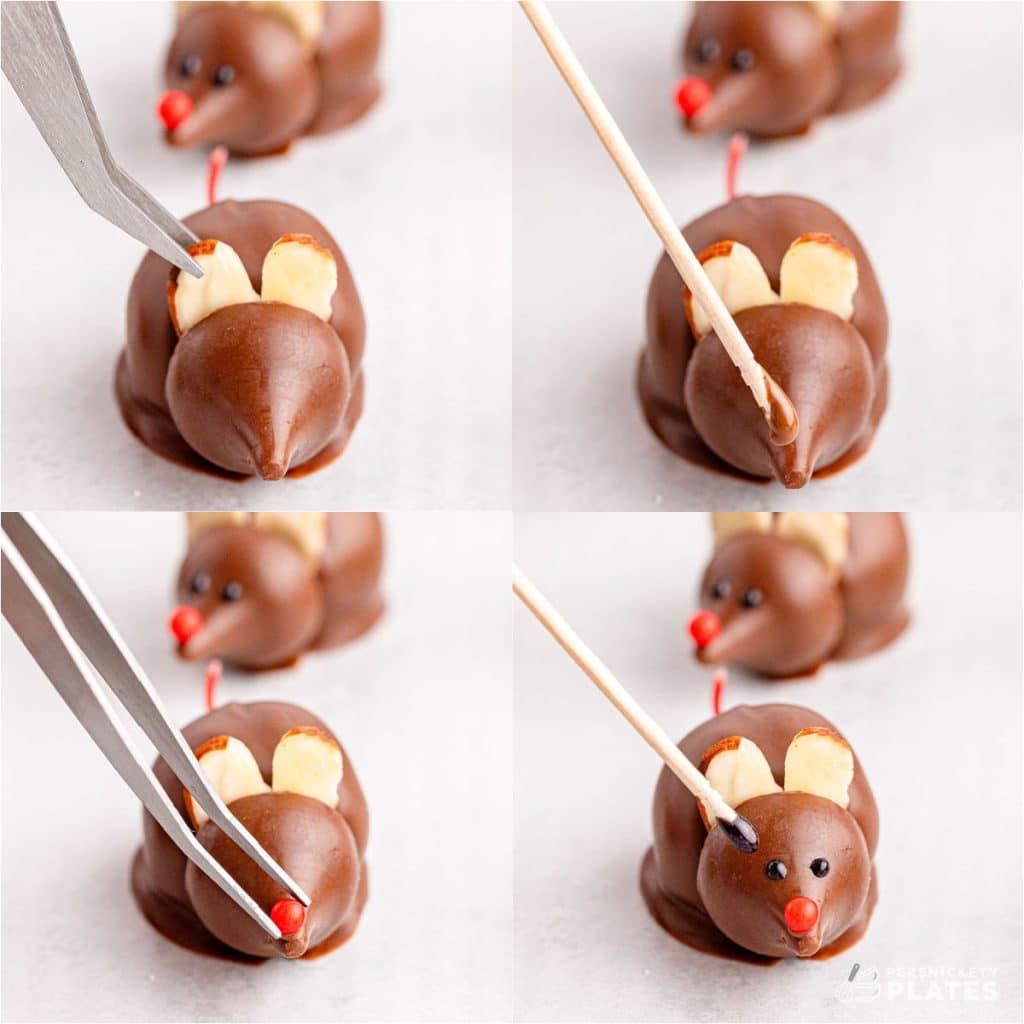
- Step 4: Place two almond slices between the cherry body and the Kiss head. Use a toothpick or skewer to dab a tiny drop of melted chocolate onto the tip of the Hershey to hold the sugar pearl for the nose. Hold it in place for a moment for it to set. Then, use decorative black icing to make two small dots for the eyes. Repeat with remaining mice and place in the fridge until you’re ready to serve them!
Tips & Suggestions 🍒
- The dough should be should be soft & pliable. If the dough is too sticky, knead in additional powdered sugar. Chilling for 5-10 minutes may also make it easier to work with.
- If melting chocolate in the microwave, make sure to use a microwave-safe bowl and heat in 30-second increments, stirring between each, until smooth.
- Using a double boiler or candy melter is preferred so the chocolate doesn’t set as you’re working through dipping the cherries.
- Any flavor of Hershey Kiss can be used, just make sure the “head” matches the chocolate “bodies”.
- Use white chocolate melts for white chocolate cherry mice!
- Candy eyeballs, chocolate drops, or black icing can be used for the eyes.
- Almond extract can be omitted but it pairs well with the almond Kisses. Other options are coconut or vanilla extract.
How to store
How to store leftovers
While these little guys can stay out on the counter, in a cool dry place, for a few days, you’ll need to keep the chocolate covered cherry mice in an airtight container in the fridge for a longer period. Especially if your place is warm.
How long will chocolate cherry mice last in the fridge?
You’ll have plenty of time to enjoy them. They’ll be good for up to 3 weeks!
Can I freeze chocolate mice?
It’s not recommended. Once the chocolate thaws it may start to sweat and too much moisture can ruin the decorative icing and the texture of the dough may be altered as well.
FAQs
Here’s the thing. Technically you can. They’ll be juicier and not quite as sweet, but will still be delicious. The problem is when you take out the pits, you’ll most likely end up removing the stems. In this case, you’ll need to find a replacement for the tails. Maybe some black licorice?
So, yes, it’s possible, but won’t be as easy to deal with!
Omit the almonds and use mini marshmallows instead! They’ll be just as adorable!
You don’t have to. I think they add not only to the taste of the chocolate cherry mouse but they help to bulk up the body. If you want to just coat the cherries in chocolate, you’ll want to replace the Hershey’s Kisses with chocolate chips so the head isn’t so big!
The mouse character can be found in all sorts of Christmas stories. Such as the Christmas Mouse, The Nutcracker, and the Mouse King, and of course the famous line, ‘Twas the night before Christmas when all through the house, not a creature was stirring, not even a mouse!
Need more Christmas character recipes? Try these:
Click here for my entire collection of Christmas recipes.
Chocolate Cherry Mice
Ingredients
- 20 ounces maraschino cherries with stems well drained and dried
- ¼ cup unsalted butter softened to room temperature
- 3 tablespoons corn syrup
- 1 teaspoon almond extract
- 2 ½ cups powdered sugar sifted
- 10 ounce milk chocolate melting wafers
- 30 milk chocolate almond Hershey’s Kisses unwrapped, for the heads
- almond slices for the ears
- black decorative icing for the eyes
- red sugar pearls for the nose
Instructions
- Line two baking trays with parchment paper and set aside.
- In a large bowl, add the butter, corn syrup, and almond extract. Use a hand mixer on medium speed to mix until smooth and fully combined.¼ cup unsalted butter, 3 tablespoons corn syrup, 1 teaspoon almond extract
- Gradually add the powdered sugar into the bowl and knead together until a soft dough forms.2 ½ cups powdered sugar
- Pinch off approximately ½ tablespoon of dough, roll into a ball, then flatten the balls in the palms of your hands to form discs.
- Place a maraschino cherry into the center of the disc and wrap the dough around it, keeping the stems exposed.20 ounces maraschino cherries with stems
- Gently roll each ball in the palms of your hands to smooth, being careful not to break off the stems (the "tails"). Repeat with the rest of the cherries, placing them on the prepared baking sheet as you finish.
- Once done, move the tray to the fridge to chill until firm, about 2-4 hours.
- Once firm, melt the milk chocolate wafers until smooth (either in the microwave in 30 second increments, in a double boiler, or a candy melting pot over low heat).10 ounce milk chocolate melting wafers
- One at a time, holding gently by the stem, dip each cherry into the melted chocolate.
- Lay the dipped cherry on its side on the prepared baking sheet.
- Immediately, before the chocolate sets, press the bottom of a Kiss onto the opposite side of the stem for the head.30 milk chocolate almond Hershey’s Kisses
- Place two almond slices between the cherry body and the Kiss head for the ears.almond slices
- Repeat the process for the rest of the cherries.
- Once you are done creating the bodies, decorate the faces.
- Use a toothpick or skewer, dab a tiny drop of melted chocolate onto the tip of the Kiss to hold on a red sugar pearl for the nose. Hold in place for a moment to allow the chocolate to set.red sugar pearls
- Next, use black decorative icing to dot two eyes onto the Kiss.black decorative icing
- Repeat with the rest of the mice and then refrigerate until ready to serve.
Notes
- Ghirardelli melting wafers (either milk chocolate or dark chocolate) are my preferred chocolate. Use a premium chocolate for the best texture and flavor (I don’t recommend chocolate candy melts here).
- Dough should be soft and flexible—add powdered sugar if it’s too sticky, or chill briefly to make it easier to handle.
- If melting chocolate in the microwave, make sure to use a microwave safe bowl and heat in 30 second increments, stirring between each, until smooth.
- A candy melter or double boiler helps keep chocolate smooth and warm while you dip the cherries.
- Any flavor Hershey Kiss can be used, just make sure the “head” matches the chocolate “bodies”.
- Candy eyeballs, chocolate drops, or black icing can be used for the eyes.
- Almond extract adds nice flavor with almond Kisses, but vanilla or coconut extract are good swaps.
- Store leftovers covered in the fridge for up to 3 weeks.
Nutrition
Nutritional information is an estimate and provided to you as a courtesy. You should calculate the nutritional information with the actual ingredients used in your recipe using your preferred nutrition calculator.


This so easy & show stopper!!
Thanks Mary Ann!
Chocolate cherry mice are delicious. Better then store bought chocolate covered cherry. Plan to make more soon