


Skip the store-bought crust and make an easy homemade Oreo pie crust with just 2 simple ingredients. Its chocolate flavor and stable structure hold up to all kinds of fillings – perfect for baking or no bake pies!

An easy 2-ingredient Oreo pie crust is like a gift to those of us who struggle with traditional pie doughs. It’s also a gift to those of us who just love chocolate and Oreo cookies!
It’s made with the whole Oreo cookie pulsed into fine crumbs and combined with melted butter. That’s it! It’s one I’ve used over and over again for things like Oreo magic bars, cookies and cream cheesecake, and easy chocolate cream pie.
It gives desserts an extra crunch, a familiar chocolaty flavor, and a way out of mixing, rolling, and worrying about getting it just right.
Although a flaky pie crust is kind of amazing, sometimes you just want something quick and easy and basically foolproof.
Oreo Cookie Pie Crust

Why you’ll love this recipe
- It’s just 2 ingredients!
- You can bake it or make it a no-bake Oreo pie crust.
- It holds together well and makes a great base for all kinds of desserts.
- A crust that tastes like Oreo cookies is always a win!

Helpful Tools
- 9-inch pie plate or springform pan
- Food processor – I have this mini one & it works well while not taking up a ton of room
- Rolling pin – smashing the cookies with a rolling pin also works well
Ingredients
Below is a list of the ingredients you’ll need to gather to make this recipe, why you need them, and possible substitutions. Scroll all the way down for the full recipe card with measurements.
Jump- Oreo cookies – You’ll need 24 cookies pulsed to fine crumbs. Throw the whole cookies in, creamy centers included.
- Salted butter – Melted butter provides moisture and holds the crust together. I like to use salted for a bit of balance, but you can use unsalted.

How to make an Oreo Pie Crust
This section shows you how to make this recipe, with process photos showing the steps to help you visualize it. For full instructions, including amounts and temperatures, see the recipe card below.
Jump- Step One: Pulse the Oreo cookies in a food processor until they become fine crumbs. You may need to work in batches. Or, use a rolling pin in a zip top bag to crush the cookies.


- Step Two: Pour the crumbs into the melted butter and stir until the crumbs are moist.


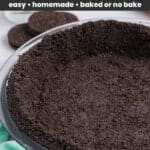
- Step Three: Then, transfer that mixture into the pie plate. Use a flat bottom glass to gently press the crust down, ensuring it’s level, but not overly compacted.

- Step Four: Bake in a preheated 325°F oven for 10 minutes. Set it out on the counter and let it cool completely before adding any filling.

Ways to Use Oreo Pie Crust
Among other desserts, I’ve used it for a no-bake chocolate lush and a triple chocolate cheesecake. It’s also great for things like fruit tarts, banana pudding pie, peanut butter pie, etc. Basically all the pie.
- This recipe makes enough pie crust to fill a 9” springform pan or a 9” pie plate.
- Turn this into a no-bake pie crust by chilling it in the fridge for an hour instead of baking it.
- Double the recipe and use a 9×13 baking pan.
- Salted butter is what I use to balance the sweetness, but, if preferred, unsalted works too.
- Making crumbs for the crust without a food processor can be done. Place them in a zip top bag, get rid of excess air, seal it, and then use a rolling pin to crush them into fine crumbs.
- Oreo crumbs are dark, so it’s hard to tell when it’s been baking for too long. Keep an eye on it, and take it out once the baking time is up.
- Swap the regular Oreos for mint Oreos or peanut butter Oreos for a different flavor.

Make ahead & Freezing
How to store Oreo pie crust
If you’re just getting ahead on your preparation and don’t need to use the crust just yet, you can keep it refrigerated, covered, for up to 3 days in advance.
Freezing Instructions
If you’re really on the ball and making crusts just to keep handy for later on, freeze your Oreo pie crust for up to 3 months. Just be sure to thaw it before using it – set it on the counter to thaw at room temperature.
FAQs
Can I double the recipe?
Absolutely. You can make two separate crusts or use a larger 9×13 dish.
Would this work using gluten-free Oreos?
I have never tried, but I don’t see why it wouldn’t.
Why did my crust turn out so hard?
This is usually because it’s been packed down too much. You want to gently pack it down to level it out, but if you overdo it, the crust will be quite hard.


Oreo Pie Crust
Equipment
- 9" Pie Plate
Ingredients
- 5 Tablespoons (71 g) salted butter melted
- 24 Oreo cookies fine crumbs
Instructions
- Preheat the oven to 325°F and set out a 9" pie plate.
- In a medium microwave safe bowl, add the butter and heat in the microwave in 20 second increments until melted.5 Tablespoons salted butter
- Add 24 Oreo cookies to a food processor, work in batches if necessary – don't overcrowd – and crush into a fine crumb.24 Oreo cookies
- Pour the crumbs into the melted butter and stir until fully moistened.
- Pour the crumb mixture into the pan and use the bottom of a flat glass to gently press it in evenly. Don't overpack it.
- Bake for 10 minutes and then remove and set on the counter to cool.
Notes
- Makes enough for a 9″ springform pan or pie plate.
- For no-bake version: chill in fridge 1 hour instead of baking.
- Double the recipe for a 9×13 pan.
- Salted butter balances sweetness; unsalted works if preferred.
- No food processor? Crush cookies in a sealed zip-top bag with a rolling pin.
- Dark Oreo crumbs make it hard to judge doneness—bake for exact time.
- Try flavor twists with mint or peanut butter Oreos.
Nutrition
Nutritional information is an estimate and provided to you as a courtesy. You should calculate the nutritional information with the actual ingredients used in your recipe using your preferred nutrition calculator.
Did you make this recipe?
Tag me on Instagram @melissa_pplates so I can see!Did You Make This?
If you made this recipe, I’d love to know how it went in the comments section below.
You can also tag me on Instagram – @melissa_ppplates or share a pic in the Persnickety Plates Community Facebook group. I love seeing what you’ve tried!


So simple! Will make excellent crust for marble pie. Going to make a marble crust too, using golden Oreos.
So funny, my 10 year old suggested the same when she saw me working on it!