


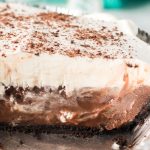
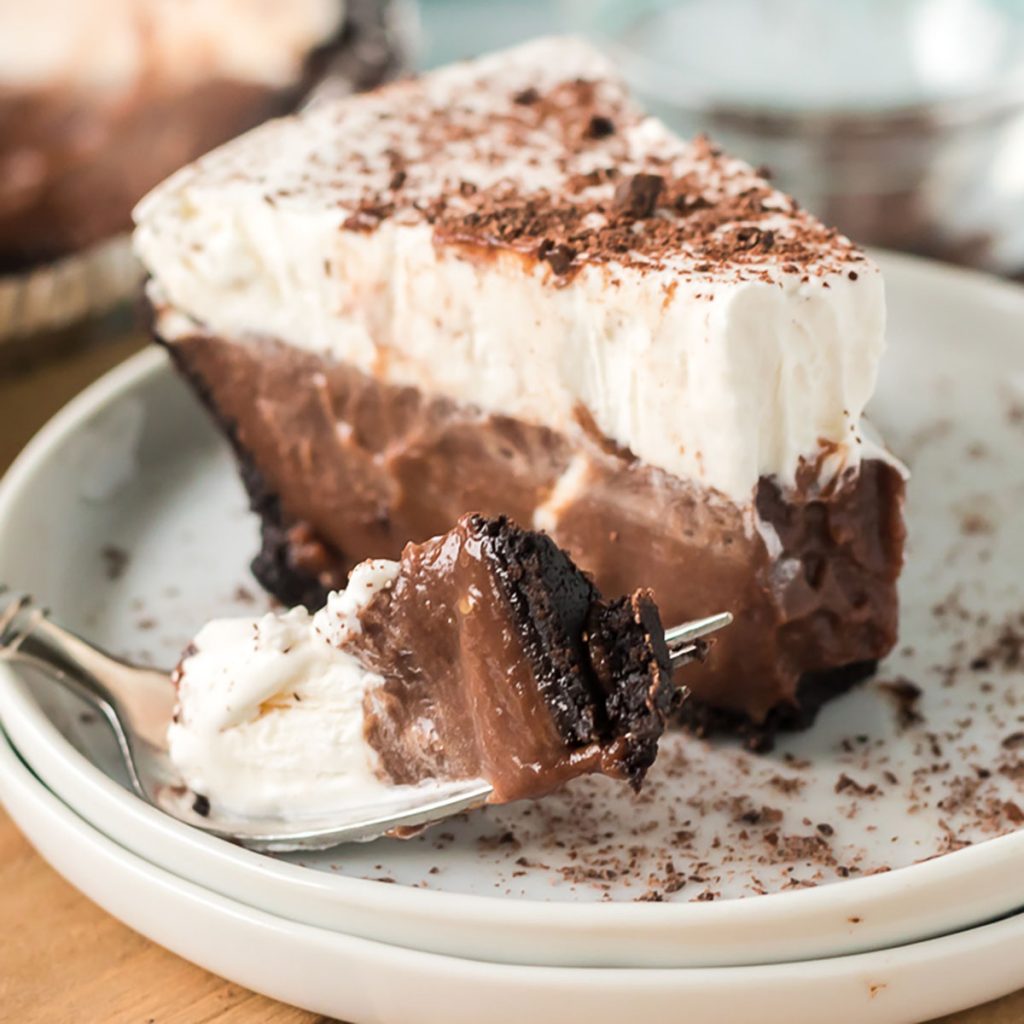
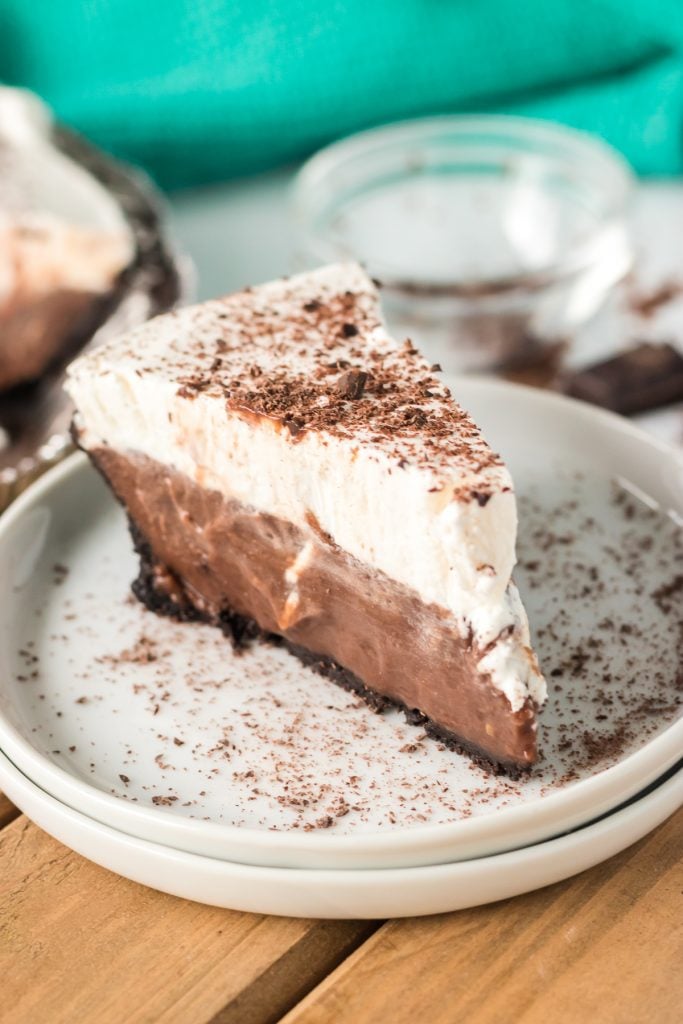
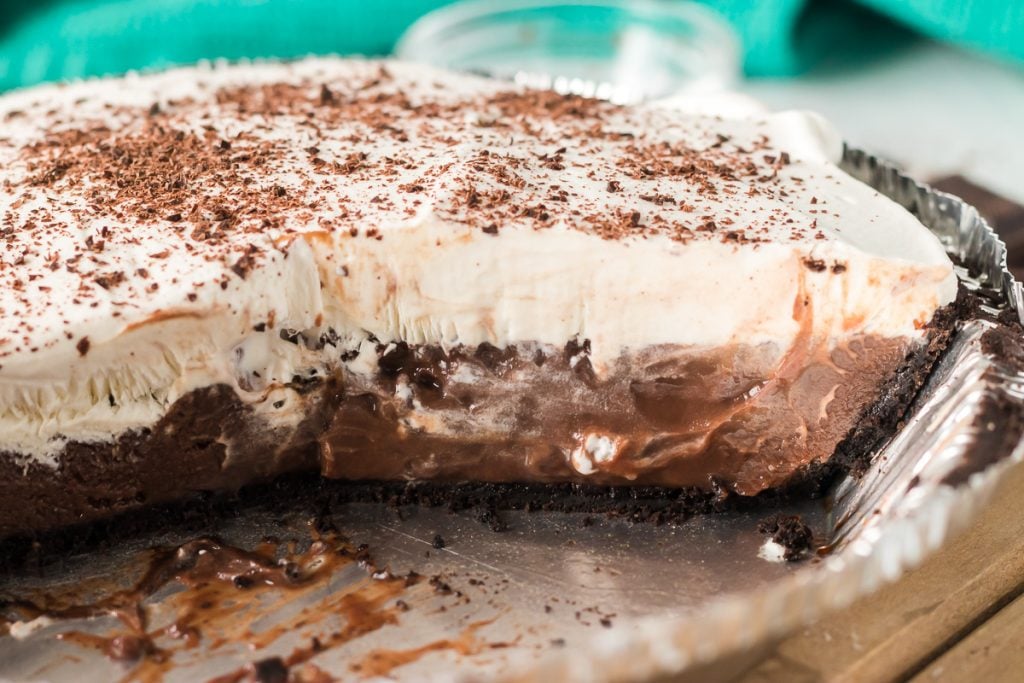
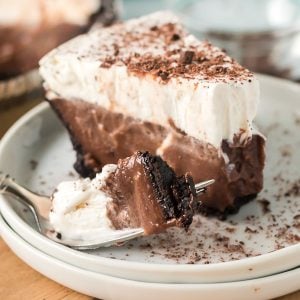
Easy Chocolate Cream Pie is a delicious, chocolatey vintage dessert sure to please the whole family! Homemade chocolate pudding topped with homemade whipped cream in an Oreo pie crust makes a cold, creamy dessert that is perfect for chocolate lovers.
Click HERE to save recipe to Pinterest
This easy chocolate pie feels so rich and decadent, you won’t believe how easy it is to put together. For more easy chocolate desserts try my Chocolate Lush, Hot Chocolate Poke Cake, or Oreo Dirt Pudding.
I love a no bake recipe in the warmer months (and the cooler months…who am I kidding). This pie is essentially chocolate pudding made from scratch on the stovetop, inside an Oreo crust, topped with homemade whipped cream. It is very easy to make, but also a lil fancy looking.
TIPS & SUGGESTIONS
This no-bake chocolate cream pie is really easy to make and perfect to serve to a group. The pudding filling and whipped cream topping are made from scratch but I took a shortcut with the crust and bought premade.
- An Oreo crust is really easy to make if you want to go totally homemade. Or, if you want to take the chocolate down a notch, you could also use a graham cracker crust (like in my lemonade pie) or traditional pie crust.
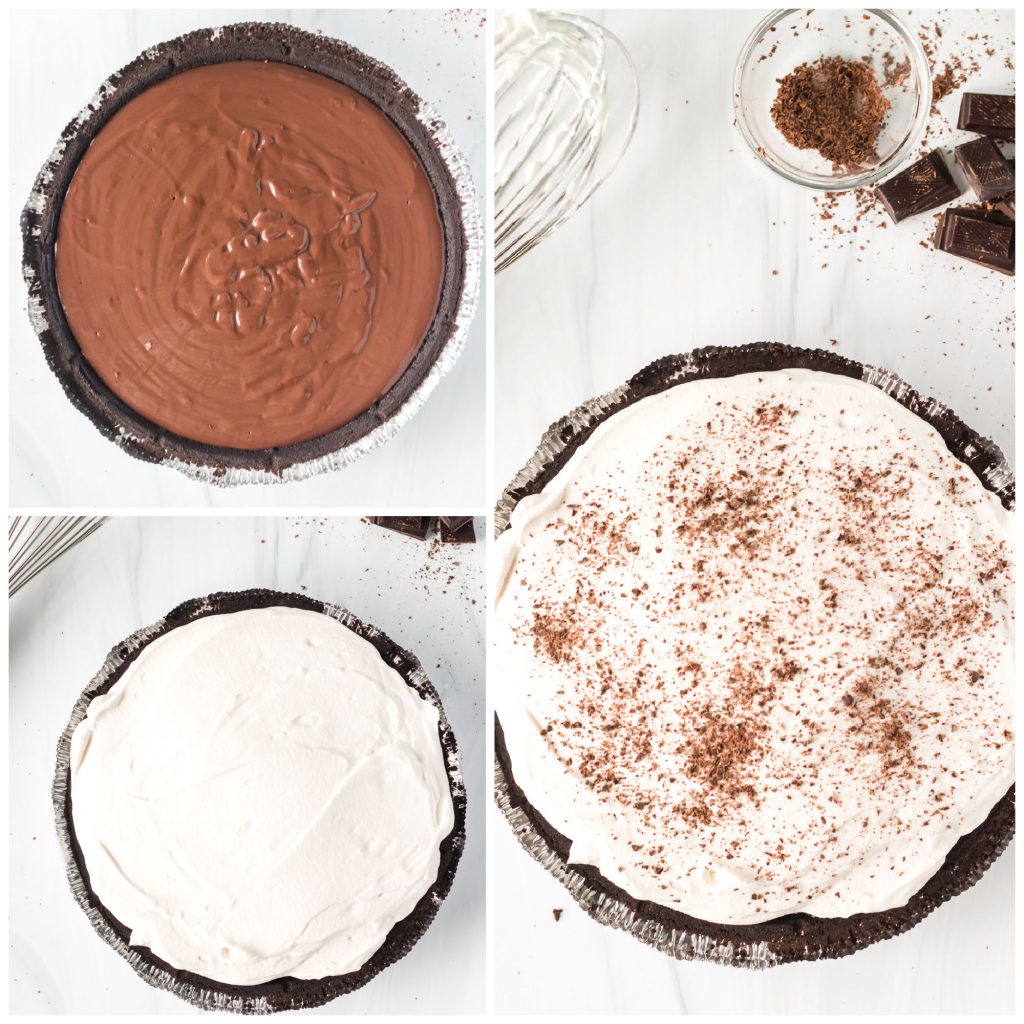
- I topped mine with grated dark chocolate to keep things simple, but you can also do chocolate shavings, mini chocolate chips, or chocolate sauce.
- While this pie recipe is no-bake, you do need to allow time for the pudding layer to set. It will need at least 4 hours in the fridge, but I prefer to make the chocolate layer and let it set overnight, then top with the whipped cream the next day.
- To make slicing easy and clean, run your knife under hot water and wipe clean with a paper towel between slices.
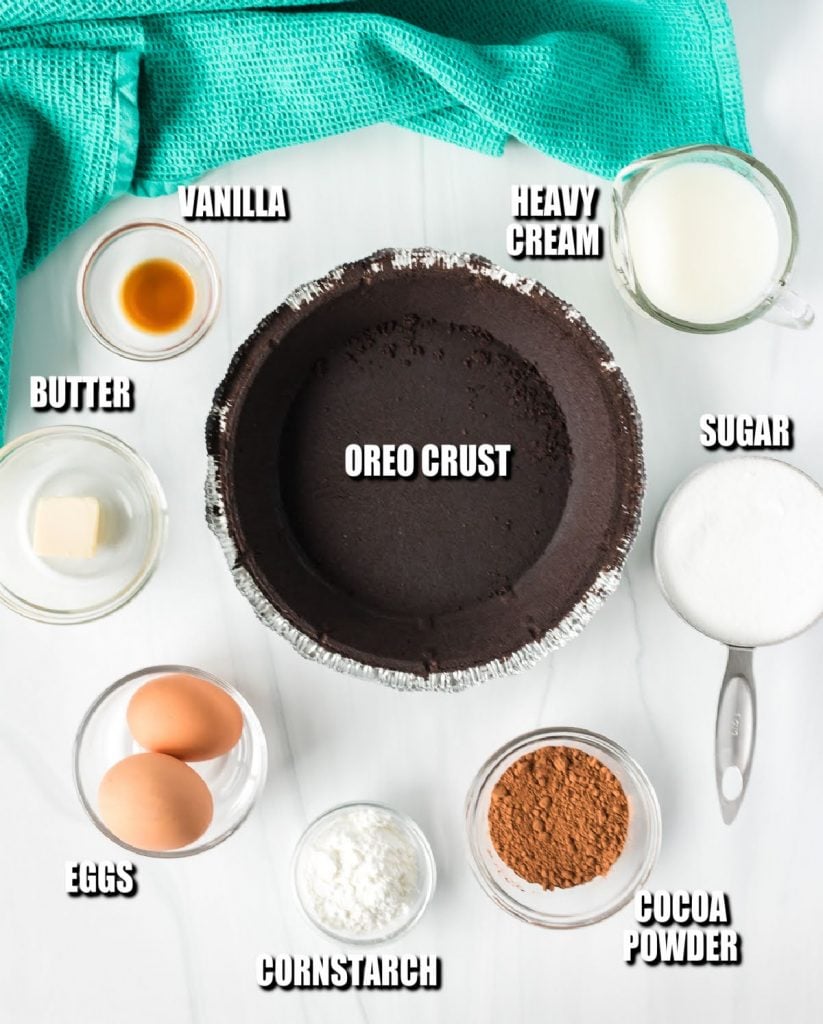
CHOCOLATE CREAM PIE INGREDIENTS
Most of the ingredients needed are pretty common and may already be in your kitchen but in case they aren’t, lets go over some of them them that may be less familiar to you. Scroll down for the full recipe card.
UNSWEETENED COCOA POWDER – Cocoa powder by itself is a bitter powder that’s made by grounding cocoa beans. It’s when you mix it together with other ingredients that the real magic happens.
CORNSTARCH – Cornstarch is a thickening agent made from corn and is commonly used in puddings, pies, and gravies. It helps to thicken this chocolate cream pie.
EGG YOLKS – Save the egg whites for another recipe!
UNSALTED BUTTER – You will want to make sure you use unsalted butter so your pie doesn’t end up with a salty flavor. If you use salted butter, make sure to exclude pinch of salt from recipe.
HEAVY WHIPPING CREAM – This can be found either by the milk or the coffee creamers as it is used to cream coffee. You only need a cup so save the rest for peaches and cream ice cream pie.
TOOLS FOUND ON AMAZON TO HELP YOU
- Pie Plate – If you’re not using a premade crust (which comes in its own tin), a 9″ pie plate would be perfect for this dessert. If you want to keep leftovers in the same pan, you can find several inexpensive ones with an airtight lid.
- Silicone Spatula – Silicon spatulas are really nice because they flex to your bowl perfectly to get every last drop of filling out of the bowl and into the pie plate.
- Whisk – You’ll need a whisk both for the pudding layer & the whipped cream layer.
HOW TO MAKE CHOCOLATE CREAM PIE
Luckily, making this pie is really easy because everyone loves it and it gets eaten really quickly. There are just 3 steps, although you do need to allow time to chill the pie.
STEP ONE – Make the pie crust. If you’re making a pie crust from scratch, do that first and let it cool completely. If you’re using a premade crust like I did, you’re ready for step 2!
STEP TWO – Make the chocolate pudding filling. Make the chocolate pudding from scratch. Whisk together sugar, cocoa powder, cornstarch, and salt in a saucepan, then add milk, egg yolks and butter. It doesn’t take long to thicken, but once it does, pour it into the pie crust and chill it in the fridge for at least 4 hours so it can firm up.
STEP THREE – Make the whipped cream topping. Once firm, make the whipped cream by whisking heavy cream, sugar, and vanilla in a cold bowl until stiff. Spread the whipped cream in a thick layer over the chocolate layer. Finish off your chocolate pudding pie with some grated chocolate.
HOW DO YOU THICKEN CHOCOLATE CREAM PIE FILLING?
The chocolate pudding filling gets nice and thick thanks to the egg yolks and cornstarch. It will set and firm up as it chills in the fridge.
WHY IS MY PIE RUNNY
If your chocolate pie is runny, you likely didn’t cook the pudding long enough to let it coagulate. This happens right around 160 degrees. You also don’t want to overcook the filling. Using a thermometer can be helpful, especially if this is your first time trying it out.
MAKE AHEAD, STORAGE, AND FREEZING
Make Ahead: Make the crust up to a couple days in advance if you’re making it from scratch and store it in the fridge. Make the chocolate cream pie filling (pudding) up to a day in advance. Finish the whole pie a couple days before serving if needed.
Storage: Once the pie is fully prepared, carefully cover and store in the fridge for up to 5 days. Same goes for leftovers.
Freezing: This pie can be frozen for up to 3 months. When ready to eat it, move it to the fridge to thaw before slicing. I actually prefer to serve it cold from the freezer.
MORE EASY NO BAKE DESSERT RECIPES
- Frozen Peanut Butter Pie
- Golden Oreo Sand Pudding
- Chocolate Peanut Butter Eclair Dessert
- Chocolate Peanut Butter Cornflake Cookies
- Oreo Balls

CONNECT WITH PERSNICKETY PLATES!
Follow along on my social media so you never miss a post!
Facebook | Twitter | Pinterest | Instagram
I made a fun group on Facebook for sharing recipes, asking questions, and talking about food. I’d love to have you! Request to join HERE.
Also, sign up to receive an email in your inbox for each new recipe:
FREE EMAIL SUBSCRIPTION & EBOOK
If you MAKE & LOVE this recipe, share it on Instagram and tag me @melissa_pplates and/or #persnicketyplates so I can see it. I LOVE seeing what you make & I’ll share it in my stories!
It is VERY HELPFUL to me and other readers if you leave a review after you make my recipe. Please come back & let me know how it turned out!
Easy Chocolate Cream Pie
Ingredients
For the Chocolate Pudding Layer
- 1 cup granulated white sugar
- 4 Tablespoons unsweetened cocoa powder
- 2 Tablespoons cornstarch heaping
- 2 large egg yolks
- 2 ½ cups milk
- 1 Tablespoons unsalted butter
- 1 tsp vanilla extract
- 1 pinch salt
For the Whipped Cream
- 1 cup heavy whipping cream
- 2 Tablespoons granulated white sugar
- 1 ½ Tablespoon vanilla extract
For the Crust
- 9 inch Oreo pie crust or your favorite homemade crust
Instructions
For the Chocolate Pudding Layer
- In a medium saucepan, whisk together the sugar, cocoa powder, cornstarch and salt. Add the the milk, egg yolks, and butter over medium heat and cook until thickened.1 cup granulated white sugar, 4 Tablespoons unsweetened cocoa powder, 2 Tablespoons cornstarch , 2 large egg yolks, 2 ½ cups milk, 1 Tablespoons unsalted butter, 1 pinch salt
- Remove from heat then stir in the vanilla. Pour the pudding into a 9" prebaked Oreo pie crust. Cover lightly and move to the fridge to set for at least 4 hours. I let mine chill overnight.1 tsp vanilla extract, 9 inch Oreo pie crust
For the Whipped Cream
- Once your chocolate pudding layer is firm, make the whipped topping.
- To a cold mixing bowl, add the heavy whipping cream and mix with a hand mixer on medium for 1-2 minutes (or whisk vigorously). Add in the sugar and vanilla extract and continue mixing until stiff peaks form. This should take 2-3 minutes.1 cup heavy whipping cream, 2 Tablespoons granulated white sugar, 1 ½ Tablespoon vanilla extract
- Spread the whipped cream over the chocolate layer and top with grated chocolate shavings.
Notes
- Use a premade Oreo crust or homemade Oreo, graham cracker, or traditional pie crust.
- I use low fat 1% milk. 2% or whole milk will work as well.
- Cover gently and store in the fridge for up to 5 days.
- Prepared pie can be covered and frozen for up to 3 months. Once ready to serve, move to the refrigerator to thaw.
Nutrition
Nutritional information is an estimate and provided to you as a courtesy. You should calculate the nutritional information with the actual ingredients used in your recipe using your preferred nutrition calculator.
Did you make this recipe?
Tag me on Instagram @melissa_pplates so I can see!This recipe first appears on Yellow Bliss Road.


My pie is runny but I know I cooked it for the appropriate time, what could I do? Would freezing it work??
Yep, pop it in the freezer. I actually prefer it that way 🙂
The pudding was not thick enough even though thermometer was at 162. I saw a comment about freezing it so I did that. Seeing that it is a little runny should I move it to refrigerator before serving 16 hours from now? Or straight from freezer and slice? Never had a pudding recipe come out runny. I did double it for 2 pies.
I move it from the freezer to fridge a couple hours before serving.