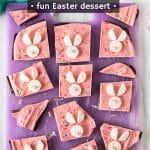
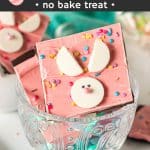
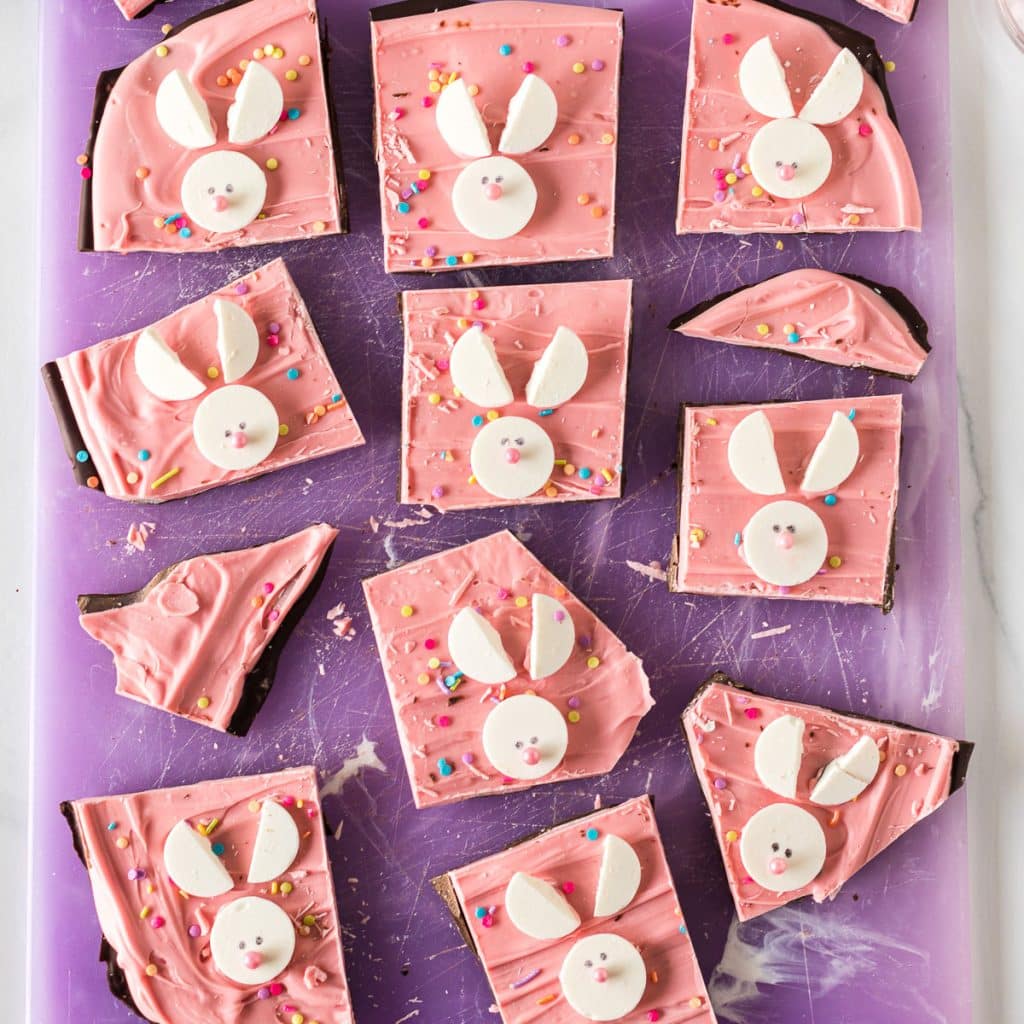
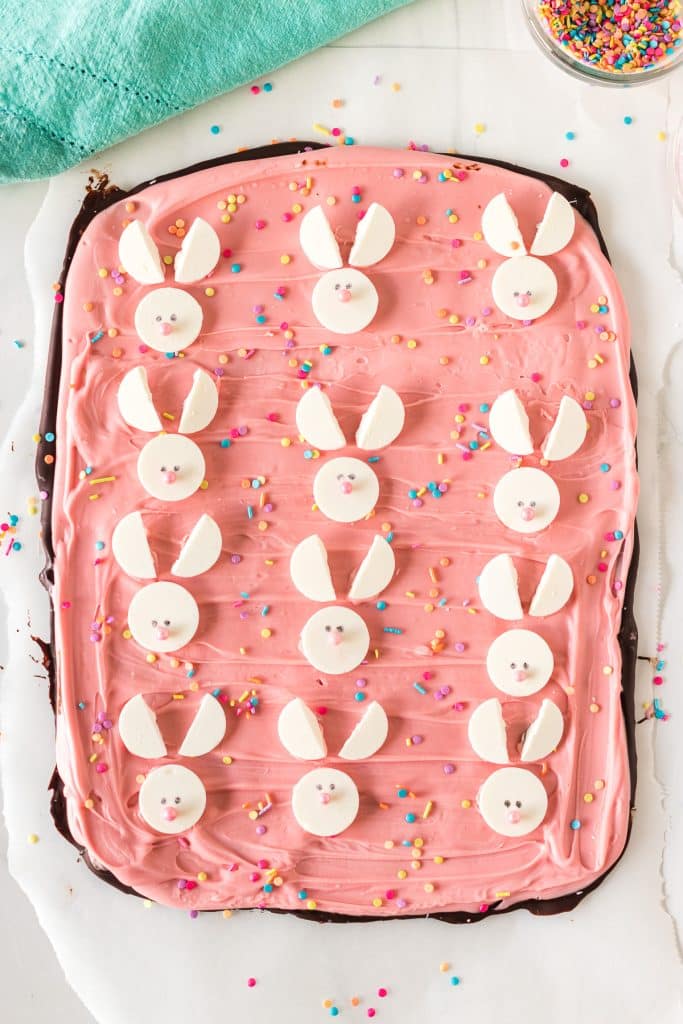
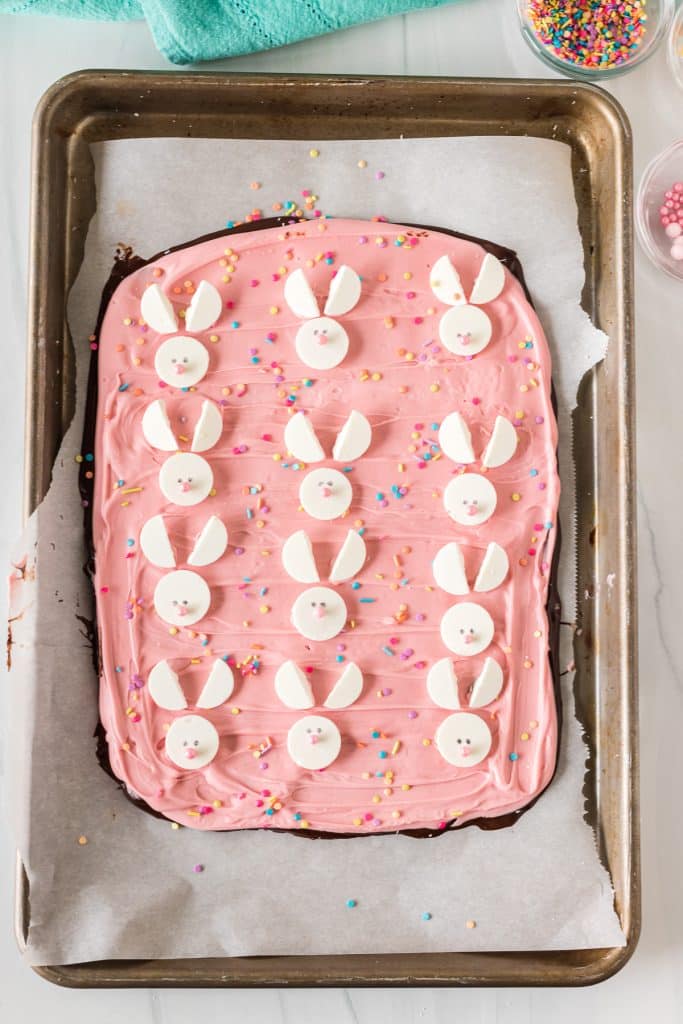
Easy Easter bunny bark is a festive, no-bake treat that starts with a layer of chocolate, topped with a layer of melted pink candy wafers, and decorated with bunnies made out of white candy melts with pastel-colored pearl sprinkle noses.
Made with just a few ingredients and 10 minutes of prep time, Easter bark is fun for the whole family and makes an adorable gift idea too!
Easter Bunny Bark
Easy Easter bark is all done in the microwave and made with a handful of ingredients making this a no-bake easy dessert treat that even the kids can make on their own.
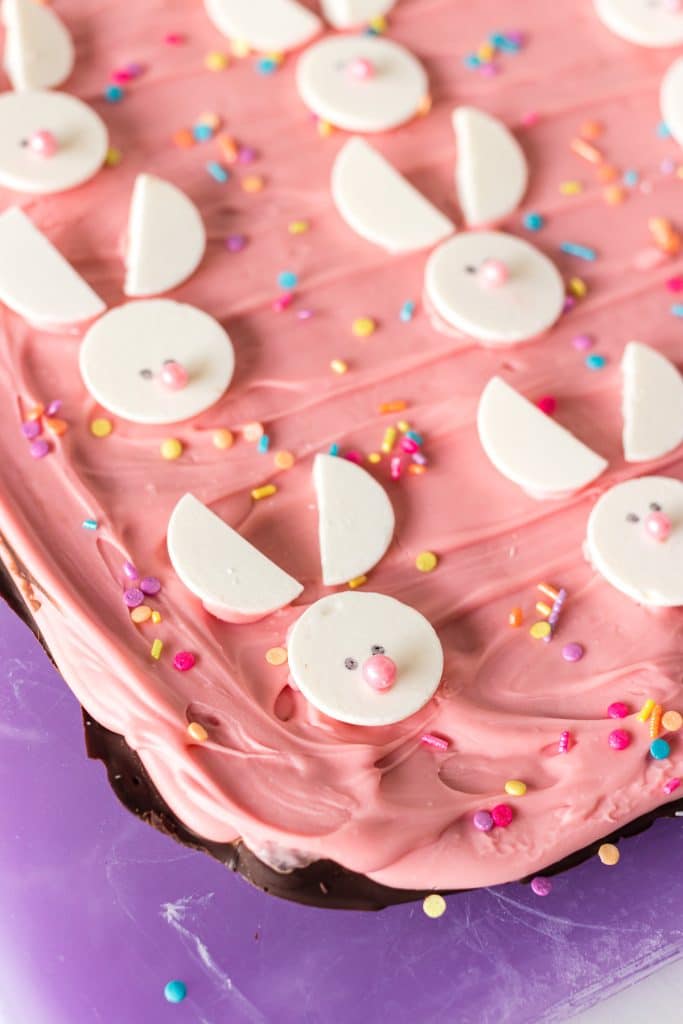
Each piece of chocolate bark is adorned with an adorable bunny rabbit and yummy sprinkles. I used chocolate for the base then added a layer of pink candy melts on top.
White candy melts are used to form the bunny face and ears, and sugar pearls for the noses. I used a black food coloring pen to add eyes, but they’re just as cute without them.
Honestly, there are so many different ways you could decorate yours.
Add extra candies, chocolates, and sprinkles to yours! Feel free to get creative with it!
Easter bunny bark, like Easter bunny dessert cheese ball and Easter chick dipped wafer cookies, is basically an Easter craft activity you can eat!
Why you’ll love Easy Bunny Bark
- Fun for the whole family – This is a kitchen activity that parents and kids can take part in! It’s so easy, even older siblings can guide the younger kids while you sit back and watch.
- They make great gifts – Once set, you can wrap them in cellophane bags or place them in sandwich bags to give as party favors or to pack in a school lunch bag.
- Super simple – With just 4 simple ingredients, no use of the stove or oven, and 10 minutes of prep time, this is one of those quick and easy easter treats you’ll keep coming back to.
- Customizable – You can decorate your Easy bunny bark any way you want! I love to keep it simple so the cute bunny doesn’t get lost in all the extra add-ons, but you do you!
Helpful Tools
Ingredients
Below is a list of the ingredients you’ll need to gather to make this recipe, why you need them, and possible substitutions. Scroll all the way down for the full recipe card with measurements.
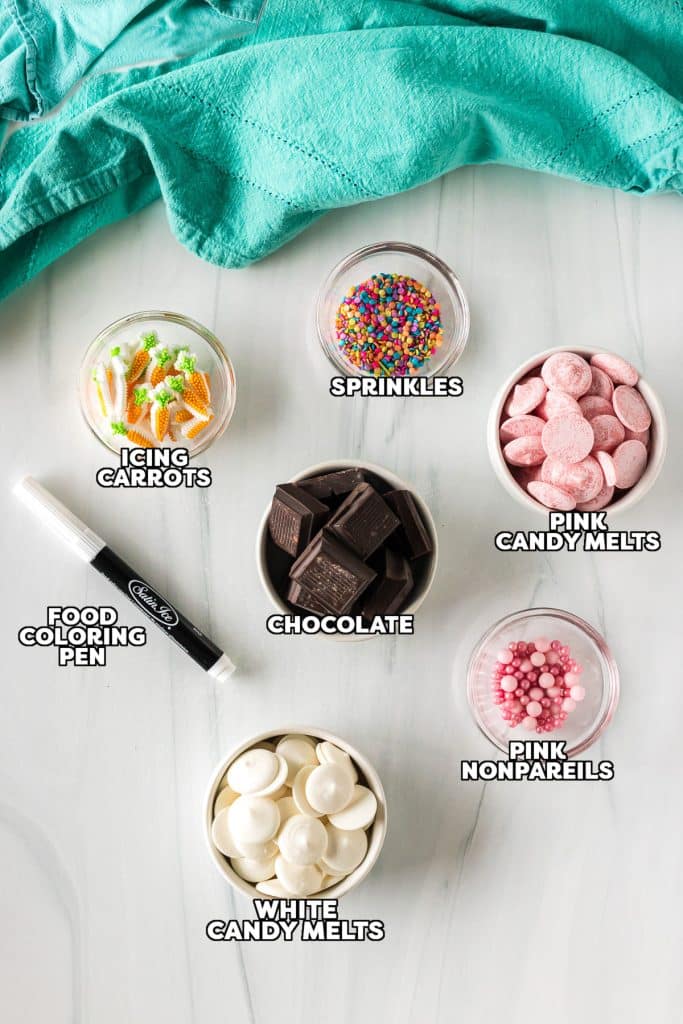
Jump- Chocolate – I used a mix of German baking chocolate (leftover from my crockpot peanut clusters) and chopped chocolate from a Trader Joe’s Pound Plus bar. I don’t recommend using chocolate chips because they don’t melt as nicely, but if that’s all you have, it will work.
- Pink Candy Melts – Melting wafers are so easy to use, but if you have vanilla almond bark and some food coloring you can use that instead. Michaels has a wide variety of colors & any will work. Shown is “light pink”.
- Round White Candy Melts – I recommend sticking with the melting wafers because they’re what we use to make the little bunny face and ears, but white chocolate chips could work. Cutting the candy melts in half (for the ears) is something you should do ahead of time because the candy melts tend to set quickly.
- Pastel Sprinkles – Pastel colors not only represent Easter, but also sunshine and warmth, which is definitely a sign of spring! We love adding pastel colors to all of our favorite Easter candy.
- Sugar Pearls – These little balls come in all kinds of colors, but we’re using pink for the nose. They stand out against the white bunny rabbits.
How to make Easter Bark
This section shows you how to make this recipe, with process photos showing the steps to help you visualize it. For full instructions, including amounts and temperatures, see the recipe card below.
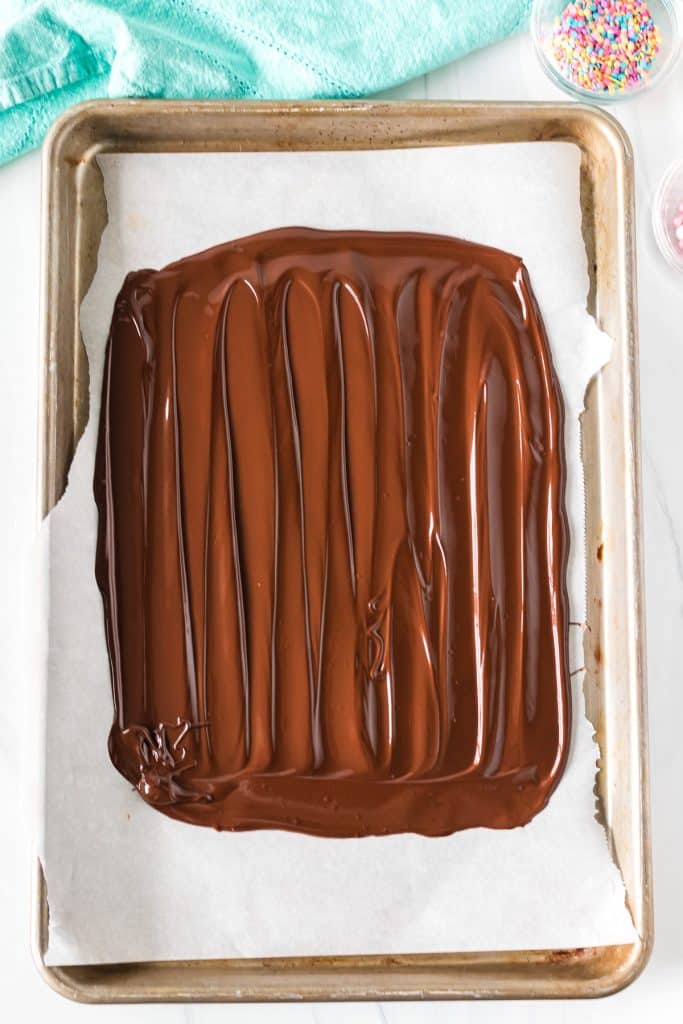
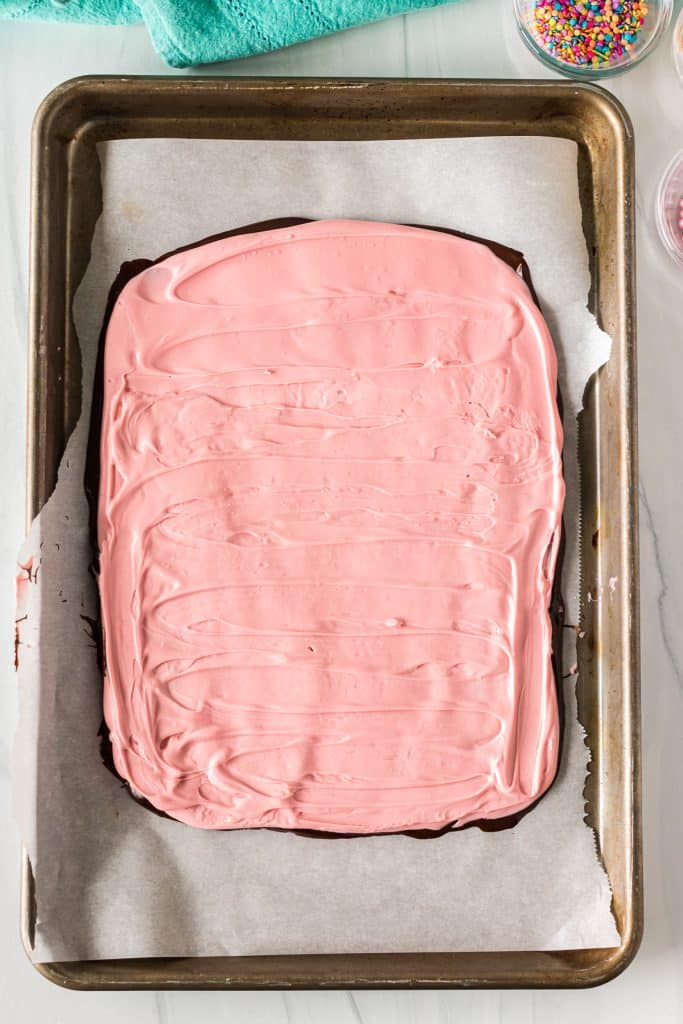
Jump- Step One: Melt the chocolate in a microwave-safe bowl in 30 second intervals and stir until smooth. Spread the melted chocolate onto a parchment lined cookie sheet to about 1/8″ – 1/4” thick. It does not need to be spread to all corners of the pan, as long as it’s in an even layer. Pop the pan into the refrigerator to chill for about 10 minutes.
- Step Two: In another microwave safe bowl, melt the pink candy melts in 30 second increments, stirring between each one. Carefully spread it onto the set chocolate layer using an offset spatula to keep it smooth. Reserve a very small amount of the melted candy melts to use as “glue” to affix the noses to the bunny faces.
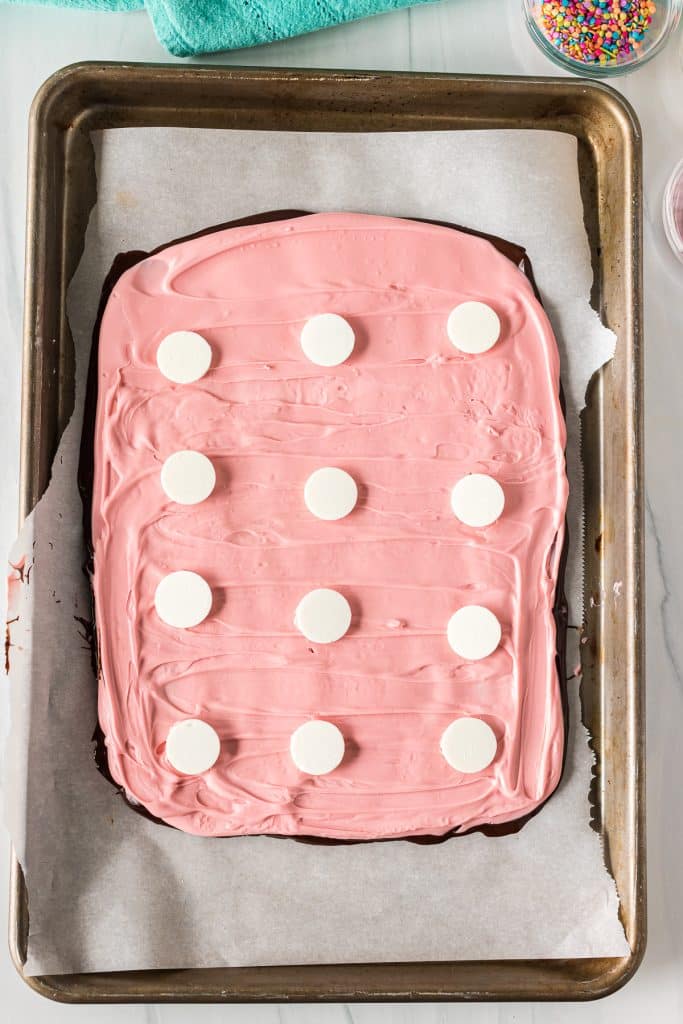
- Step Three: Next, place the white candy disks on the pink layer for the heads, evenly spaced across the melted candy base, leaving enough room between each bunny for their ears.
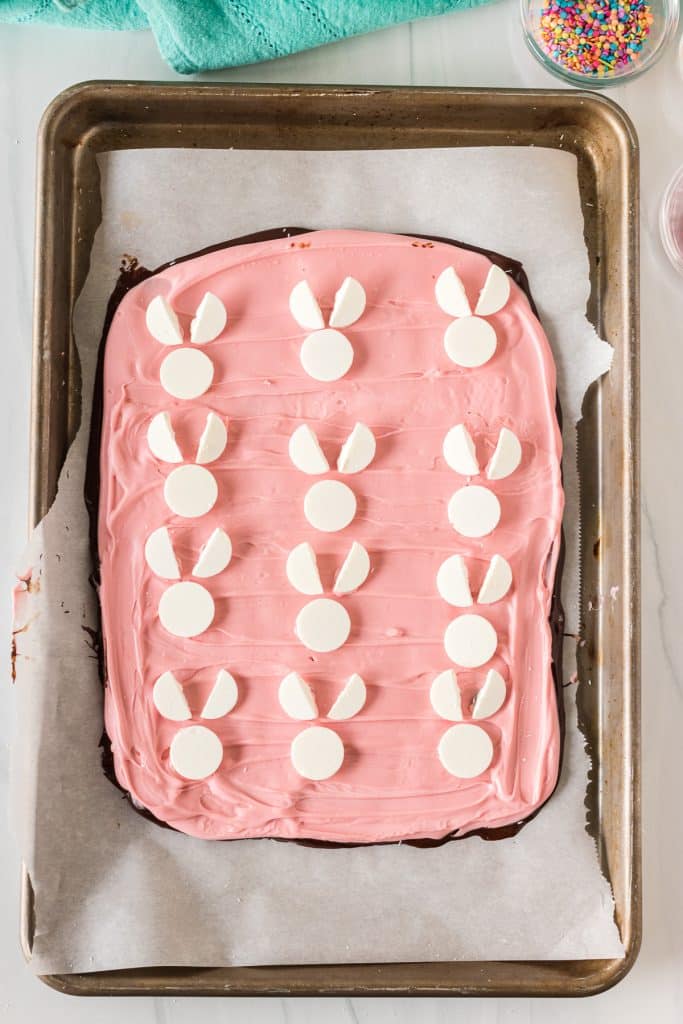
- Step Four: Take the white halves and place them above each bunny head for the ears.
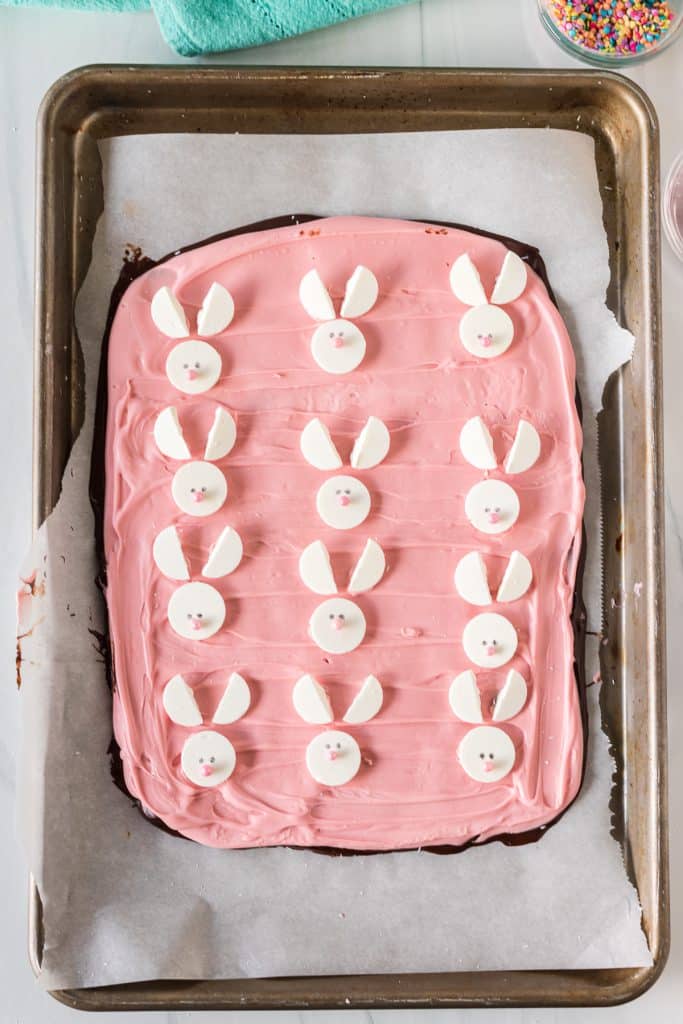
- Step Five: Dip a toothpick into the reserved melted pink candy and place a drop onto the white head. Place a pink pearl sprinkle for the nose and then use a food coloring pen to make the eyes. Finally, scatter the colored sprinkles overtop the melted bark.
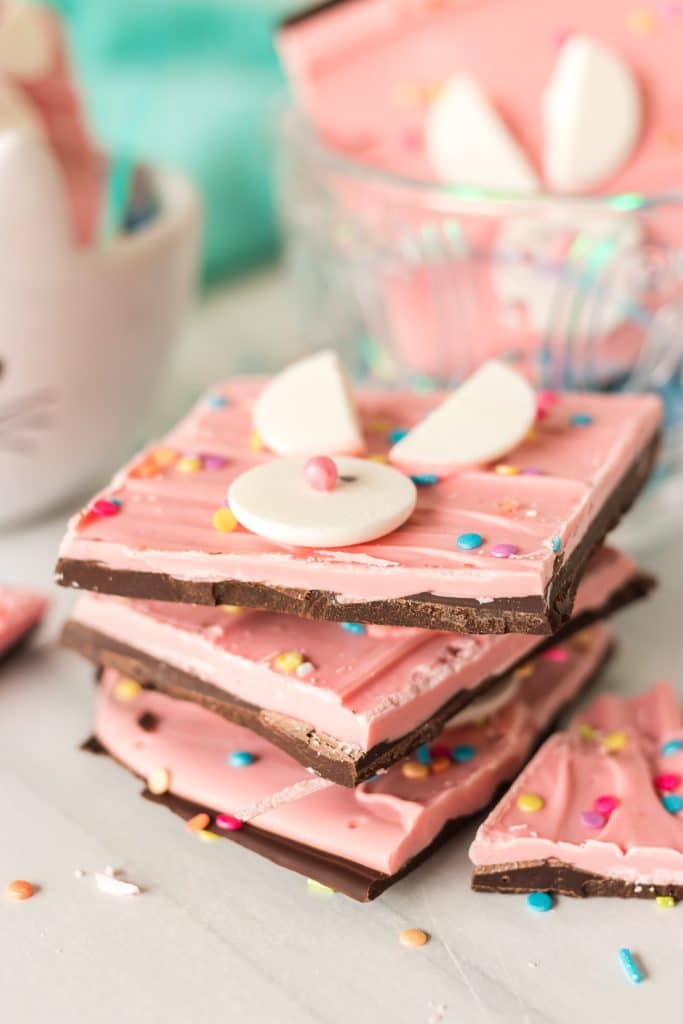
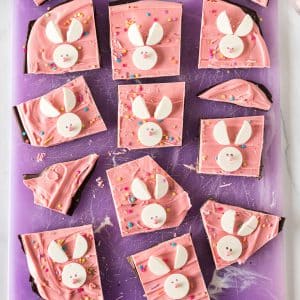
- Step Six: Move the pan to the fridge and allow the bark to fully set for about 10-15 minutes and then use a sharp knife to cut them into pieces with a full bunny head on each piece of easy bunny bark.
What to serve with Easy Bunny Bark
Adding pieces of bunny bark is always a fun addition to an Easter dessert tray. Other nibbles to have alongside them are slow cooker Easter candy and Easter egg Oreo truffles, making it one festive party platter!
But first, dinner!
You could go the traditional route with orange honey spiral ham, lamb, or crock pot roast beef. Or maybe this year you’re up for making a less traditional but equally delicious vodka rigatoni!
Complete your meal with cheesy asparagus puffs and a couple of other side dishes.
- Choose any pastel color you prefer for the top layer.
- You can skip the chocolate layer altogether and just use the candy melts as the base if you prefer.
- If you notice your melted candy isn’t smooth enough, add a teaspoon of vegetable oil or coconut oil to thin it out a bit.
- Don’t skip the parchment paper. It keeps the melted candy from sticking but also makes for easy cleanup of the sprinkles.
- Don’t spread the base too thin or it will be too fragile and break apart where it shouldn’t break.
- For clean edges, wipe your knife in between slices.
- You’ll want to work fairly quickly as candy melts tend to set pretty quickly. Have all your supplies laid out and ready to assemble.
- You can also use a piping bag or zip top bag with melted candy melts to pipe the “glue” on for the nose.
- Additional add-ons to the bark could be any of your favorite Easter candy. Pastel colored jelly beans, M&Ms, mini marshmallows, robin eggs, milk chocolate eggs, chocolate chips, etc.
- You can also replace the white candy melts with ready-made chocolate bunnies or bunny graham crackers, if preferred.
How to store leftovers
Easy bunny bark stores well at room temperature in an airtight container.
How long with Easter bunny bark last in the fridge?
Although these are just fine at room temperature, you can keep them in the fridge if you’d like. They’ll be good for a couple of weeks.
Can I freeze bunny bark?
You can! When you’re ready to eat it again, let it sit out for a while so that way it’s not rock solid when you bite into a piece.

FAQs
I know, I know, part of the fun of making bark is breaking it into pieces once it’s set! However, if you want a full bunny face on each piece, you’re going to have to cut around them in empty spaces.
First off, you want to do it once it is set, but not rock hard. Once it’s super hard, it’ll be harder to cut.
You can also score it first with a sharp knife, then use your hands to break it apart along the lines.
Sure you can! Since we’re not baking anything, there’s absolutely no difference in the outcome. As long as it doesn’t stick and it helps with cleaning, you can certainly use it.
It’s not necessary in this case. If you prefer to use the stovetop rather than the microwave to melt your wafers, you can melt them directly in a pot. Once melted, follow the rest of the recipe as directed.
Need more Easter dessert recipes? Try these:
Spring Chick Cupcakes for Easter
Easy Easter Basket Cookie Cups
Click here for my entire collection of dessert recipes.
Easy Bunny Bark
Ingredients
- 4 ounces chocolate baking bar semi-sweet or dark chocolate
- 12 ounces pink candy melts one bag – any color can be used
- 40 round white candy melts approximately
- ¼ cup pastel sprinkles approximately
- 17 round sugar pearls approximately
- black food coloring pen
Instructions
- Line a cookie sheet with parchment paper and set aside.
- Prep the "ears" by cutting around 15 white candy melt disks in half and set aside.
- In a large, microwave-safe bowl, add the chocolate & heat in 30 second increments, stirring between each, until melted and smooth.4 ounces chocolate baking bar
- Immediately pour the melted chocolate onto the prepared baking sheet and spread with an offset spatula in a layer about 1/8-1/4" thick. Move the pan to the fridge to set (approximately 10 minutes).
- In another microwave-safe bowl, add the pink candy melts & heat in 30 second increments, stirring between each, until melted and smooth. If not smooth, add a teaspoon of coconut oil or vegetable oil to thin it a bit.12 ounces pink candy melts
- Spread the candy melts onto the chilled chocolate layer, reserving a tiny bit to use as "glue" for the noses.
- Press 12-17 white candy melts on the melted chocolate (for the heads), leaving room for the ears.40 round white candy melts
- Place the cut white candy melt disks above the bunny heads for the ears.
- Dip a toothpick into the remaining pink candy melt (reheat if it has already firmed up), and dab a dot onto the white disk and immediately add a pink pearl sprinkle for the nose.17 round sugar pearls
- Use a black food coloring pen to add the eyes to each bunny.black food coloring pen
- Scatter the colored sprinkles on top of the melted candy bark.1/4 cup pastel sprinkles
- Place the pan in the fridge to allow the bark to fully set, about 25-30 minutes. Then cut them with a sharp knife so that each piece has a full bunny head.
Notes
- Use any pastel color for the base.
- Can be made with or without the chocolate layer.
- Don’t spread the base too thin or it will be too fragile.
- If the candy melts are too thick, stir in 1 tsp of vegetable or coconut oil.
- Use a piping or zip-top bag to apply melted candy as “glue” for decorations.
- Add jelly beans, pastel M&Ms, mini marshmallows, robin eggs, chocolate chips, and more.
- Store at room temperature or in the fridge in a covered container for up to 2 weeks.
Nutrition
Nutritional information is an estimate and provided to you as a courtesy. You should calculate the nutritional information with the actual ingredients used in your recipe using your preferred nutrition calculator.
Did you make this recipe?
Tag me on Instagram @melissa_pplates so I can see!Did You Make This?
If you made this recipe, I’d love to know how it went in the comments section below.
You can also tag me on Instagram – @melissa_ppplates or share a pic in the Persnickety Plates Community Facebook group. I love seeing what you’ve tried!