

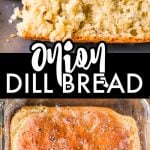
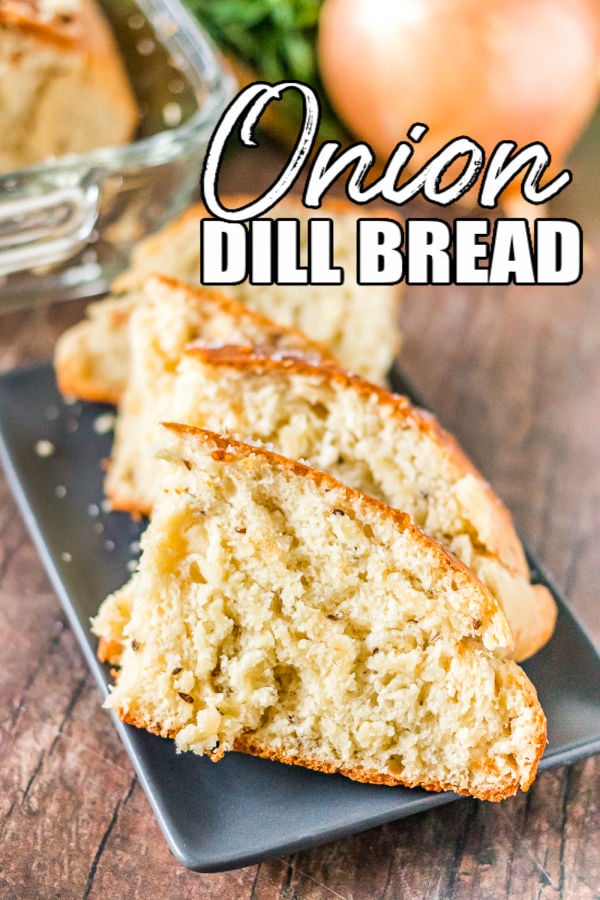
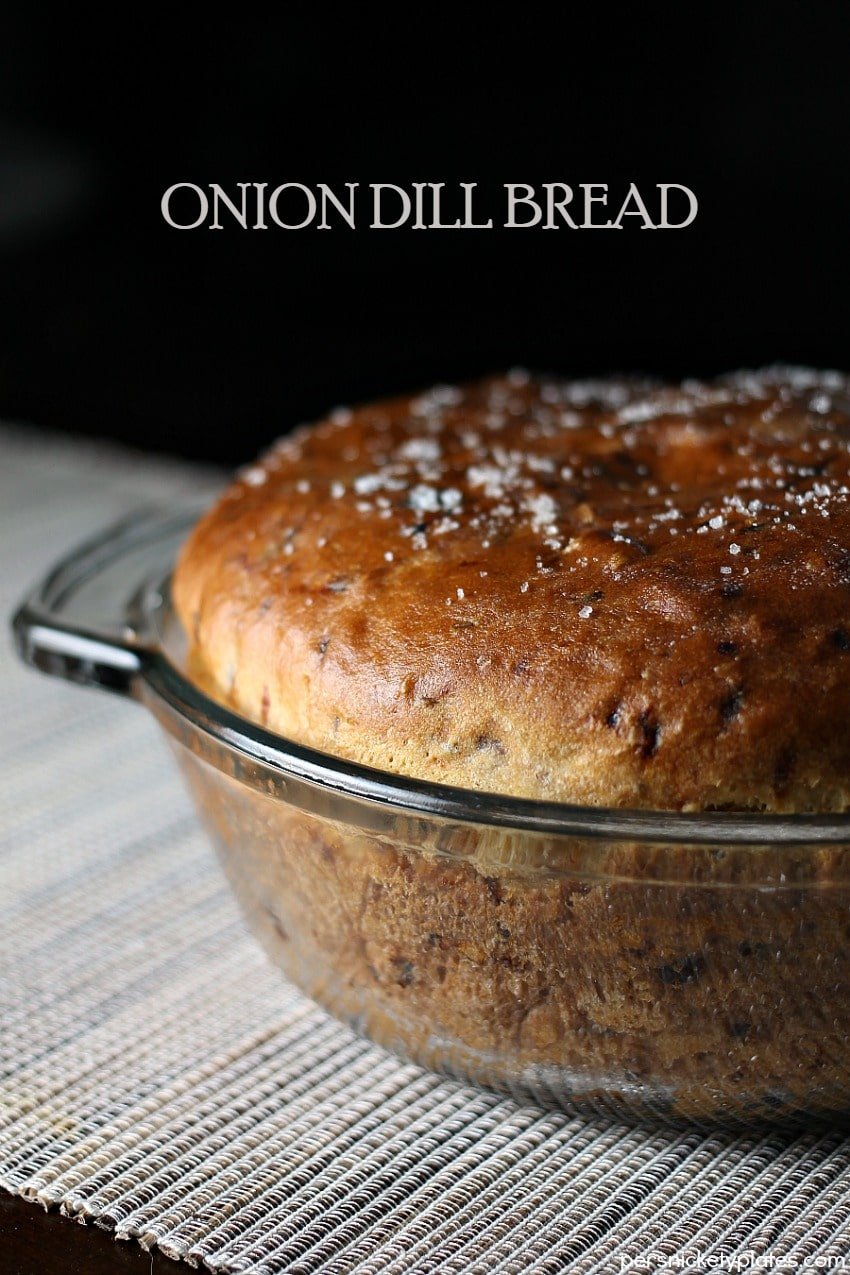
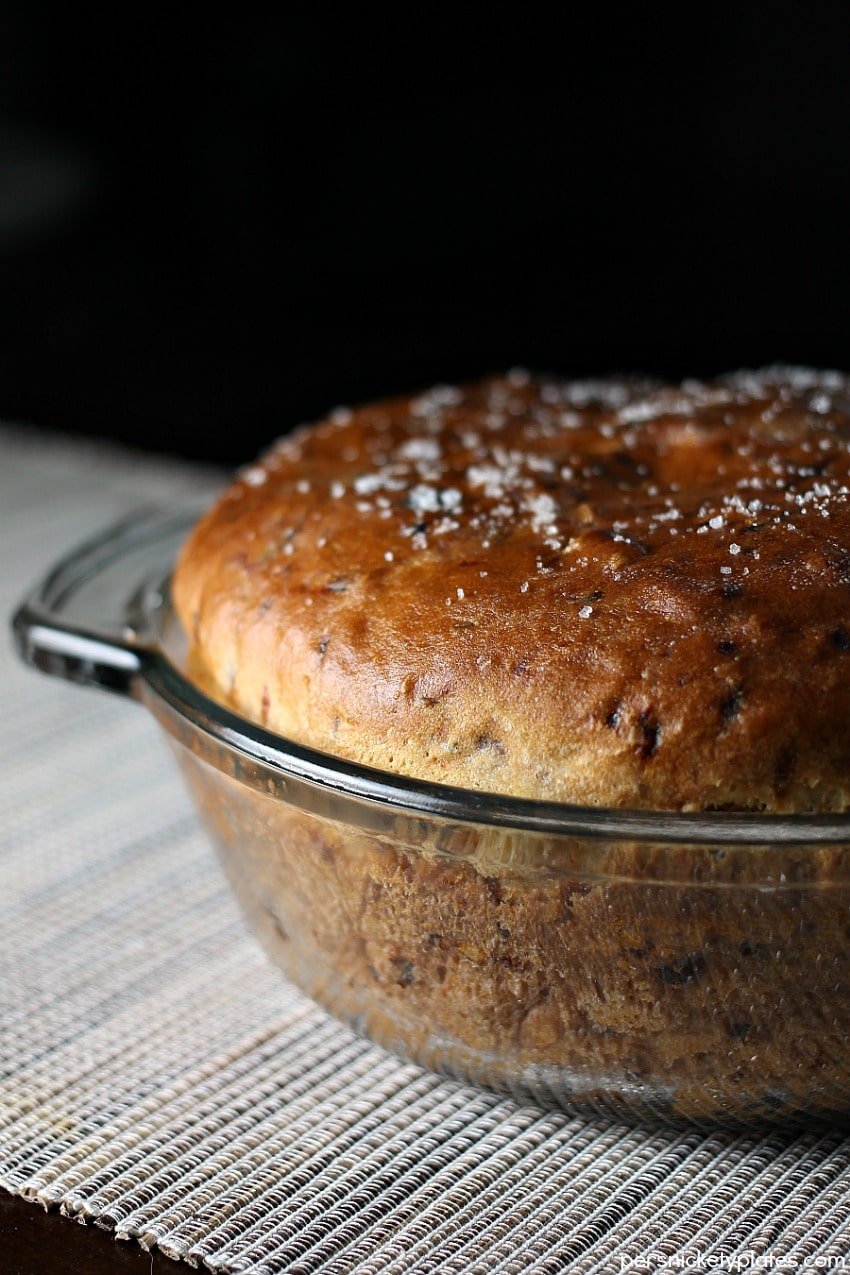
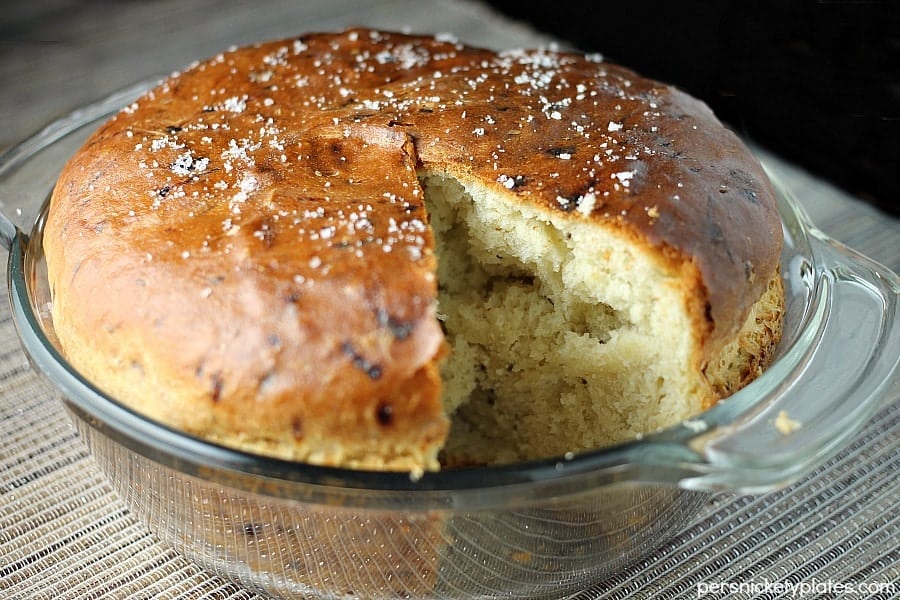
A simple, vintage recipe for Onion Dill Bread, that includes cottage cheese, passed down from my great-grandma. It pairs perfectly with soups & stews.
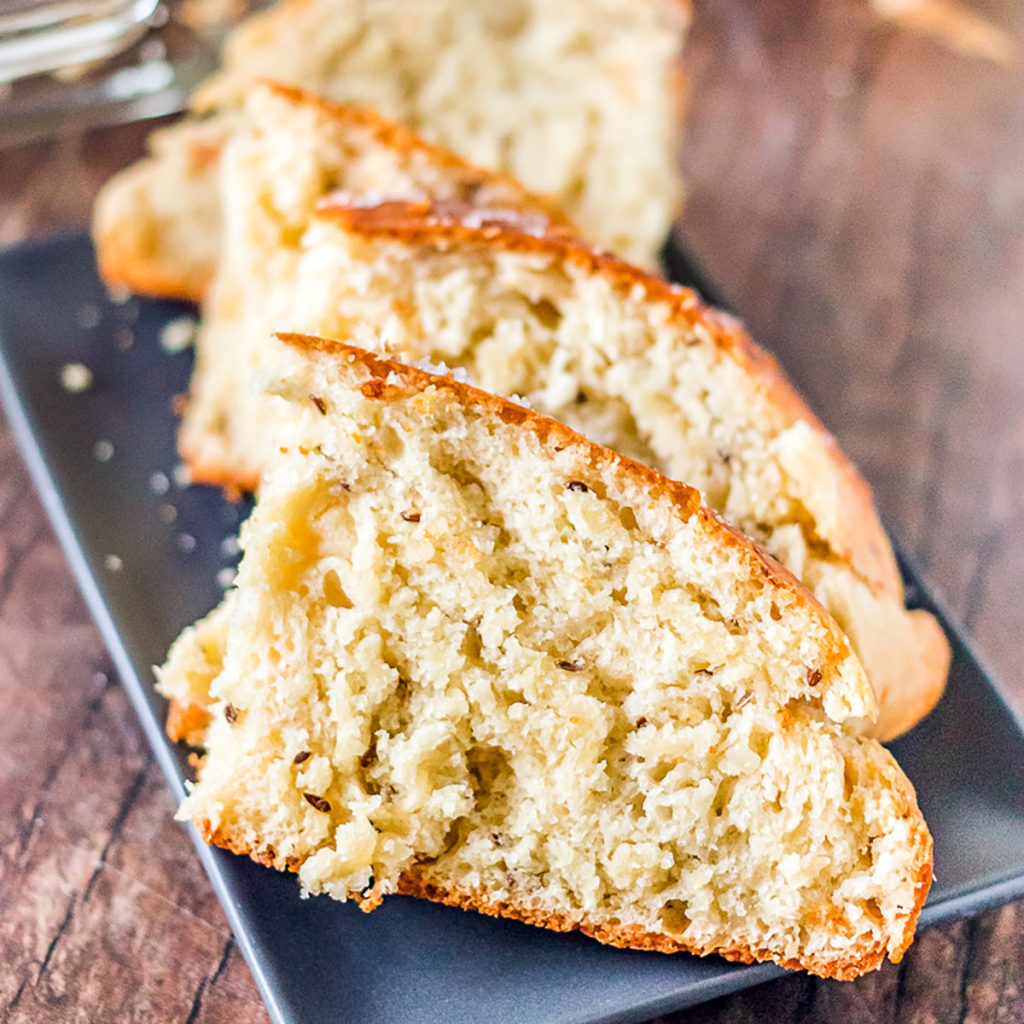
Dill Bread with Cottage Cheese
Pair this flavorful bread with Loaded Potato & Cauliflower Soup, Lemon Chicken Orzo Soup, Slow Cooker Corned Beef, or Mississippi Pot Roast. It’s perfect to add comfort to any meal.
My great-grandma, Grandma Gallop, was only around until I was about 2, but I swear I remember her. Maybe I just remember pictures, but I feel like I actually remember her.
While my mom and grandma aren’t big fans of the kitchen, Grandma Gallop was. I have several of her recipes, in her scrawly handwriting, tucked into books, but I had never actually made one, until this Onion Dill Bread.
Tools you’ll need
- Mixing bowls – this set is my favorite. I love the grippy on the bottom.
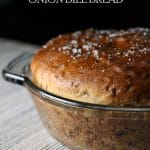
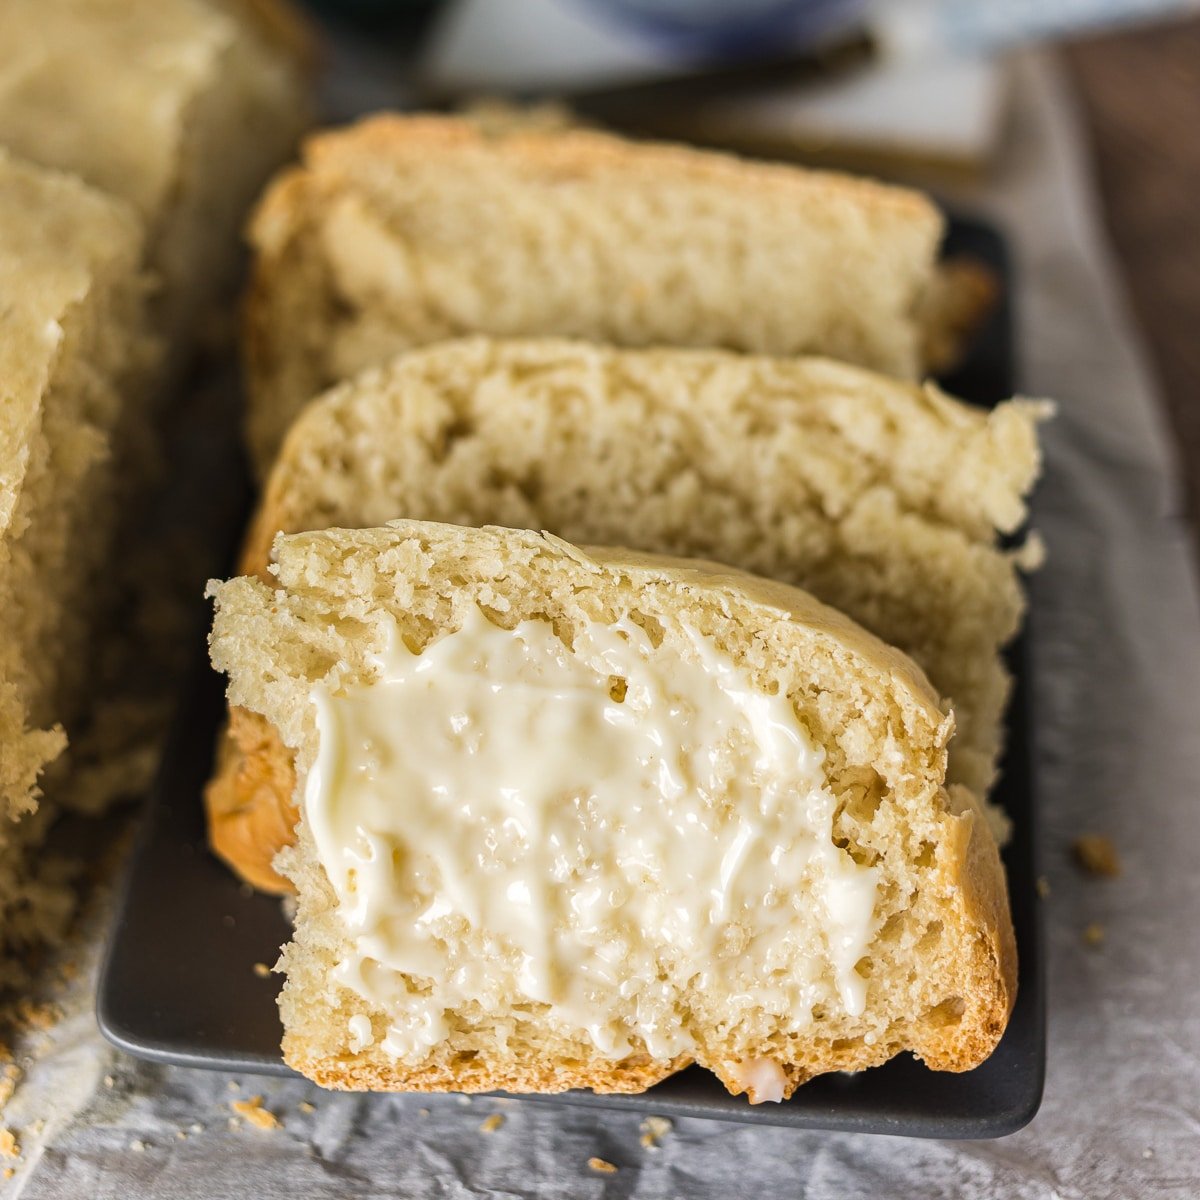
- 2 quart casserole dish – as you can see, I have used both square and round. Either will work.
- Pastry brush – to brush butter onto the warm bread. mmmm
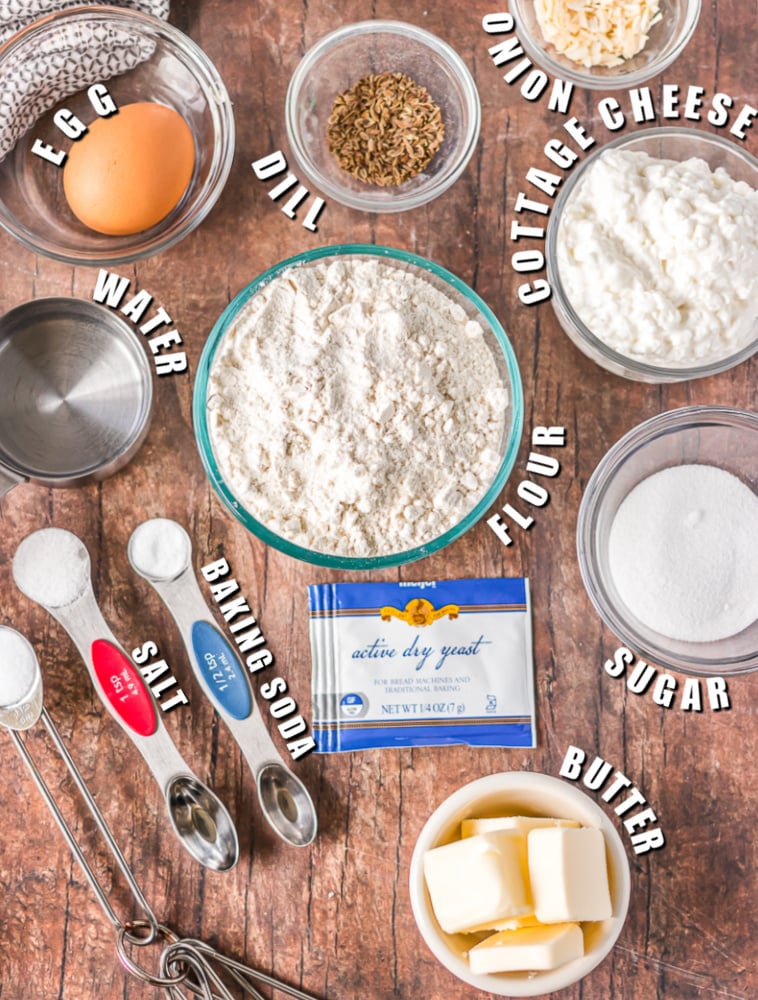
Ingredients
Below is a list of the ingredients you’ll need to gather to make this recipe, why you need them, and possible substitutions. Scroll all the way down for the full recipe card with measurements.
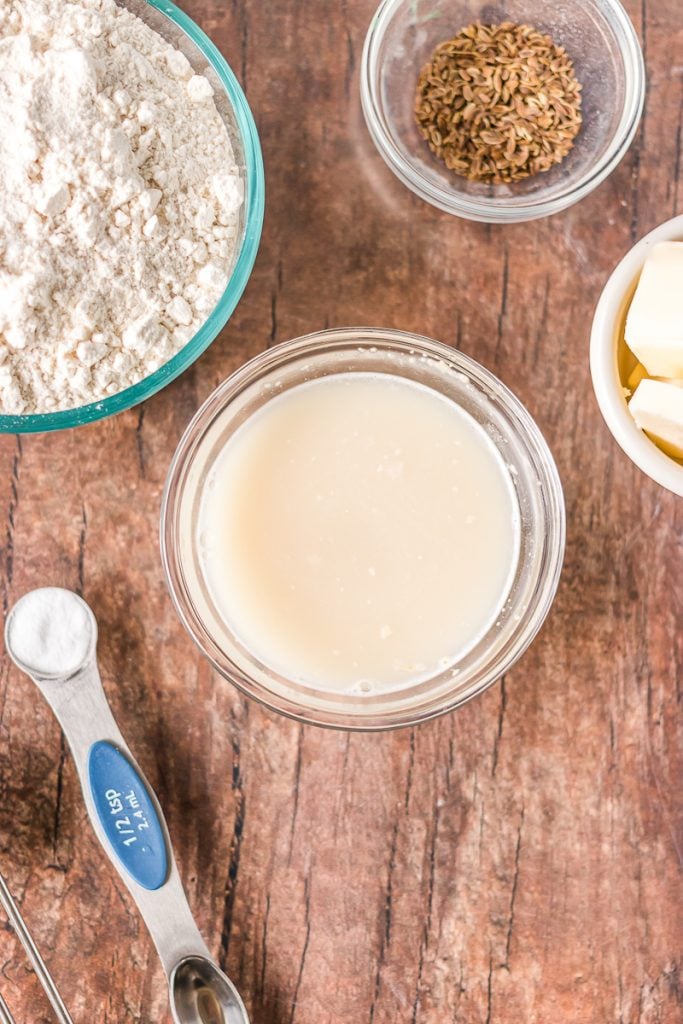
- Warm water/sugar – you’re making bread and need to activate the yeast.
- Active dry yeast – you use active dry yeast in this bread, as opposed to instant yeast, so you do need to dissolve it in warm water.
- Cottage cheese – strange? maybe. But just go with it. If you want to do some more baking with it, try some cottage cheese biscuits, too.
- Margarine or Butter – My great grandma used margarine (because butter was scarce) but I use butter. Both work.
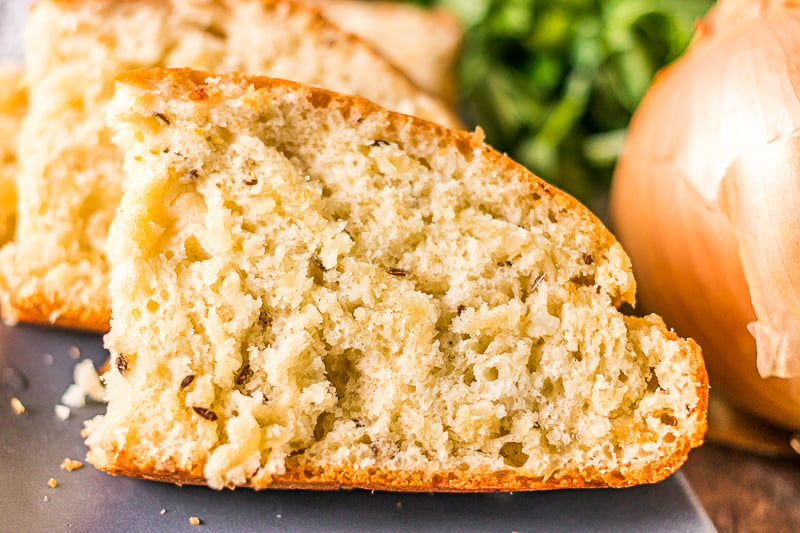
- Dried onion – it’s Onion Dill Bread, after all. You need dried onion for flavor.
- Dill seeds – again, it wouldn’t be Onion Dill Bread without it.
- Baking soda – to help your bread rise.
- Egg – make sure you start with your egg at room temperature.
- Flour – you can’t really make bread without flour.
- Olive oil – you’re going to coat your mixing bowl with a little oil before you put the dough in to rise.
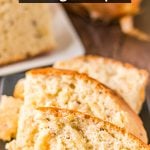
- Butter & kosher salt – you’ll brush with butter and sprinkle with kosher salt immediately after you take the bread out of the oven.
How to make Onion Dill Bread
This section shows you how to make this recipe, with process photos showing the steps to help you visualize it. For full instructions, including amounts and temperatures, see the recipe card below.
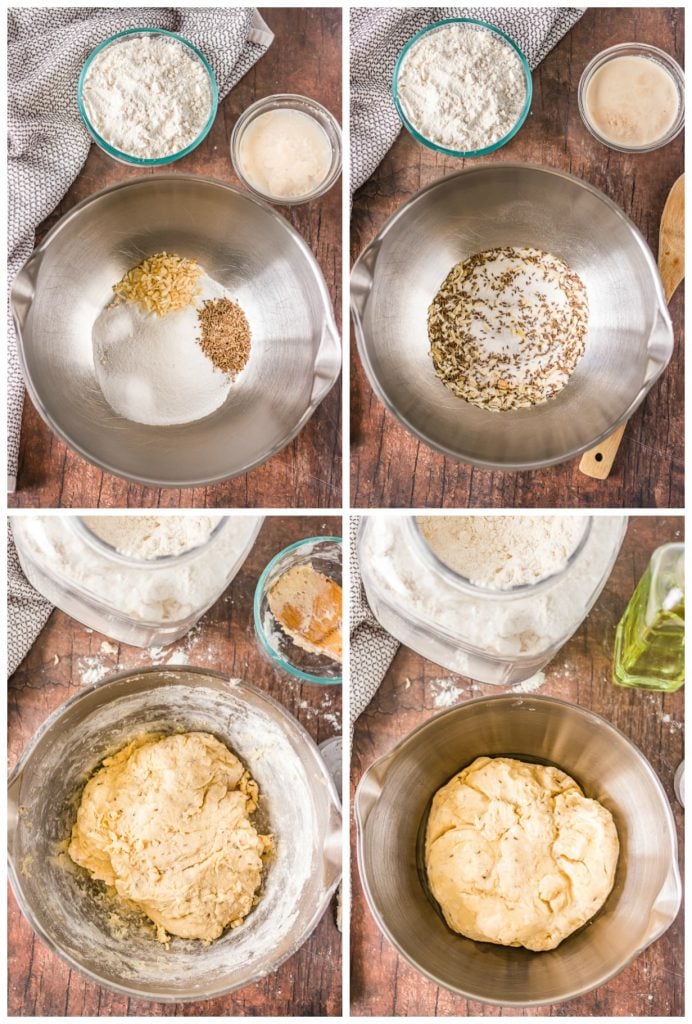
- STEP ONE: In a small bowl of warm water, add the packet of yeast and sugar and let dissolve.
- STEP TWO: In a medium saucepan, add the cottage cheese and butter (or margarine) over medium heat stirring occasionally until it fully melts.
- STEP THREE: To a large bowl, add the sugar, dried onion, dill seeds, salt, and baking soda and stir. Pour in the cottage cheese/butter mixture and stir. Add in the egg and dissolved yeast and stir again.
- STEP FOUR: Stir in the flour, 1/3 cup at a time, until a medium soft dough forms. I used 2 2/3 cups. I used my hands to get it to come together.
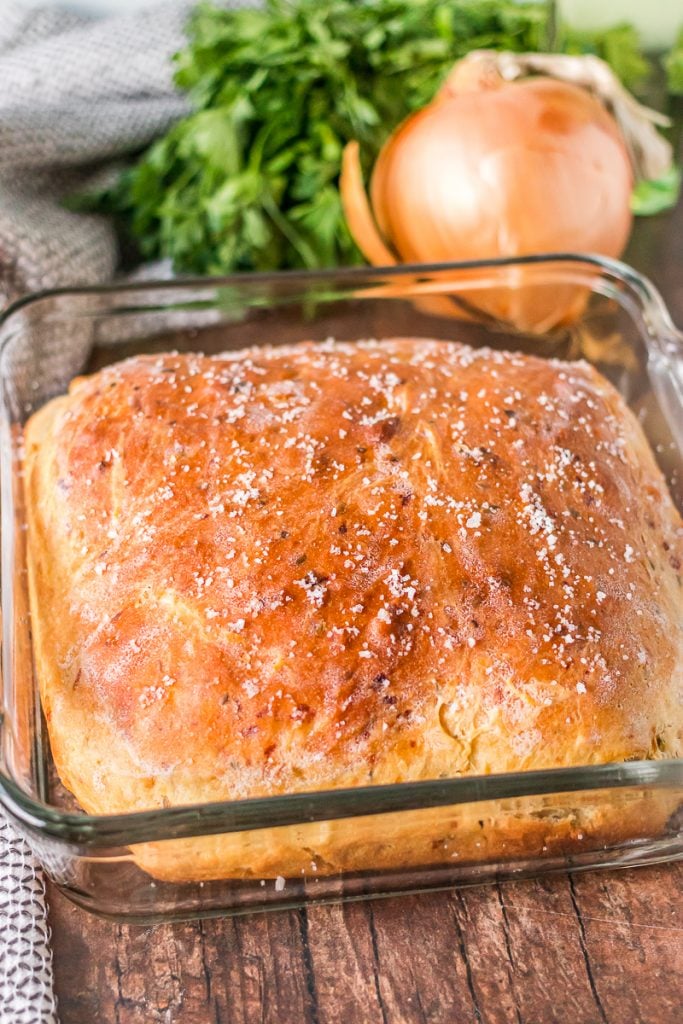
- STEP FIVE: Drizzle 1 Tablespoon olive oil in a medium bowl and turn the bowl to coat. Add your dough and coat with olive oil. Cover lightly with plastic wrap and set in a warm place to rise for 50-60 minutes. After it has risen, punch it down, then put it in a greased 8″ round or square (2 quart) casserole dish. Let it rise again for 30 minutes.
- STEP SIX: Bake for 30 minutes at 350 or until golden brown. Once done, immediately brush with butter and sprinkle with kosher salt.
Need more bread recipes? Try these:
Quick & Easy Beer Bread
Rosemary Olive Oil Bread
Homemade Pita Bread
Quick & Easy Wheat Rolls
Simple Garlic Knots
Rustic Slow Cooker Bread
Click here to view my entire collection of bread recipes.
CONNECT WITH PERSNICKETY PLATES!
Follow along on my social media so you never miss a post!
Facebook | Twitter | Pinterest | Instagram
I made a fun group on Facebook for sharing recipes, asking questions, and talking about food. I’d love to have you! Request to join HERE.
Also, sign up to receive an email in your inbox for each new recipe:
FREE EMAIL SUBSCRIPTION & EBOOK
If you MAKE & LOVE this recipe, share it on Instagram and tag me @melissa_pplates and/or #persnicketyplates so I can see it. I LOVE seeing what you make & I’ll share it in my stories!
It is VERY HELPFUL to me and other readers if you leave a review after you make my recipe. Please come back & let me know how it turned out!

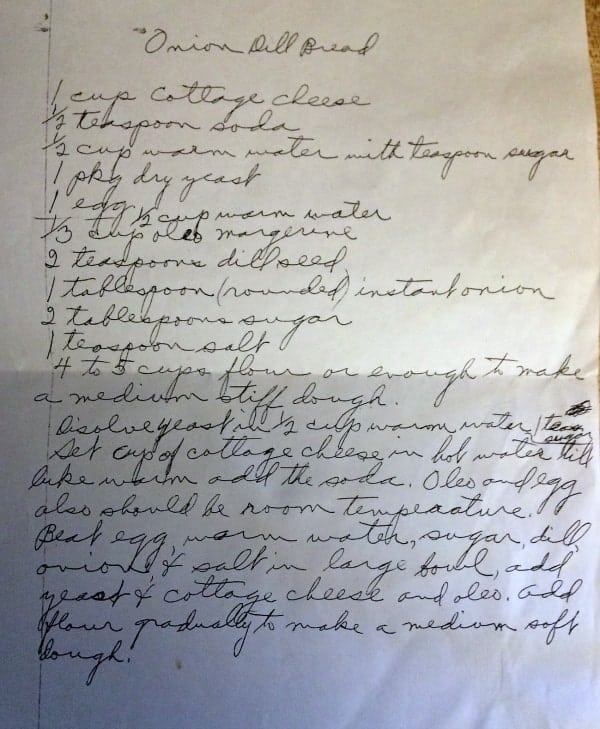
Onion Dill Bread
Ingredients
- ½ cup warm water + 1 teaspoon sugar
- 1 package dry active yeast
- 1 cup cottage cheese
- ⅓ cup margarine
- 2 Tablespoons granulated white sugar
- 1 Tablespoon dried onion
- 2 teaspoons dill seeds
- 1 teaspoon salt
- ½ teaspoon baking soda
- 1 egg at room temp
- 2-3 cups all purpose flour
- 1 Tablespoon extra virgin olive oil
- butter & kosher salt for topping
Instructions
- In a small bowl, add 1/2 cup warm water, packet of yeast, and teaspoon of sugar, and let dissolve.1/2 cup warm water + 1 teaspoon sugar, 1 package dry active yeast
- In a medium saucepan, add the cottage cheese and margarine over medium heat. Stir occasionally as it fully melts and combines. Remove from heat.1 cup cottage cheese, 1/3 cup margarine
- In a large bowl, add the sugar, dried onion, dill seeds, salt, and baking soda. Stir.2 Tablespoons granulated white sugar, 1 Tablespoon dried onion, 2 teaspoons dill seeds, 1 teaspoon salt, 1/2 teaspoon baking soda
- Pour in the cottage cheese/margarine mixture and stir to combine.
- Add in the egg and dissolved yeast and stir.1 egg
- Stir in flour, 1/3 cup at a time, until a medium soft dough forms. I used 2 2/3 cups. I used my hands to get it to come together.2-3 cups all purpose flour
- Drizzle 1 Tablespoon olive oil in a medium bowl and turn the bowl to coat. Add your dough and coat with olive oil. Cover lightly with plastic wrap and set in a warm place to rise for 50-60 minutes.1 Tablespoon extra virgin olive oil
- After it has risen, punch it down, then place it in a greased 8″ round (2 quart) casserole dish. Let it rise again for 30 minutes.
- Preheat oven to 350 degrees while it’s rising.
- Bake for 30 minutes or until top is golden brown.
- Once done, remove from oven and immediately brush with butter and sprinkle on kosher salt.butter & kosher salt for topping
- Let cool then serve.
Nutrition
Nutritional information is an estimate and provided to you as a courtesy. You should calculate the nutritional information with the actual ingredients used in your recipe using your preferred nutrition calculator.
Did you make this recipe?
Tag me on Instagram @melissa_pplates so I can see!Originally published October 5, 2015


Yum! And what an amazing thing to share your great grandma’s recipe with your daughter. I love cooking as a family!
Me too. Thanks, Mary! =)
I made this bread 3x now the first exactly like you did, the second time I used 8 oz ramekins I wanted to use it for a recipe I was developing for a food truck. I baked as you directed let them cool then Piped in the sandwich filling (If you carefully wiggle the tip of the food grade calk type gun you make a hollow for the filling) I filled with melted baby Swiss and and finely chopped pastrami and stone ground mustard.The customers went absolutely crazy for it I had made just 16 of them and it took less then an hour and they were gone one man bought one and came back and asked for a dozen more for a party he was having on Saturday . The food truck owner gave him my number and I made them for him. He called and said they were a huge hit and he had passed out my number to several others who wanted them for their parties. I am just a home cook no formal training but I have been making bread for 50 years now and I love to experiment with different recipes. My foray into developing recipes for a friends food truck was a lot of fun now she wants more and she is making and selling these their called “Persnickety Pastrami” since the bread recipe is yours
I think I’m flattered =) What’s the name of the food truck?
Sounds delish. Thanks for sharing.
Is the sugar necessary to make this bread? Thanks, Jennifer
I haven’t tried it without (as I mentioned, it’s my great grandma’s recipe). Sugar typically acts as “food” for the yeast so it can rise, as well as adds flavor to the bread.
Love this recipe! My Mom has a recipe for Dill bread that she won first prize with at the Indiana State fair, I grew up with her making it and is one of my favorite things ever. She told me I can have the recipe when she dies…Lol, so I have tried every dill bread recipe over the years to replicate her winning bread. This is the closest I’ve ever come. I made it twice, the first time I followed the recipe exactly and it was delicious and close to my moms but not perfect. The second time I tripled the dill seed and doubled the onion flakes and it was perfect!
That makes me smile – so glad you were able to get close to the OG. Take that, mom 😉
What happened to the recipe?
What do you mean? I see it above…
Exquisite!! Brought back memories of my favorite Dill bread from bakery in San Francisco in the early 80’s!! So delicious ❤️
Yay =)
Oh, the bread turned out so beautiful and delicious!! I wanted to eat it all myself. I followed your easy directions to a tee then used two different sizes of vintage Pyrex vessels to bake it in. Planning to make it again this weekend for my guests. Thank you for sharing this wonderful recipe!
I love hearing that – thanks so much for reporting back! Send me a pic when you make it again – I’d love to see your Pyrex 🙂
I noticed that in your great-grandma’s recipe, it calls for 1 t. salt. In your printed recipe, there is not salt added. Just wondering why you omitted that.
Hi! It is included – both in the ingredient list & step 3 🙂
My apologies….I am blind!
No worries, if I did miss it, it wouldn’t have been my first typo lol
Curious, I want to make this for our Christmas dinner. How long will this keep? I’m trying to determine how far in advance I can make.
Thank you
Thank You for this recipe! It’s a Christmas Tradition to make Dill Bread, started by my Father who is deceased. Somehow his recipe was lost, but with a slight change….. I am happy to say your Great Grandmother’s recipe (hand written) is my new Favorite ♥️
That makes me so happy. Thank you for reporting back & Merry Christmas!
Is this recipe requiring dill seed or weed?? Can I use the dill “fringe” instead of the dill seed??
Dill seed. I’m not sure what fringe is?
That was my question too!! Surprised nobody asked that except you and I’m even more surprised at questioning what the fringe was! I’m assuming dill weed…. Not seed….at least that’s what I’m using. Bread rising as I type. We’ll see
Cottage cheese, is this like a 1% , 2% or is it dry cottage cheese?
I don’t think it’s fussy but in this batch shown I used Hood Country Style which I believe is 4%.
This recipe was originally a Pillsbury Bake-off recipe. My Mother always baked this bread for turkey sandwiches on Thanksgiving. I have carried on this tradition. I often make it without the dill seed–increasing the dried onions to 2 tablespoons. I have also divided the dough into pieces for hamburger buns. This bread easy it is to make. As you can tell we love this bread.
I didn’t realize the Pillsbury Bake Off went back to the 40s (I just googled!). Thanks for the fun fact, Great Grandma didn’t share that tidbit 🙂
I love old fashioned cooking n baking , my mom was a great home cook , home is a great place, question. I have lots of fresh , in my garden ,Dill . can fresh chopped fine Dill be used and Granular Onion ,instead of powdered , also can I use a bread machine on dough setting , tis Joseph , Me 81. associate of a great Chef James , Jimmy to his friends ,Beard , in 1970s. he hated smell of Garlic on his hands, and his true term for eating was ” Good Eating ” nothing more. !!
Hi Joseph 🙂 For your first two questions, fresh dill can definitely be used as well as granular onion. As for the bread machine, I have never used one so I’m not sure, but I think it can! Let me know how it turns out!
ill be making this in my bread machine
Let me know how it turns out!
My mother use to make this bread at Thanksgiving..makes the best turkey sandwiches. I believe this was a Pillsbury Bake-off winner. I have carried on the tradition and we too enjoy out turkey sandwiches with Dilly Bread. I have also made buns and used them with hamburgers! Yum!
My mom made this dill bread and always served it with her chili. I have made this recipe 4-5 times. It is always perfect. Made it for CMAS dinner party to serve with stuffed cabbage rolls…a big hit.
It’s probably perfect with chili! I’m so glad you like it 🙂
Hi Melissa! Do you think you could substitute some of the bread flour for rye flour in this recipe? If so, how much? Thank you!
Hi Barb, unfortunately, I have never worked with rye flour so I’m really not sure. If you try it, report back!